
Staring at the timer while chasing that elusive personal best can be brutal, especially when your One Million Coins speedrun hits a wall around the twenty-minute mark.
You’ll learn how to pick the right nodes, path across the map cleanly, and build a setup capable of smashing the eleven-minute barrier completely glitch-free.
I put together this guide to share the exact setup I used to push sub-20-minute runs. At one point, this route even secured the #1 spot on the 1.1 leaderboard with a time of 11m 03s.
If you are looking to shave serious minutes off your runs, this is how I managed it.
I am not claiming this is the absolute final word on peak optimization. I simply love the game and wanted to break down how I hit my personal best, completely exploit-free.
Housekeeping
A quick note on cheating: clearly, it exists. Early on, someone logged a 47-second clear, which obviously is not legit.
We are not going to talk about how people pull that off here, or how leaderboards should manage it. We are sticking strictly to actual gameplay.
As for borderline glitches, they exist too. In 1.0, for instance, you could save and quit to immediately reset cooldowns.
I will leave the ethics of timing exploits up to you. Nothing in this build intentionally relies on bugs, though you can draw your own line on what counts as intended mechanics.
Node Discussion
I have tested a ton of different builds, and while most are a blast to play, some nodes clearly outshine the rest.
For context, every choice here is focused entirely on the endgame goal: picking up and banking all 1,000,000 coins as fast as humanly possible.
Back in version 1.0, things were pretty straightforward. If you just wanted the quick time achievement, you would buy out all the left-side chute nodes, max the right-side chute upgrades (Overdrive), and grab every Goldrush node in the deposit tree.
That simple setup would completely drain the map hands-free in under 30 minutes.
In version 1.1, you can generally break upgrades down into three core jobs: gathering coins, holding coins (capacity), and depositing them.
Gathering: Every tool has trade-offs, but bare hands come out on top overall. Manual sweeping is simply too slow when you are racing the clock, so passive stats like speed, width, strike, and lightning fall off hard.
Instead, you want massive single-hit burst. The Double Grab active ability in the hands tree scales directly with your total capacity. Stack enough storage, and each pull scoops up an easy 25k+ coins in the late game.
Capacity: In the early minutes, extra storage keeps you from wasting time walking back to deposit.
Later on, that massive pool exists solely to fuel the percentage-based scaling on your hand active.
Deposit: Just like manual grabbing, walking up to manually bank your haul destroys your pace. In my 11-minute run, the whole clock only lasted 663 seconds, so losing 20 seconds at the deposit hatch is a dealbreaker.
Automated tools carry you early: lean on the Chute and Portable Bank first, then transition into the utility tree’s auto-deposit later. Because the utility pump pulls a flat percentage, it effortlessly drains your inventory even when you are carrying practically the whole vault.
The Map
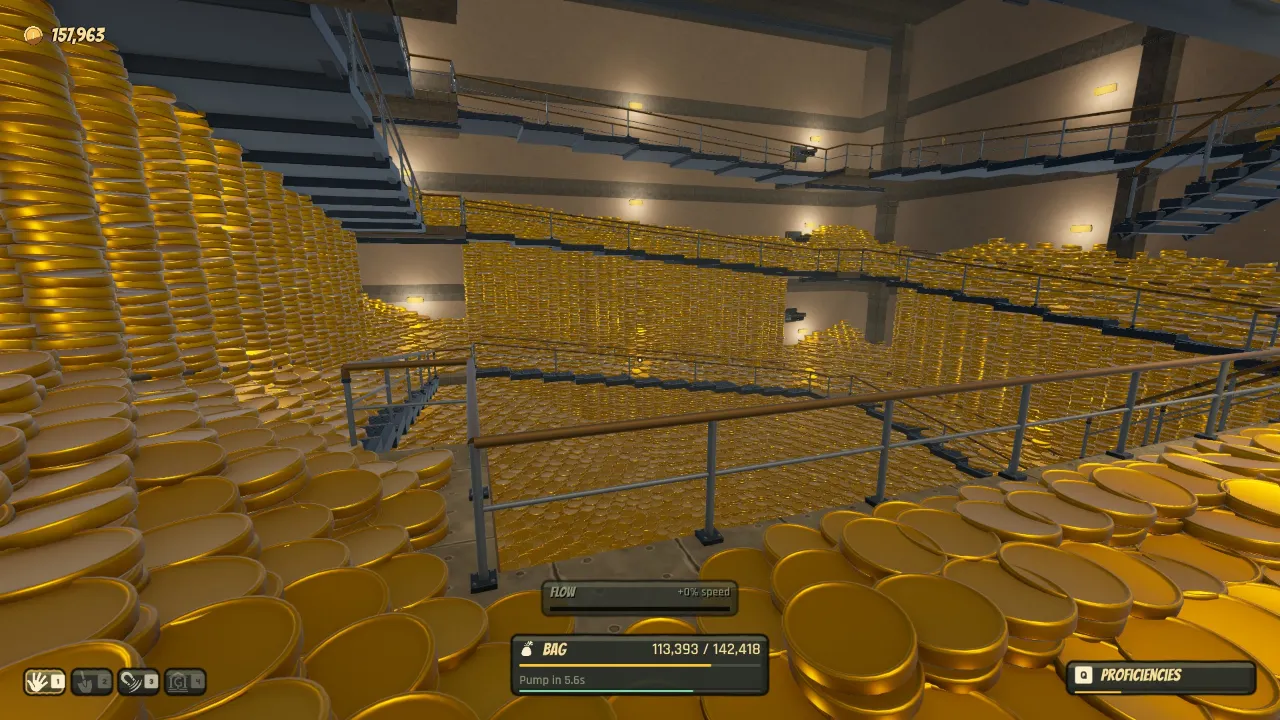
The biggest trick to understanding the layout is realizing it is not just one giant pile. It actually acts like five distinct mounds packed together.
Think of them as the Center, Top (opposite the elevator), Left, Right (past the railings), and the Elevator stack itself.
You can spot this easily: clear out just the middle, look around, and you will see four distinct coin pillars standing tall.
Always harvest these outer pillars from the very top. If you try scraping away at their bases, abilities like lightning and certain burst actives lose most of their punch.
Once your build starts snowballing, keep tabs on those four outer pillars.
Do not get tunnel vision on the center floor, or you will leave easy money behind.
Run Breakdown
Early Game (v1.1):
1. Scoop up the starting 25 coins manually and spend your very first point on Chutes. 1 coin/sec sounds tiny, but it works while you do other things.
2. Deposit your pocket change and keep manual scooping.
3. Rush straight for the Portable Bank (3 points). Every time you level, put points into faster deposits, dump your small capacity, and repeat. You will only need to bank about twice.
4. At 4 total points (1 Chute, 3 Deposit), drop the Portable Bank immediately. It sucks up 1,000 coins a second and completely crushes early manual gathering.
Mid Game (Minutes 3 to 5):
Your Portable Bank handles the heavy lifting here, but you can still help speed things along. Your main goal now is balancing scoop speed and raw capacity so you never have to stop and manually deposit.
Take the first 3 big capacity nodes on the left side, grab Ghost Hand 1 from the middle of the hand tree, add a few more capacity nodes as needed, and pick up Flow on the left hand branch. Skip the active ability for now, as it hits too softly to justify the cost. Finish maxing out the left capacity branch before you start building into the Grab active.
Late Game (Minutes 8 to 10):
As soon as you unlock the Grab active, run all the way down its upgrade branch to stack percentage bonuses. Pivot into the middle capacity branch as well to blow your storage cap wide open (aiming for roughly 800k by the end).
The active scales hard off total capacity, base hand gather size, and your Ghost Hands (they provide massive lift, whether through raw coins or mimicking the skill). Each activation should pull 10k to 25k coins, earning multiple upgrade points instantly. Wrap up the run by maxing capacity, finishing the middle/left hand paths, and dumping remaining points into 25% Auto Deposit and Chutes.
One vital thing to watch for: the active pulls so aggressively it can hollow out an entire zone instantly. Because the skill fails if loose coins are hanging directly above your target, digging straight down can strand higher mounds.
Walking back uphill burns precious seconds. From mid-game onward, always work each section from the peak down so you do not dig yourself into an empty bowl.
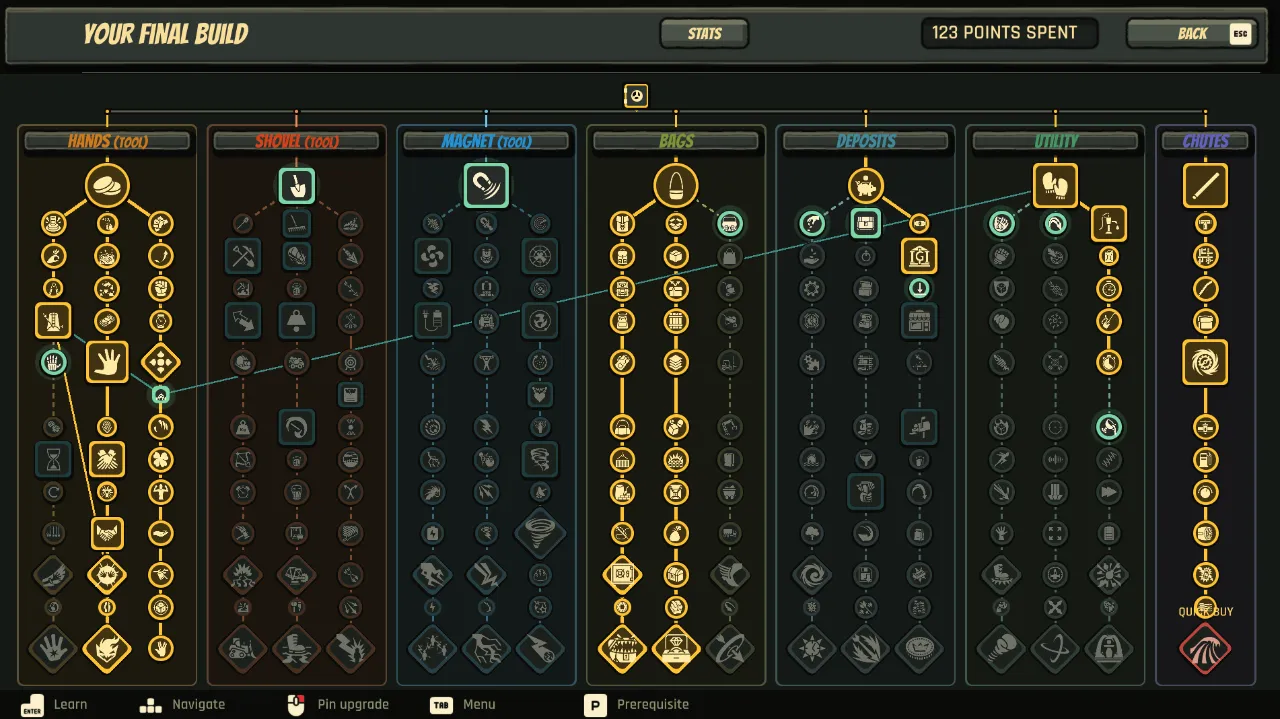
Remember that not all nodes are created equal, so pick your upgrades carefully rather than grabbing everything in sight. Reset your run if your opening path looks rough, stay focused on your route, and go grab that new personal best!
