
Moon Sweepers is a captivating resource management game where you clean the moon while managing your collection systems. The unique mechanic of balancing J.O.O.N.A.S and Collectors sets it apart, offering a fun challenge as you optimize your operations.
Understanding the limitations is key; each moon station has only 12 deposits, leading to strategic decisions on where to place your Collectors and J.O.O.N.A.S for maximum efficiency. Managing your resources effectively early on can prevent you from hitting those frustrating limits later in the game, especially with the processing rates and Capacities players often overlook.
This page provides a detailed look at the best strategies to optimize your J.O.O.N.A.S and Collector placements in Moon Sweepers. You’ll find insights on maximizing your deposits and avoiding common pitfalls that can limit your progress, so you can keep your operations running smoothly without frustrations.
Moon Sweepers Ratio Guide – J.O.O.N.A.S, Collectors
To beat the game, you need to clean the Moon.
Why do it yourself when you can use the J.O.O.N.A.S?
Just remember, to place a J.O.O.N.A.S, you also need to set up a “Collector”.
If you put down too many J.O.O.N.A.S, your Collectors can fill up too quickly, and when you build more, you’ll easily hit a limit. So, just spamming J.O.O.N.A.S can be pretty ineffective.
Numbers (Things That We Know)
Money might not be tight in the endgame, but deposits could be limited.
Let’s break down what we have:
- 4 Moon Stations total
- Each has 12 Deposits in total
- That’s a total of 48 Deposits
If we consider the capabilities of J.O.O.N.A.S and Conveyers, here’s what we know:
- Each Conveyor has a limit of 70/min
- A J.O.O.N.A.S takes 1 minute and 30 seconds to harvest 29.9 kg
- The Pressure Chamber can handle up to 5 kg of Moon Dust every 12 seconds. If it stays consistently supplied and powered, that’s a theoretical rate of 25 kg per minute
- The Stone Press processes 1 kg of dust and 1 kg of sand into a 2 kg block in 6 seconds. That’s an output/input rate of 10 kg per minute
What People Recommend
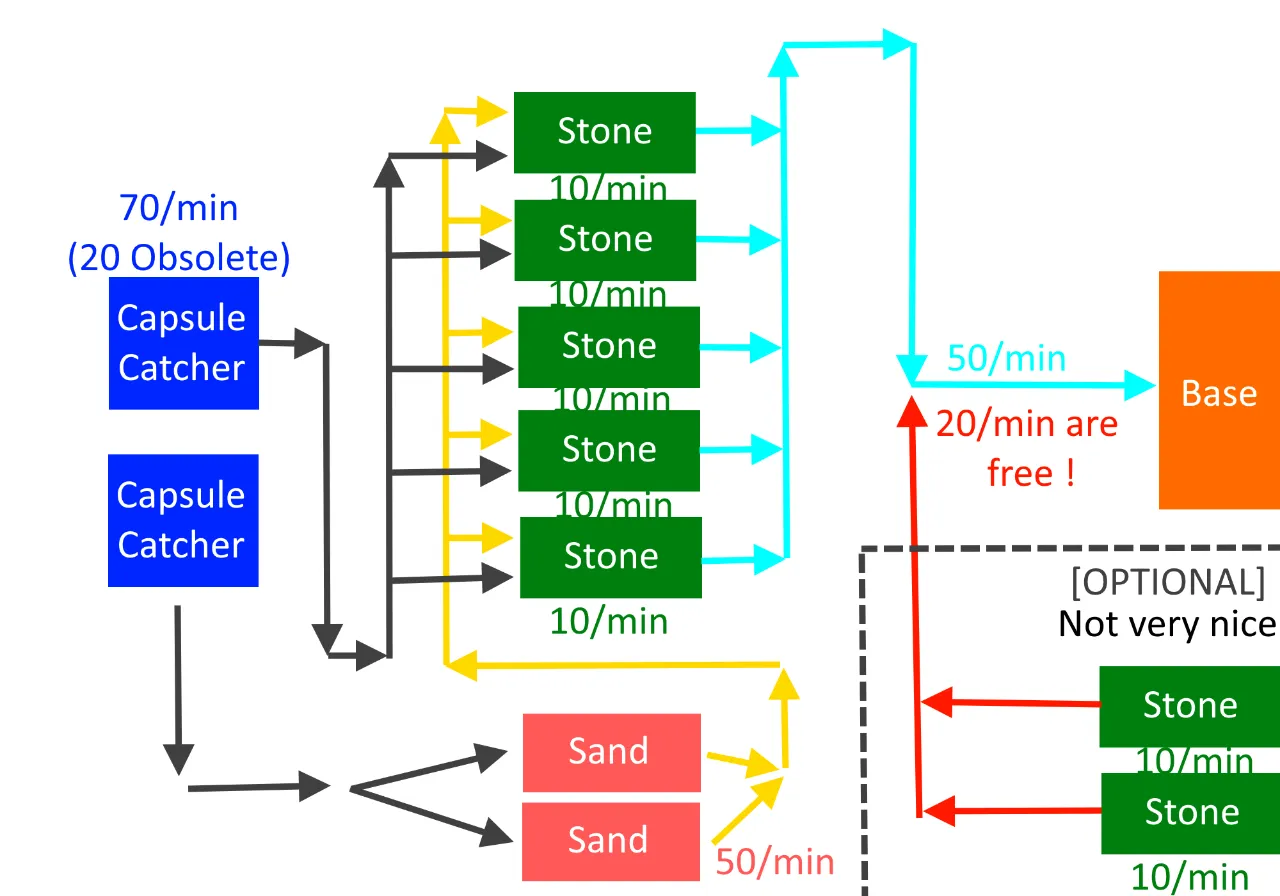
Most folks prefer this design because it’s easy to build and replicate.
I’ve seen many people complain about the ratios in other guides. You need to have 2 entry lines. Remember, one belt can transport 70 items per minute—if you split it, that’s only 35 items per minute!
Another Issue with This Design
We’re losing out on 20 Stone per minute, or even worse, 40 Moon Dust per minute that a J.O.O.N.A.S could send us. That means we’re missing the equivalent of 2 J.O.O.N.A.S units.
Note
We’re limited to 48 deposits, which equals 3360 Stone per minute we can carry off this “moon.” If we stick with this design, we’re wasting the ability to transport another 960 Stone per minute.
What I Would Recommend
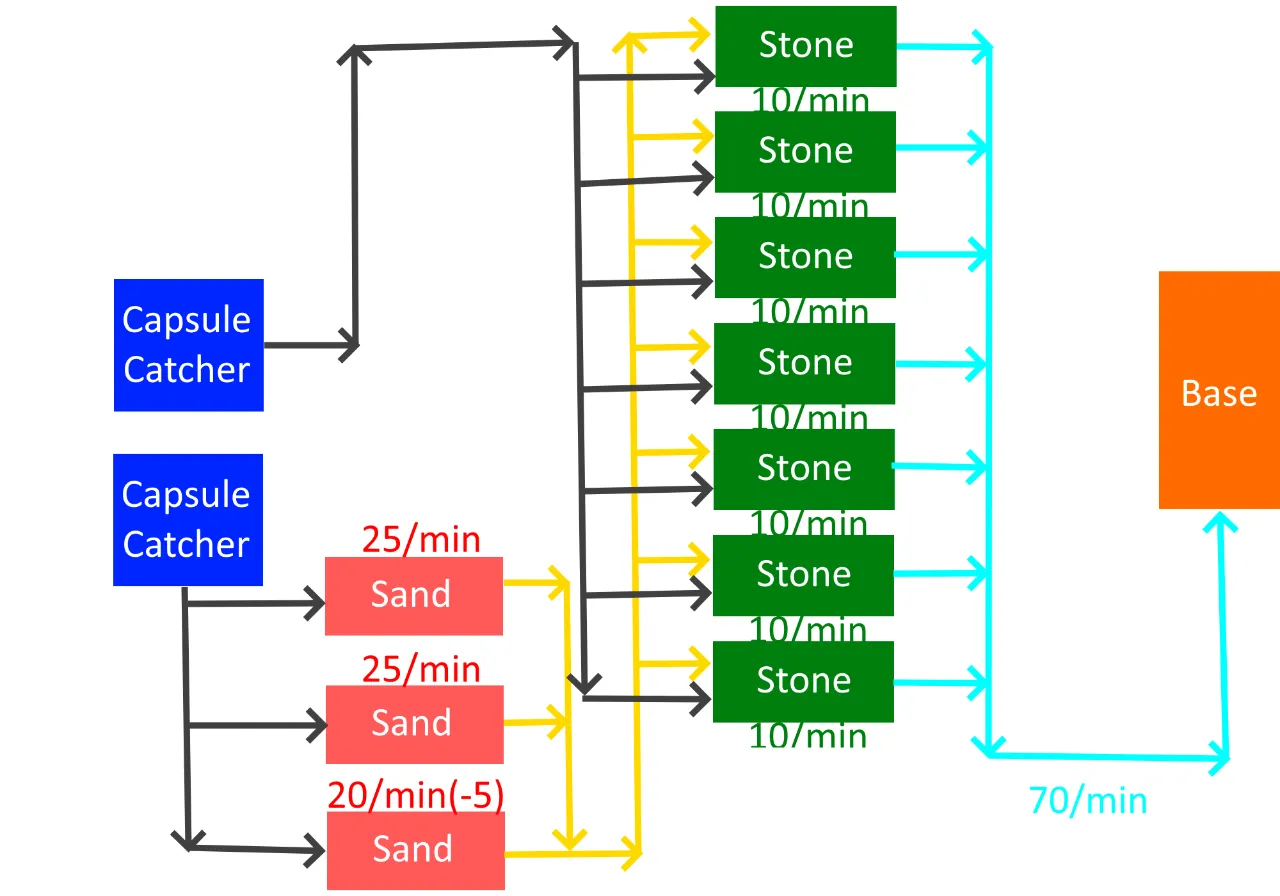
I’d go for this design. It allows us to fully utilize the 70 items per minute on the “Catchers” as well as on every deposit. Keep in mind, we only have 48 in total!
Note This design leaves one Sand Chamber with only 20 kg per minute instead of the optimal 25 kg per minute.
BUT we eliminate all other possible bottlenecks.
Since people asked,
156 kW Power is the recommended minimum. It technically uses only 154 kW since it will only consume power while producing, but I wouldn’t rely on that. This means you’ll need
10 Solar Trackers during the day, which will keep the machines running for 39 minutes in-game time.
If we assume a night duration of 12 hours, you’d need 1872 kW for storage. In simpler terms, that’s a total of 197 Solar Trackers, which doesn’t match my in-game experience.
Just go with 40 Solar Trackers. I haven’t found anything definitive on the wiki, and I could test it out, but not today.
What to Do with This Info?
Given that we’ve maxed out every deposit, we can now deposit a total of 3360 kg per minute.
Remember, 1 J.O.O.N.A.S delivers 29.9 kg every 1 minute and 30 seconds. Let’s round that to 30 kg. That gives us 20 kg per minute. So, we’d need 168 J.O.O.N.A.S on the Moon (x2 if we compress to stone).
Raw Numbers
To achieve the maximum we need: [3360 kg of Stone per minute]
- 336x J.O.O.N.A.S
- 96x Collectors
- 144x Sand Makers
- 336 Stone Presses
To achieve the “Normal” we need: [2400 kg of Stone per minute]
- 240x J.O.O.N.A.S
- 96x Collectors
- 96x Sand Makers
- 240 Stone Presses
To achieve the “Bare Minimum” we need: [2400 kg of (Dust) per minute]
- 120x J.O.O.N.A.S
- 48x Collectors
The Lazy Build
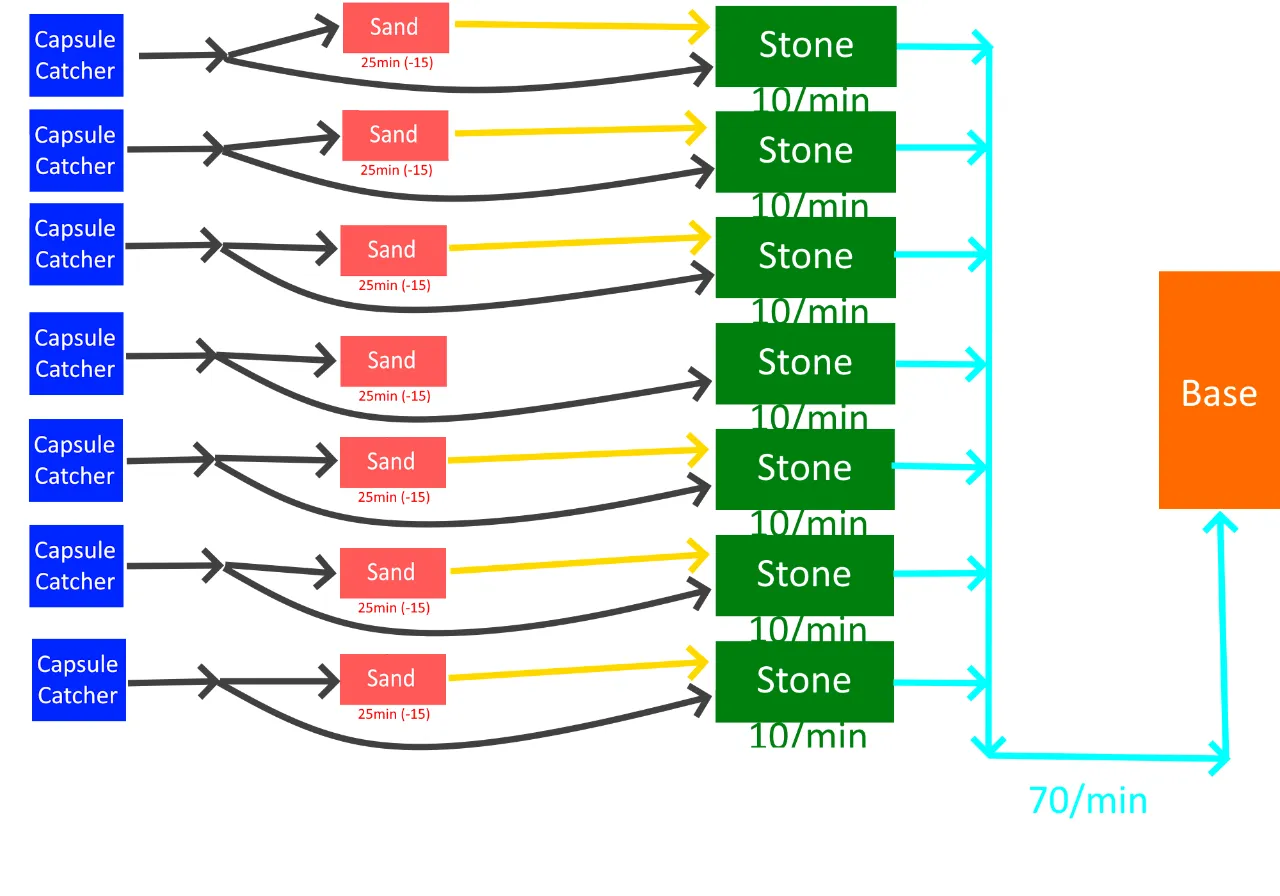
I saw this build on Instagram and thought, why not? This build significantly reduces the use of splitters, cutting it down from (Original) 24 Splitters/Mergers to just 14 Splitters/Mergers.
Not only is it nicer to build site by site, but it’s also easier to manage, especially on lower frame rates or uneven terrain.
Pros
- Easy to Build
- Easy to Manage
- Easy to Expand
- Terrain Friendly
Cons
- Much more power-hungry over area (Power is consumed based on production rate)
- False sense of Capsule Catchers Status
- Less diversity for J.O.O.N.A.S to send capsules to (even if we have more Catchers, it still takes 1 minute and 30 seconds to empty 30 kg, which matches the pace of J.O.O.N.A.S and could be considered a problem)
Thanks for checking this out! Just remember, always balance your J.O.O.N.A.S with your Collectors to keep your moon cleaning operation running smoothly.
Based on the original Steam guide by candee249
