
Death at Fleming Manor is an interactive mystery game where you piece together clues to solve thrilling whodunits. The unique formula combines investigation with forensic forms, letting you explore each scene at your own pace.
This fresh approach keeps gameplay engaging and encourages deep observation. In these hints, you’ll discover key words and insights for each episode.
Early cases are fairly straightforward, but tougher challenges arise in the later episodes, requiring keen attention to detail and careful form completion. Whether it’s understanding how to interact with the pathologist or navigating the forms, mastering these elements makes the difference in cracking the cases and enjoying your experience in Death at Fleming Manor.
This Death at Fleming Manor Walkthrough Guide provides hints for each episode in Death at Fleming Manor, detailing specific words to find and notes for the pathologist. It’s designed to help you progress through each case with minimal spoilers, while also pointing out what’s easy and what might trip you up, especially if you miss critical clues.
Death at Fleming Manor Walkthrough Guide – Chapter Hints
Author’s Note: I took the day off work and I’m going through the game one case at a time. I’ll do another playthrough to get some screenshots later.
It’s tricky to give hints for mysteries without revealing the answers. So, I’ll provide hints in a way that gradually reveals more while keeping some details hidden. For each Episode, I’ll include key words, notes for the pathologist, and hints for each form, along with a spoiled final answer.
If you’re familiar with the rising genre similar to Golden Idol, you know the drill. If not, here’s a quick rundown:
- In each scene, you’ll click on objects to discover words. Some words might come from multiple sources, but I’ll keep it simple and list just one. For many cases, expect that about a third of the words will come from the medical book.
- This game has a unique flow compared to others in the subgenre. You fill out a names form, chat with the pathologist, tackle a forensic form, and then complete relevant forms. The types of forms vary by case—sometimes you’ll deal with death certificates, sometimes injury reports. Each form gets submitted individually, and if everything checks out, it’ll be approved. But if multiple things are wrong, it’ll get rejected, and you’ll get a heads-up on how many mistakes you made.
- Each form starts partially filled out. For example, the first episode’s death certificate already includes a name but no time, while the injury report has a time but no name. This gives you a solid starting point for what needs figuring out.
- Certain episodes have specific things to note in the scene to ask the forensic pathologist about. For instance, Episode 4 has a victim with cyanotic fingers. I’ll make sure to point these out in my directions.
- If you see “Other Means” on a form, it basically means you’re unsure. That’s not a valid answer.
- Accident means there’s no malice or planning involved, while murder indicates malicious intent and human intervention. Suicide is self-inflicted, and natural causes refer to disease or old age.
- You get three tries (represented by sugar cubes) to solve a form before you can use the tea. Typically, it’ll just tell you how many mistakes you made, but the tea will highlight your wrong answers.
- The anatomy book will provide you with any medical knowledge relevant to the current case, which often hints at things to watch for. For example, the first episode discusses spinal injuries and blood typing. That’s a good starting point. I have a background in bioengineering, so I’ll point out helpful info as needed. Trust me, the medical book lays everything out clearly.
Tutorial
Words
Scene 1, Office:
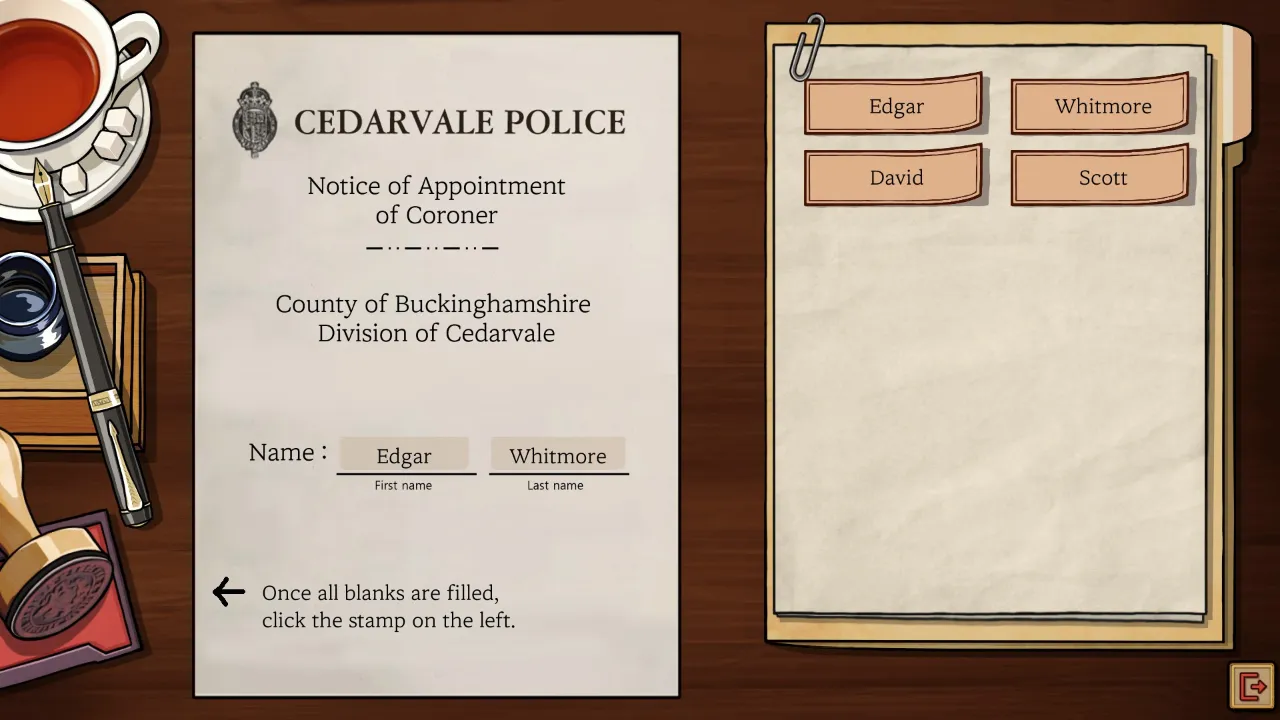
- Board: Edgar, Whitmore, Victor, Hale
Hints
- This is a test of our understanding of the controls and basic reading comprehension.
- What are we supposed to be doing again?
Final Answer:
Episode 1 – an Unexpected Accident
Words
Scene 1, Crashed Car
Look for the Passenger side windshield, Alcohol Bottle, and blood on the steering wheel:
- Glovebox:
- Map: Oak Hill, Lakeside Junction, Fieldview Crossroad, Cedarvale Fork
- Rental Car Information: Motor Car (from Motors), Derek, Walker
- Purse:
- Lighter: Brown
- Letter: Daisy, Stockbroker, Lauren
- Newspaper: second page: Doctor, Sophia, Fleming, Nurse, Eleanor, Ainworth, Artist
Scene 2, Crash Site
- Bag:
- Anatomy Book: Rupert
- Notebook: Bike
- Injured Man’s Body: Student
- Wallet, Letter: Electrician
Scene 3, Medical Book
- Central, Peripheral, Brain, Spinal Cord, Dizziness, Memory Loss, Cervical, Tetraplegia, Thoracic, Lumbar, Paraplegia, Numbness
Hints
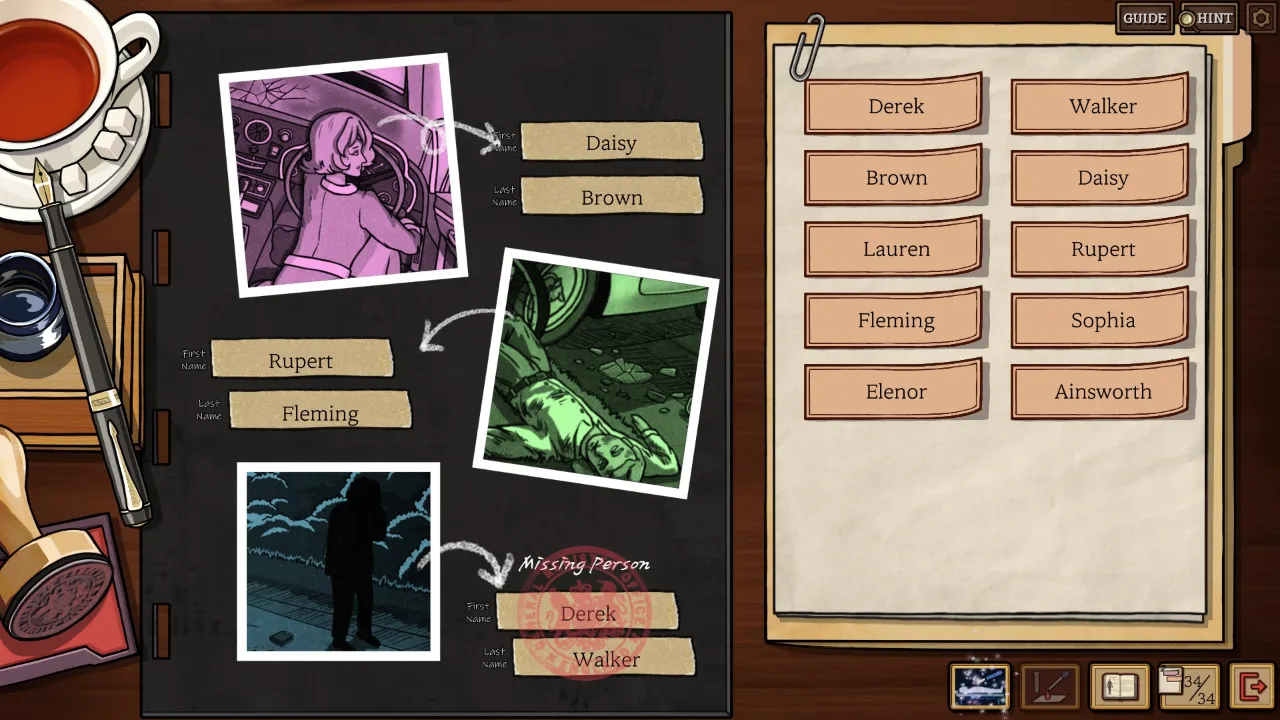
Form 1 – Names
- The name of the car crash victim, the person hit, and the missing person.
- Pay attention to the Missing Person photo focusing on the wallet.
- This should be pretty self-evident, so I’ll keep the names straightforward in later forms.
Form 2 – Blood Testing
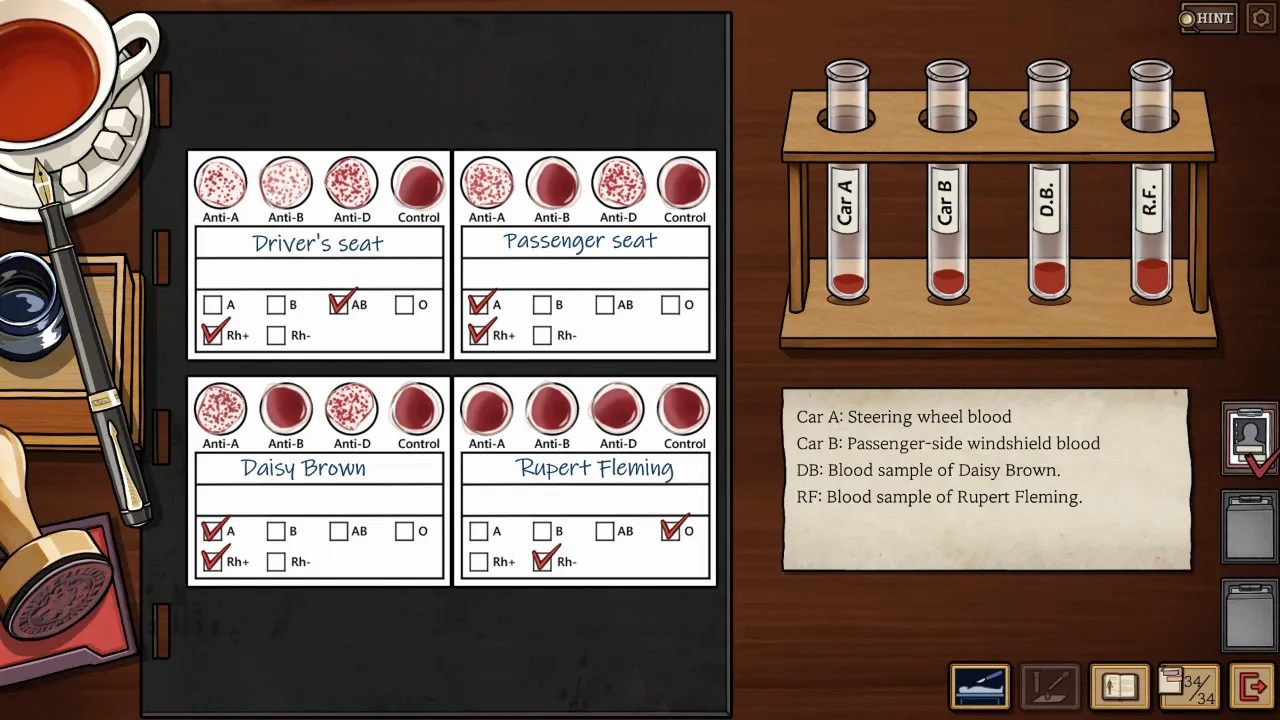
- After completing the names, you can talk to the forensic pathologist about the body and three questions. If you took all blood samples, you can conduct some blood testing. Just follow the chart in the medical book.
- Don’t worry, there’s no trick here. Simply stick to the chart.
Hints – Forms 3 and 4
- Both forms need to know the crash location.
- The crash occurred at a T-bone intersection with a tree at the fork. Are there any other landmarks?
- Having no landmarks can be telling in its own way.
- Historically, people used the sun for directions. It sets in the west.
- The map may not line up with the crash site’s orientation.
- The crash must be at Oak Hill, Lakeside Junction, or Cedarvale Fork. All three locations have a tree at the T-bone. The camera angle doesn’t show much except fields in the opposite direction, suggesting no landmarks or trees on that side.
- The path opposite the tree faces the setting sun, indicating the west road. Flip the map 90 degrees to the right for a comparison.
Form 3 – Death Certificate
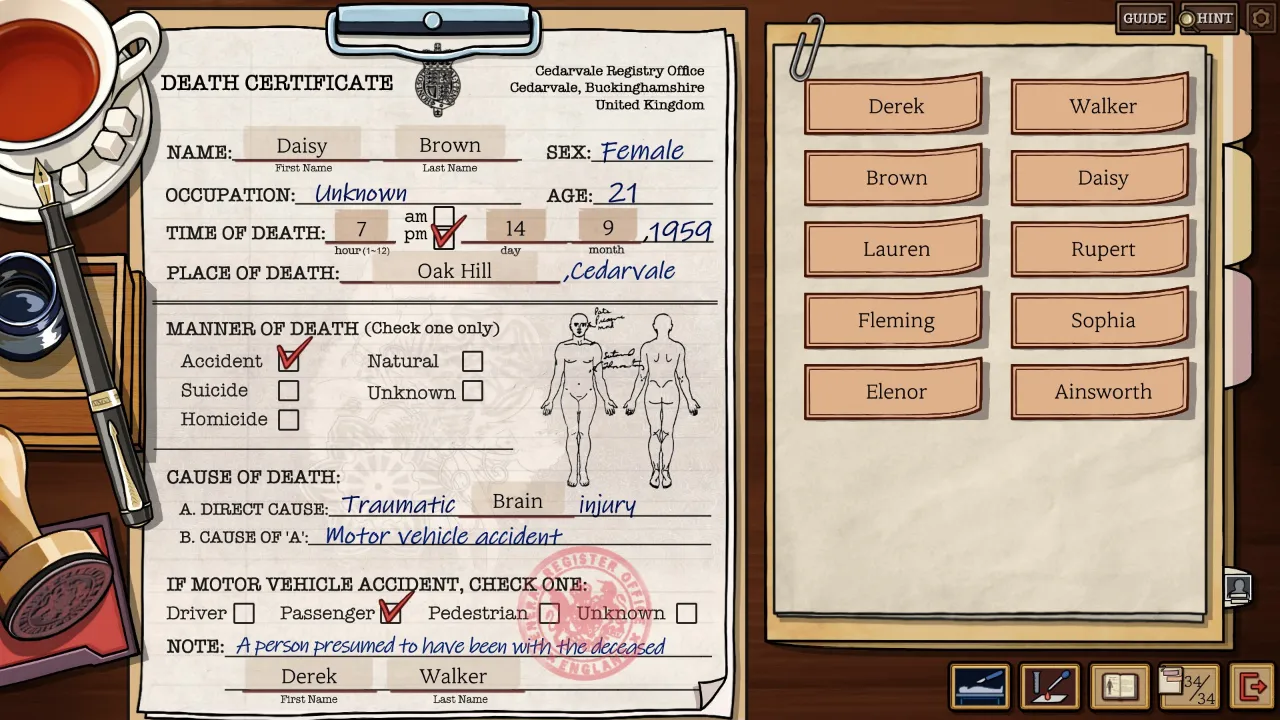
- This Form asks for name, date and time of death, location of death, manner of death, cause of death, role in the crash, and the name of the missing party.
- Notably, the other form, that of the cyclist, mentions the date and time when his injury was reported—which is the time of the crash. You can cross-reference this with another source for the sunset time.
- The narration mentions that the blood testing results show evidence of foul play. How does that work?
- The game explains it, but a bit more on blood typing: the two main clinically relevant systems are the ABO system and the Rhesus factor. ABO determines if you have A, B, both, or neither (O). Daisy only has A and Rupert has neither, so neither would provide a B antigen. What does this imply about the AB sample?
- As the pathologist notes, Daisy has blunt force trauma to the head but none to the chest. What did she hit her head on? The driver’s side windshield is completely intact.
- Unless she went off the road or the car was tampered with, the crash would be accidental.
- The key question in this case is this: Daisy was found in the driver’s seat, but does anything actually prove she was the one driving?
- The blood testing results show blood matching Daisy’s in the passenger seat, while a blood sample that doesn’t match hers is found in the driver’s seat where she was found. Connect the dots from there.
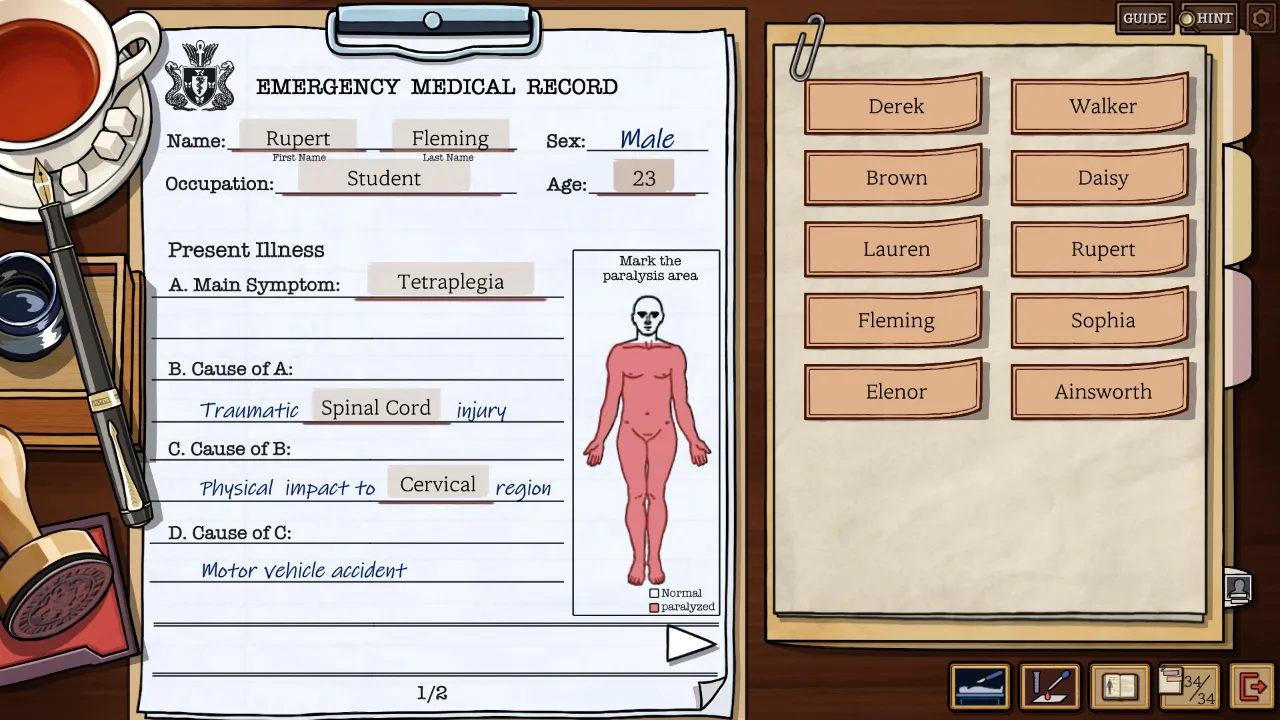
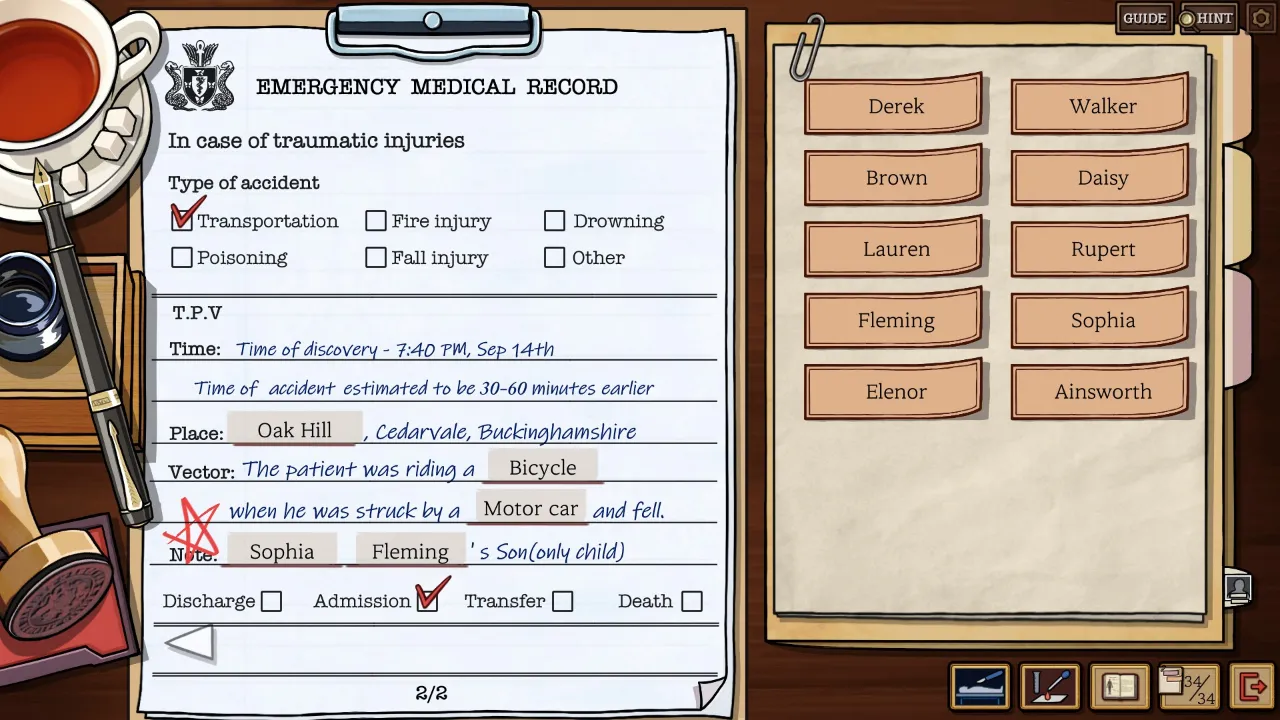
Form 4 – Emergency Medical Record
- You’ll need to calculate Rupert’s age manually.
- The only clue regarding the severity of his injuries and their cause is through his dialogue.
- Rupert’s accident will sound unusual. A bicyclist hit by a car falls under which category?
- His age is calculated as the current year minus his birth date = Newspaper – ID.
Episode 2 – the Clock Tower Incident
Words
Scene 1, Clock Tower
Make a note of the suicide note at the jump point:
- Hanging Body:
- Elite Motors: Elite, Motors, John, Walker
- Letter: Derek
- Clock Repair Manual: Clock Tower, Clockface, Hour Hand, Minute Hand
- Nursing Locker Room on Right:
- Nursing Shift: Nursing
- Locker, Handover Note: Green, Hawkins
Scene 2, Ground Level
- Doctor, Pen: Henry
- Welcome to Fleming Manor: Visitors, Caretaker
- Man on Right:
- Dialogue: Benedict
- Letter: Logan, Ashford, Sophia, Fleming, Inspector
- Logbook: Doctor, Palmer, Basement
Scene 3, Medical Book
- Neck, Hypoglossal Nerve, Thyroid Cartilage, Jugular Vein, Vagus Nerve, Carotid Artery, Amputation, Crush, Penetrating, Laceration, Asphyxia, Suffocation, Strangulation, Smothering, Choking, Hanging, Ligature, Manual, Complete, Incomplete, Hypovolemic, Cardiogenic, Distributive, Obstructive
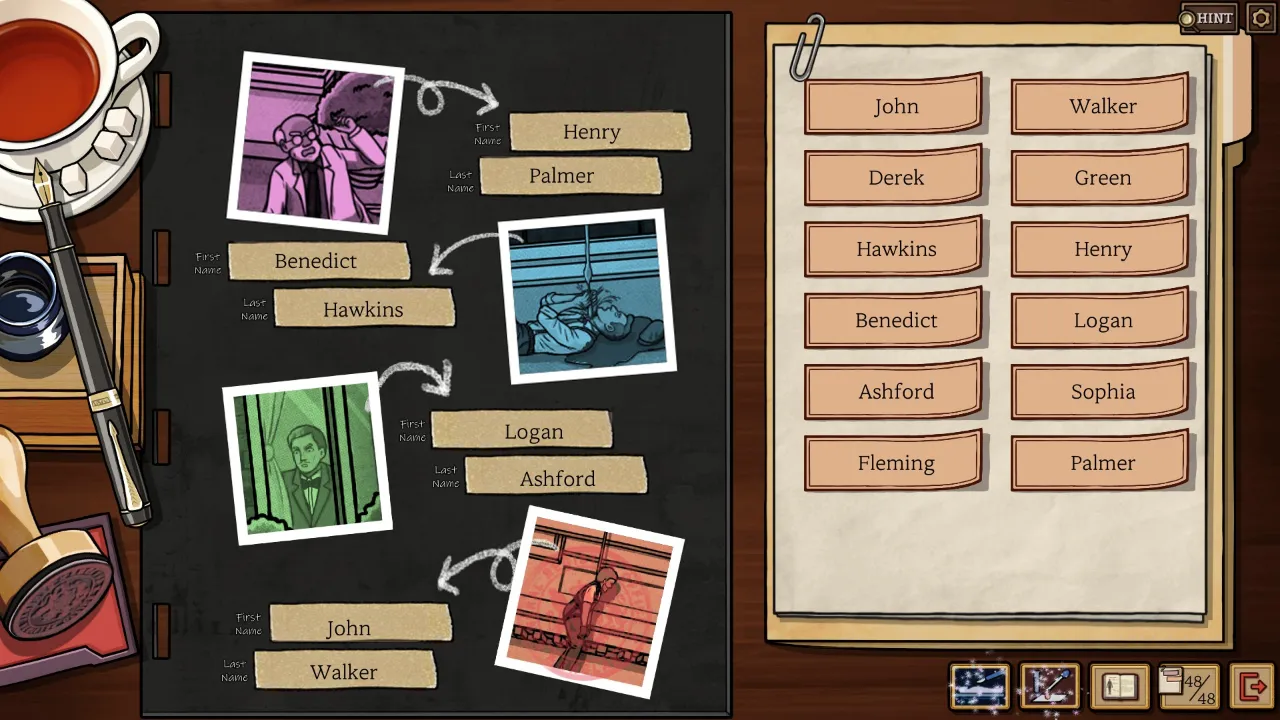
Form 1 – Names
Except for the man inside, everyone has something with their initials.
Form 2 – Handwriting Analysis
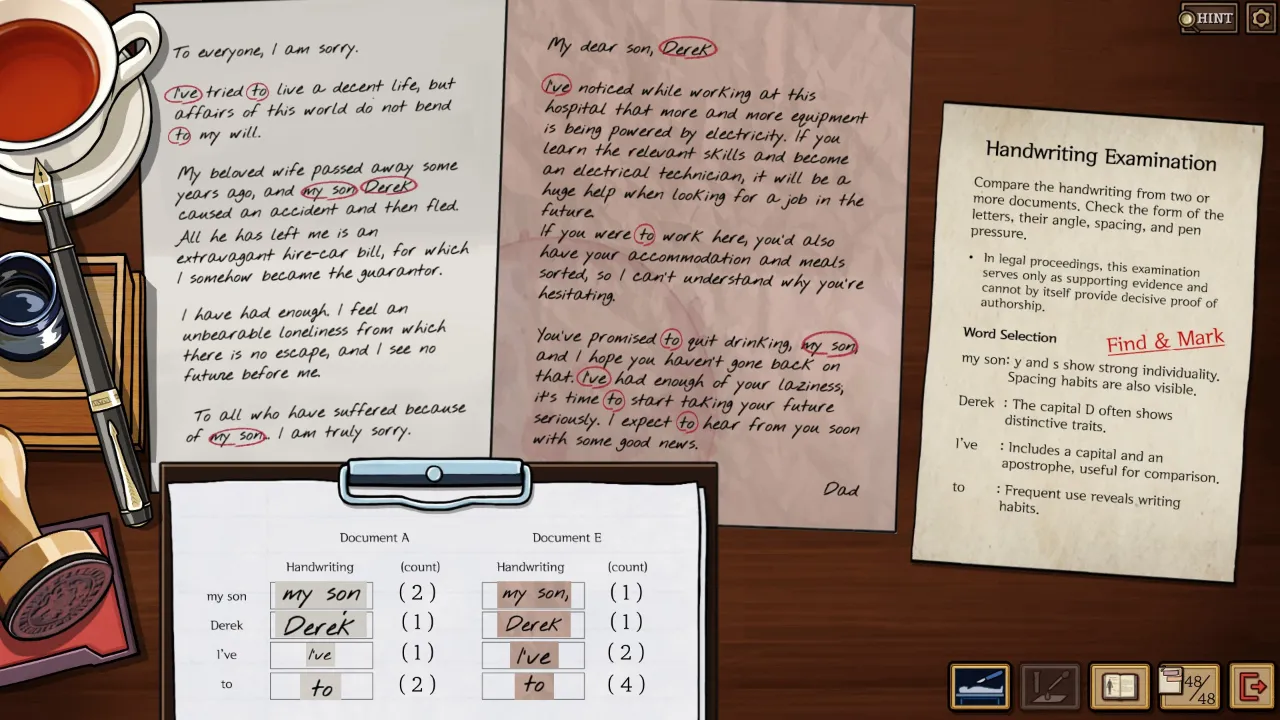
- We need another document to compare with the suicide note. Has anyone else written to their son Derek?
- The right document is Document E.
- After selecting the correct one, our goal is to click on and highlight all occurrences of “my son,” “Derek,” “I’ve,” and a lowercase “to.”
- Just a heads-up that
Hints – Forms 3 and 4
- The death certificates are partially filled in… but not by name. Rather, cause of death with a photo of the deceased as the icon
- As murder mystery audience members, we assume murder as a default. For once, there genuinely seems to be no foul play with the evidence we currently have
- The difficult part here is going to be time and date of death. They appear to have died at the same time. Remember to fill in AM or PM! Form 4 only needs date, while Form 3 needs Time, AM/PM, and Date
- The doctor says Benedict just got off his shift
- The shift handover note in the locker pointedly urges Benedict to mail a letter. It came from Green
- The outgoing mail has yet to be collected
- The thing about the cause of death being a clock hand is that broken clocks perfectly display the time they broke
- According to the nursing schedule, there’s only one day that Benedict can follow after Green and also leave work before mail is collected
Form 3 – Hypovolemic Shock Victim
- The tricky part is which part of the neck was fatally injured. What would cause urgent gushing bleeding?
- Refresh yourself on the difference between a vein and an artery
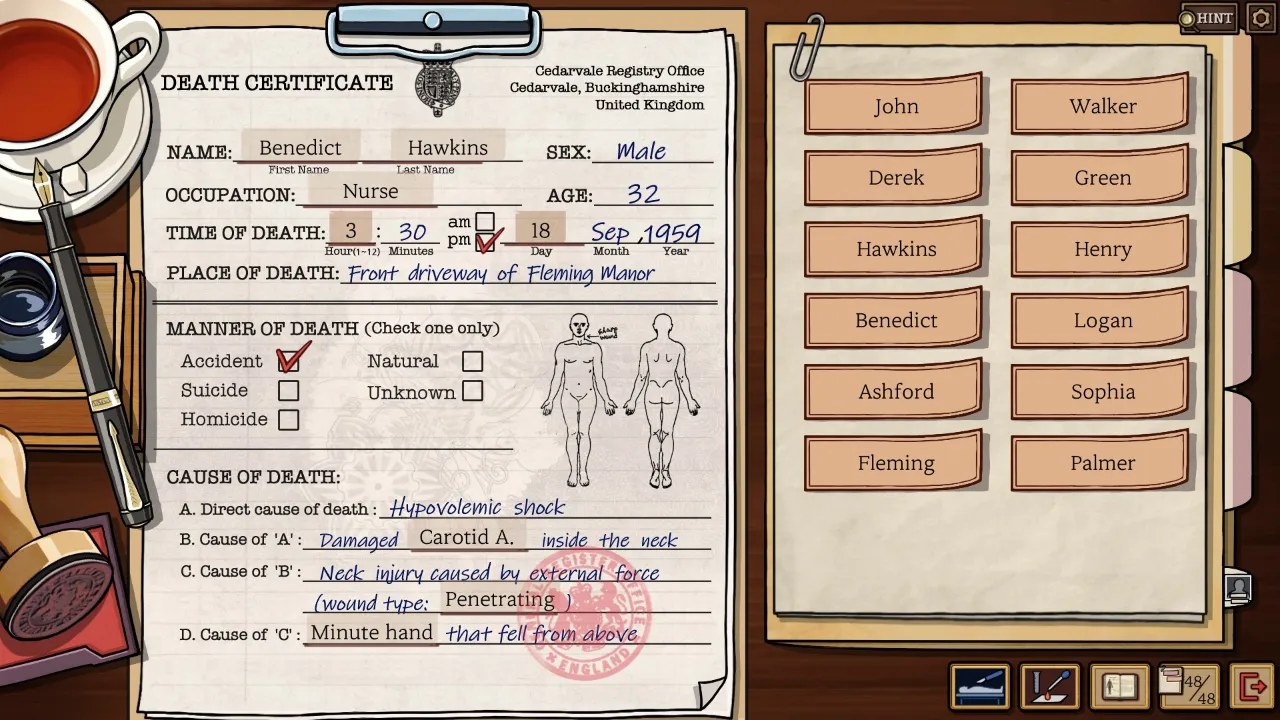
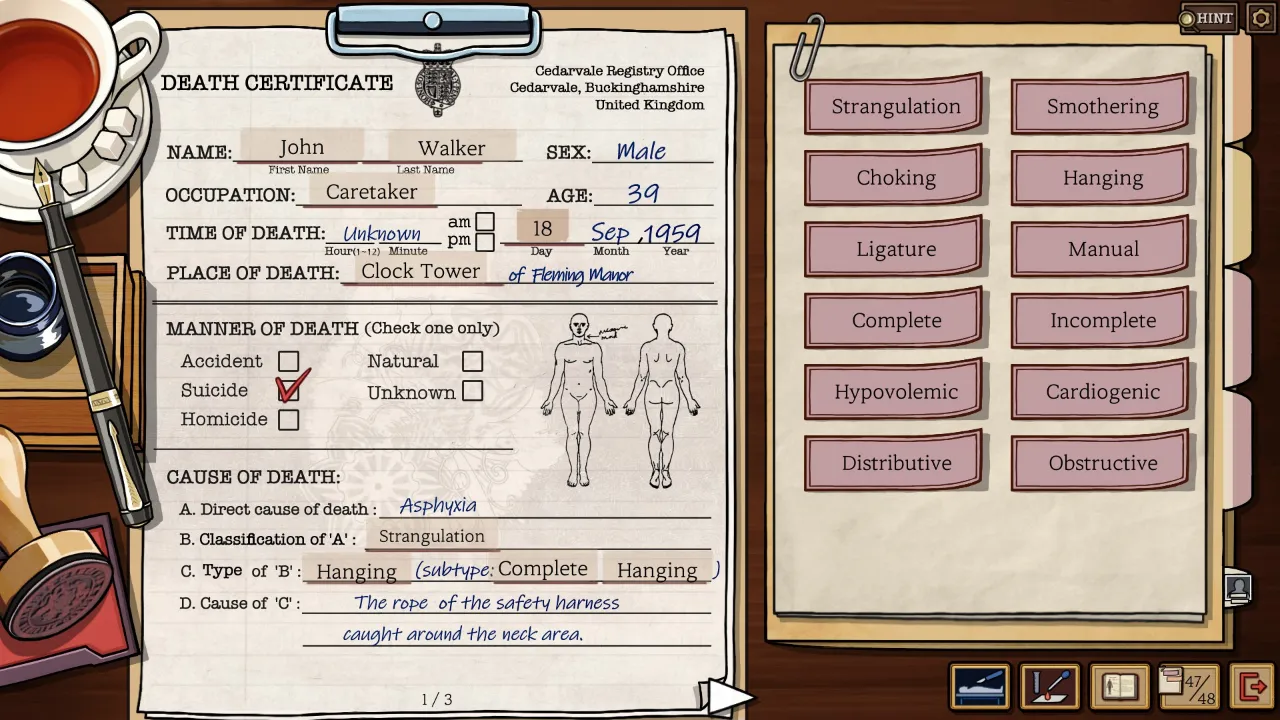
Form 4 – Asphyxia Victim
- I don’t think it needs to be explained that a fall protection harness shouldn’t be wrapped around your neck. The manual points out that it wasn’t tied correctly. This was not an accidental fall
- This is where the death certificate gets fiddly. It’s asking for the classification of asphyxia, then the specific subtype of that classification
- The second page is what he was trying to repair. His note says something about a gear?

After putting everything in, the chief inspector will ask us three questions (giving us an achievement if the first three are done right). All three questions are open and shut
- Is the handwriting analysis of the suicide note consistent with Walker having written it himself? Yes
- Did he have a motive for suicide? Yes
- Is there any evidence suggesting homicide? No
Finally, will we wait for the pathologist or close the case?
Either way, the coroner will have more to talk about
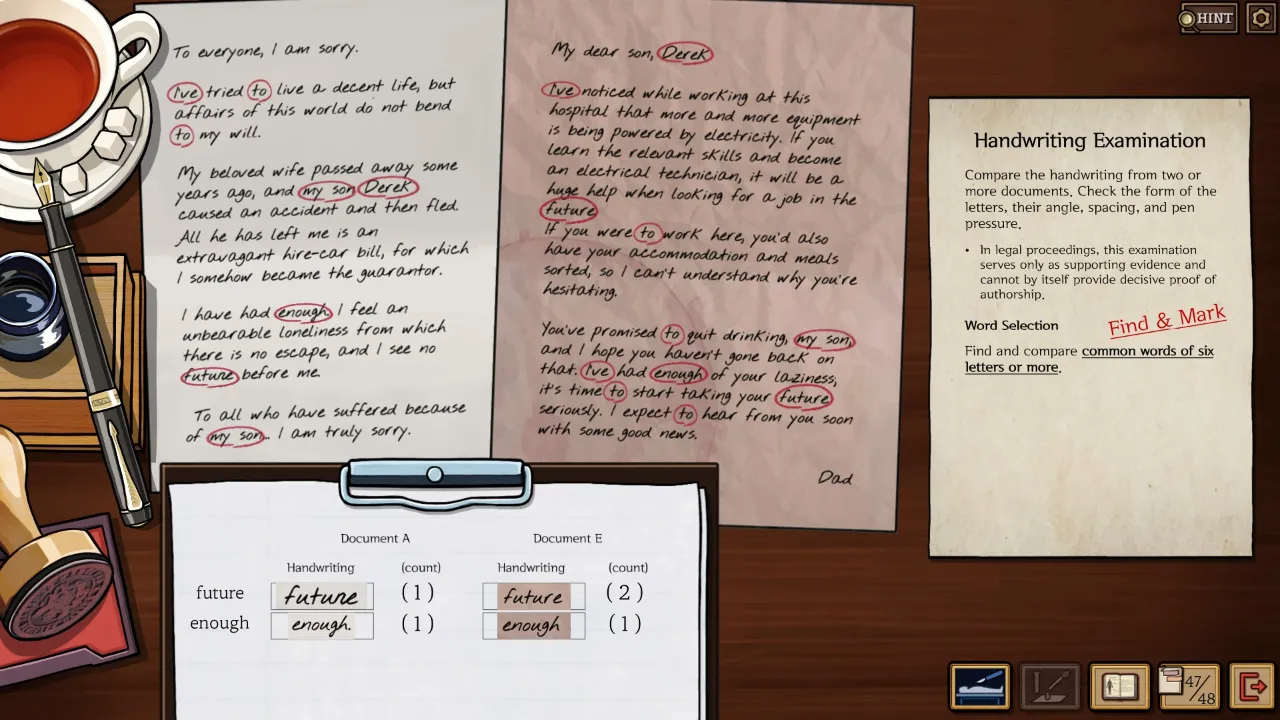
Speak to the Pathologist and go over the body again. He’ll point you to the notes and ask you to look for six letter or longer words
Form 5 – Handwriting Comparison Redux
- There are two words shared between letters that are six letters long
- The words we’re looking for are future and enough
- The first document has 2 words and the second has 3
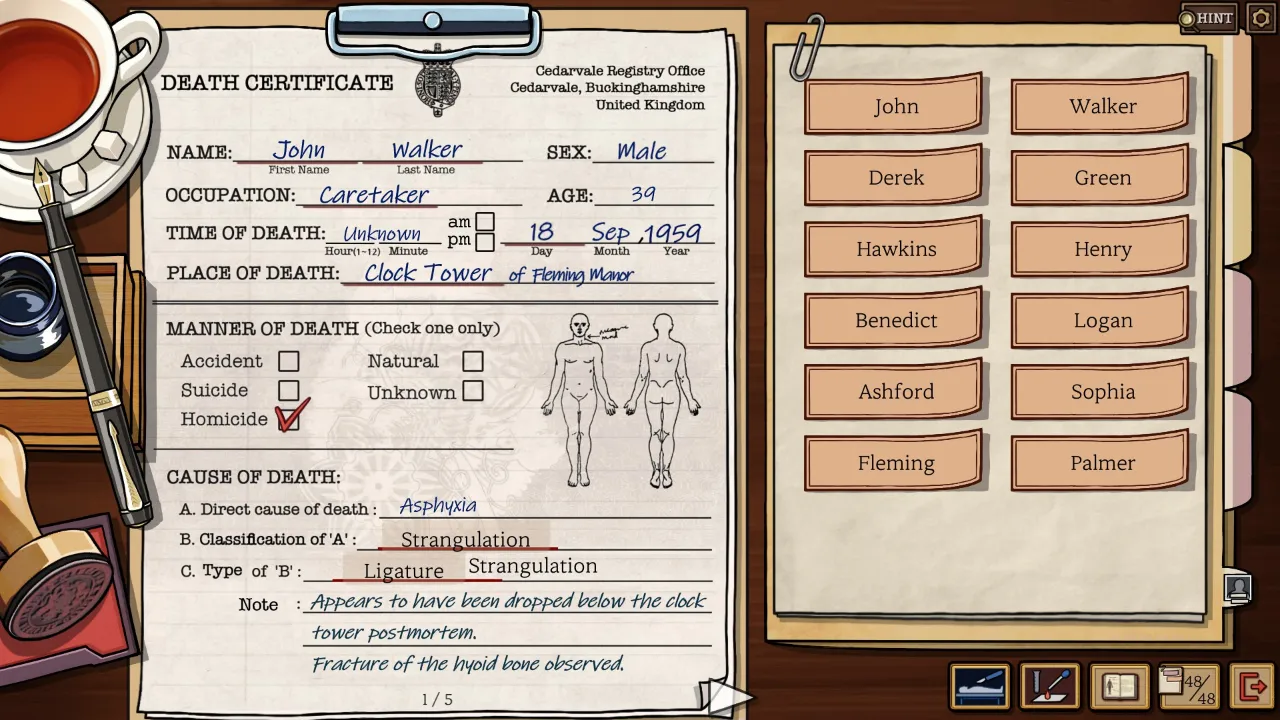
On completion, the new findings force us to readjust
Form 6 – Death Certificate Redux
- The cause of death and a new page on our reason for amending need to be filled out
- At the end of the day, he was still strangled with a rope, just a couple fine details need to be switched out
- The reason for amending is partially based off our original report, so repeat what we said as the ruling
Episode 3 – the Iron Scalpel [1/2]
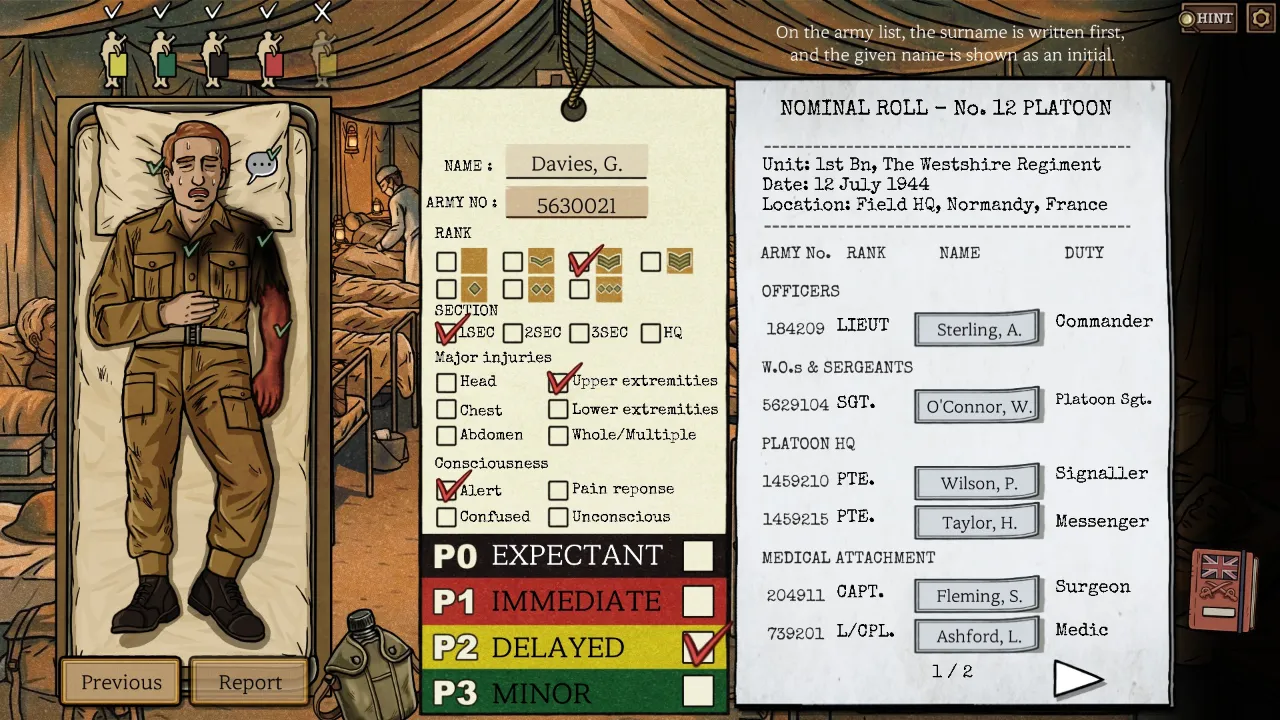
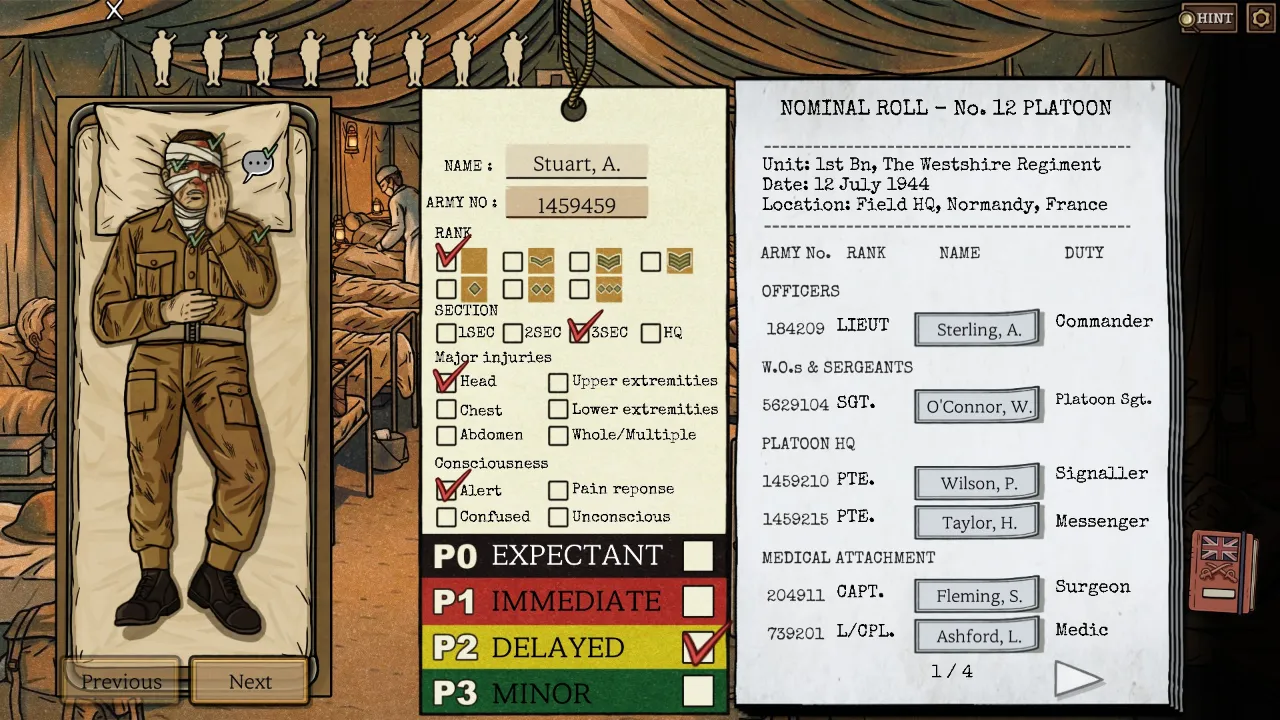
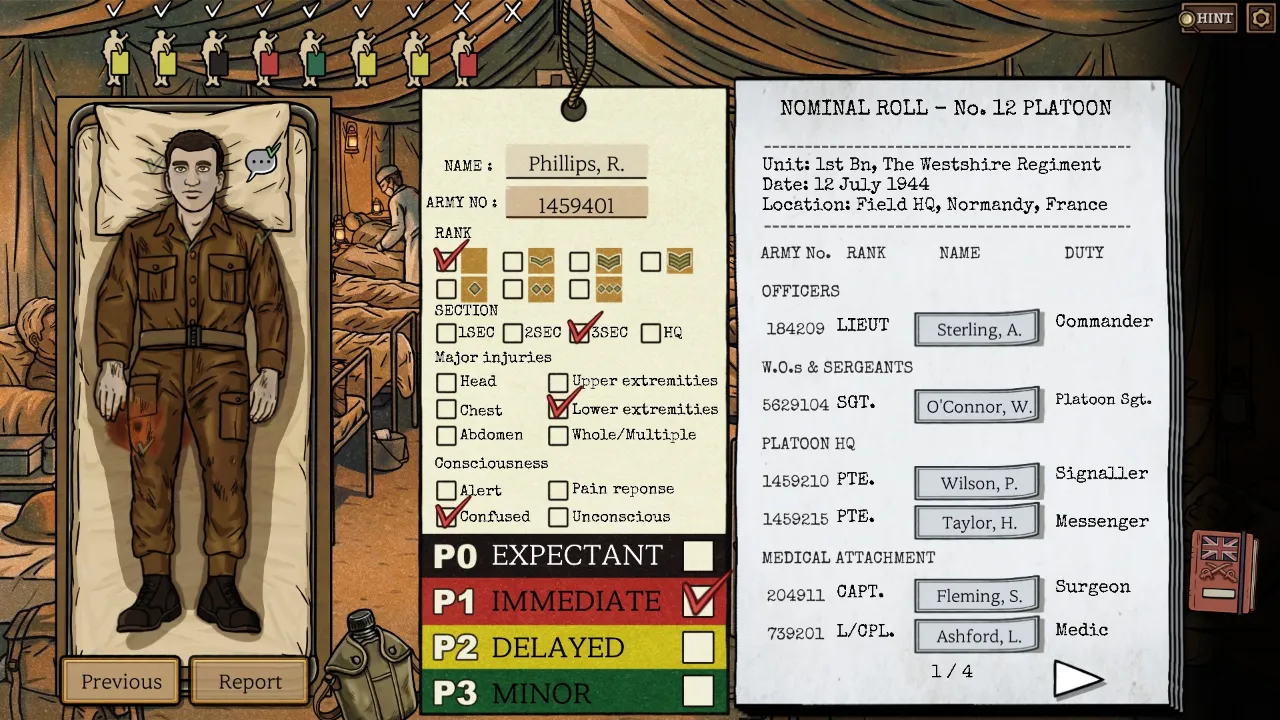
Today’s a bit different than usual. Our task is to fill out paperwork for injured soldiers, detailing their name, ID number, rank, section, injuries, state of consciousness, and their triage level.
We need to handle one person at a time, so don’t rush! You can’t move on until each person has at least a filled tag.
This comes in three batches: first, 5 soldiers, then 8, and finally 9, with casualty reports after each group.
This is more of a Papers, Please/Scrutator Tenebris kind of scenario. I’ll throw in hints for deductions, but you’ll mainly be following instructions and sorting people into the right categories.
You’ll know when you’ve correctly processed someone or not. Once you fill in a tag, you can check the rest of the group, but remember, everything has to be right before you submit them to Sophia.
At the end of each patient group, you’ll receive the canteen, which acts like tea.
General Hints
- The paper on the right lists, from left to right, ID number, rank, name, and duty. Duty refers to their job or role. Soldiers are also categorized by section, indicating their assignment (platoon, or No. 1 Section). The second batch adds No.2, and the third adds No.3. Each detail helps you identify people.
- The book on the right explains insignia, triage levels, and specific definitions of triage levels and consciousness.
- Consciousness can be tricky. It’s about the highest level of response a soldier can manage. Are they fully alert, confused from what seems like a Traumatic Brain Injury, only reacting to pain, or completely unconscious? If they’re in pain but can have a conversation, they’re considered alert. Just being in pain doesn’t mean they’re at the Pain level unless they can only moan.
- We only care about urgency to keep them alive. Extreme pain isn’t an immediate concern unless it’s due to a serious wound. Plus, if someone can’t be saved with current medical resources, they’re deemed expectant.
- The pupillary reflex means the pupil should shrink in response to light. If it doesn’t, it could indicate a traumatic brain injury or death. Here, it’s a symptom of PO.
- 2iC stands for second in command.
- Just a reminder that Chest and Abdomen are different parts on the tag. Also, a neck wound counts as head.
- Since we have a limited list, we can use process of elimination. This is really effective with the few Corporals available. Once a soldier is injured, they’re out, so later days will have fewer options for you.
- If someone can’t talk, you’ll either need their tags or have to revisit discussions with other soldiers.
Day 1
Patient 1
- They’re in too much pain to self-identify, but can still hold a conversation.
- The only visible wound is a leg injury. They need assistance but aren’t severely bleeding.
Patient 2
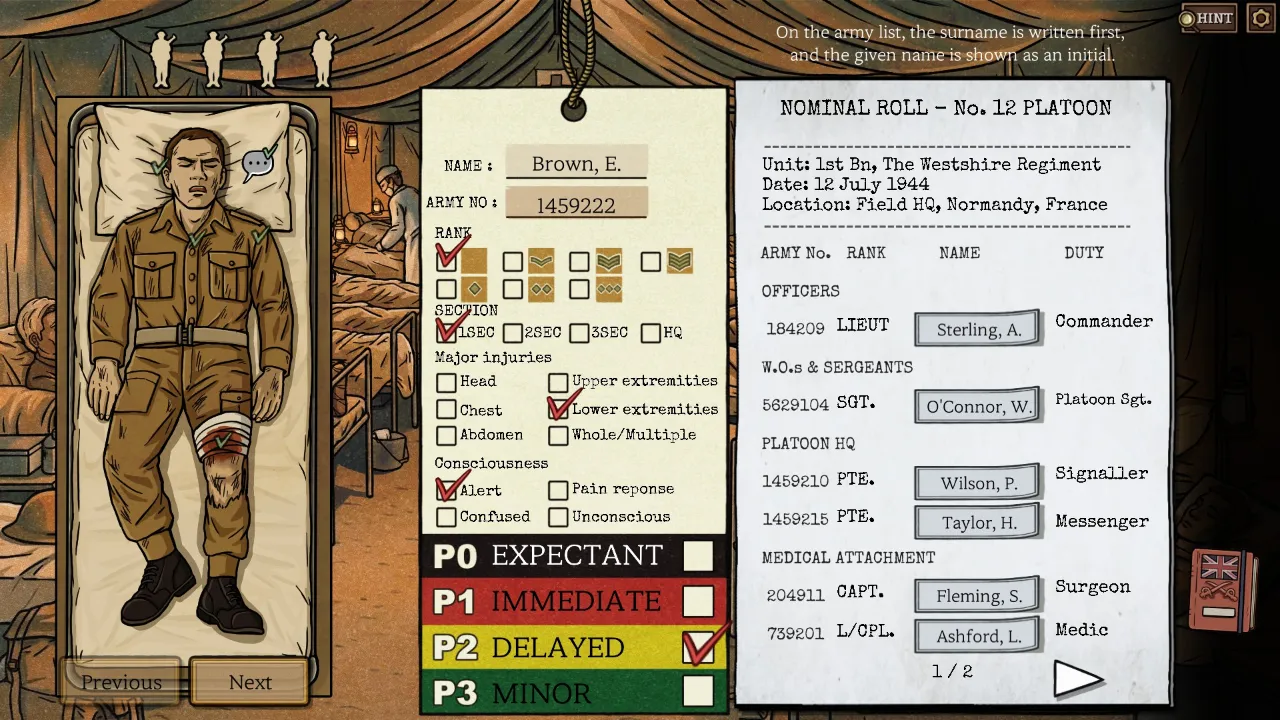
- This one’s a freebie. They’re completely lucid and can identify themselves. Just remember who they say protected them.
Patient 3
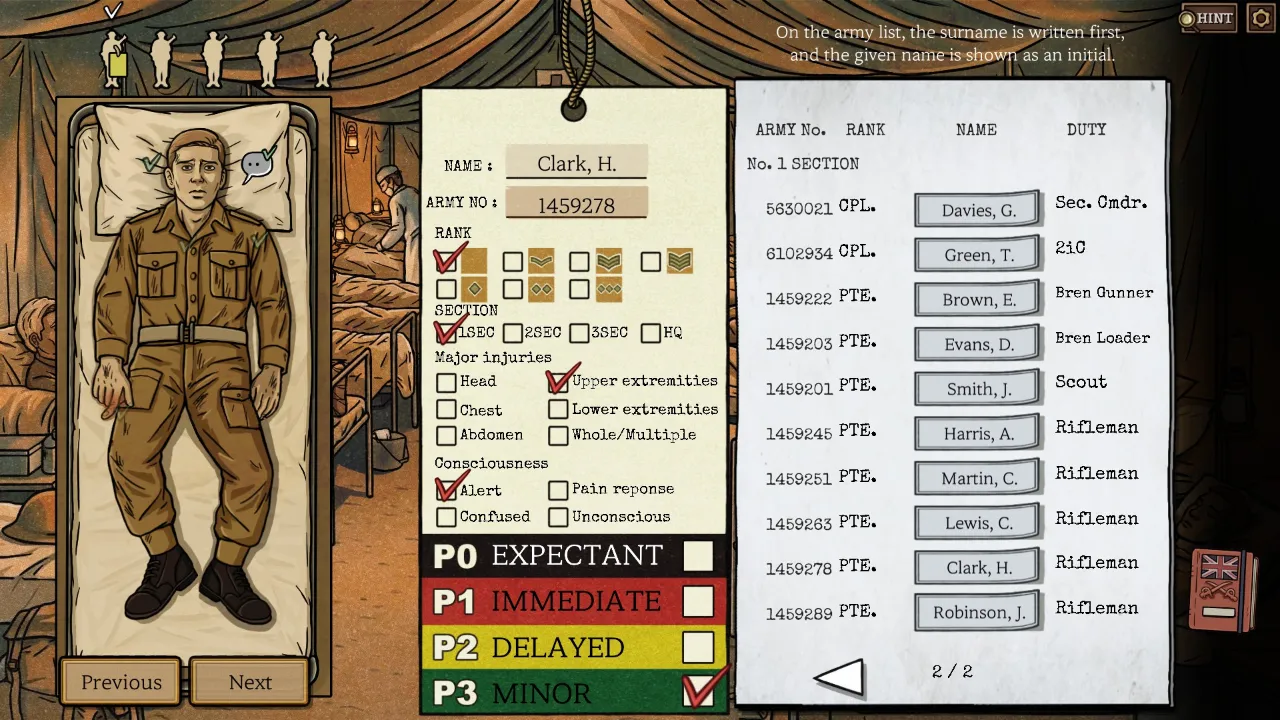
- This is one of the two corporals. Didn’t the previous patient mention something about one?
- Patient 2 said their section commander took a grenade to the arm. Does that match this patient’s condition?

Patient 4
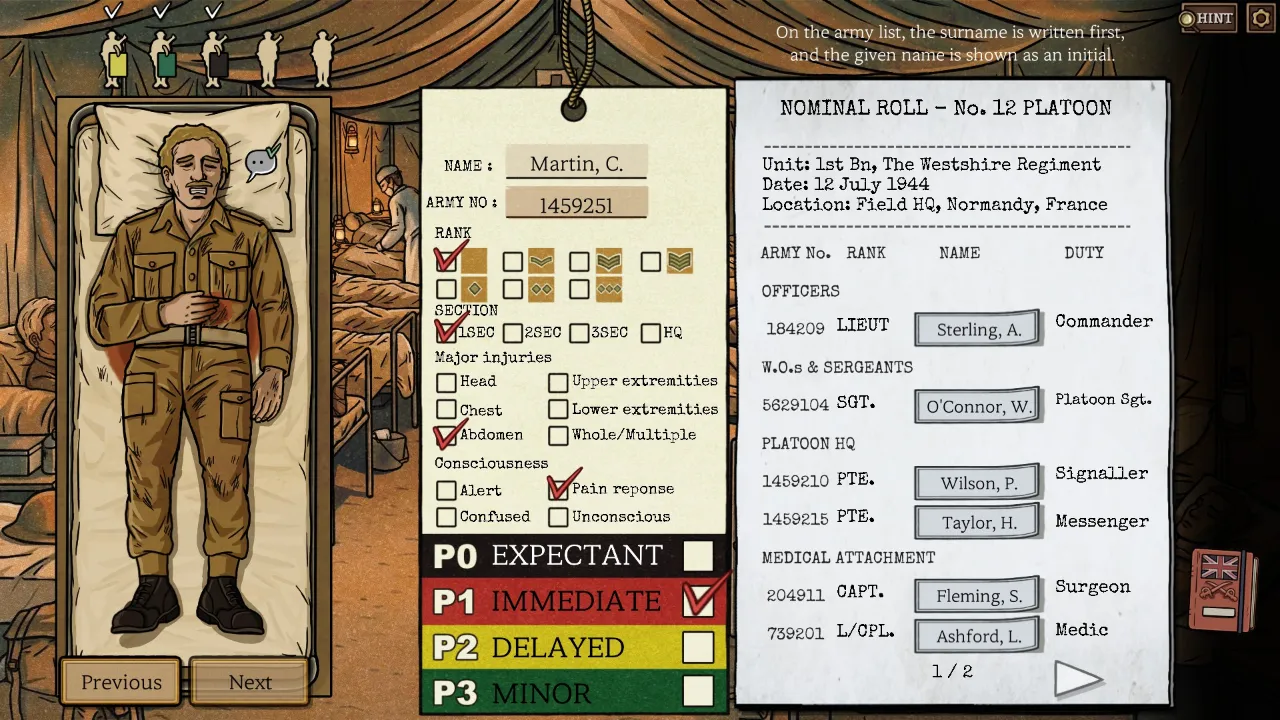
- Severe abdominal damage. Besides that, they’re easy to identify.
Patient 5
- All identifying information has been burnt away. We only know that something burned their arm.
- They’re lucid enough to ask for morphine.
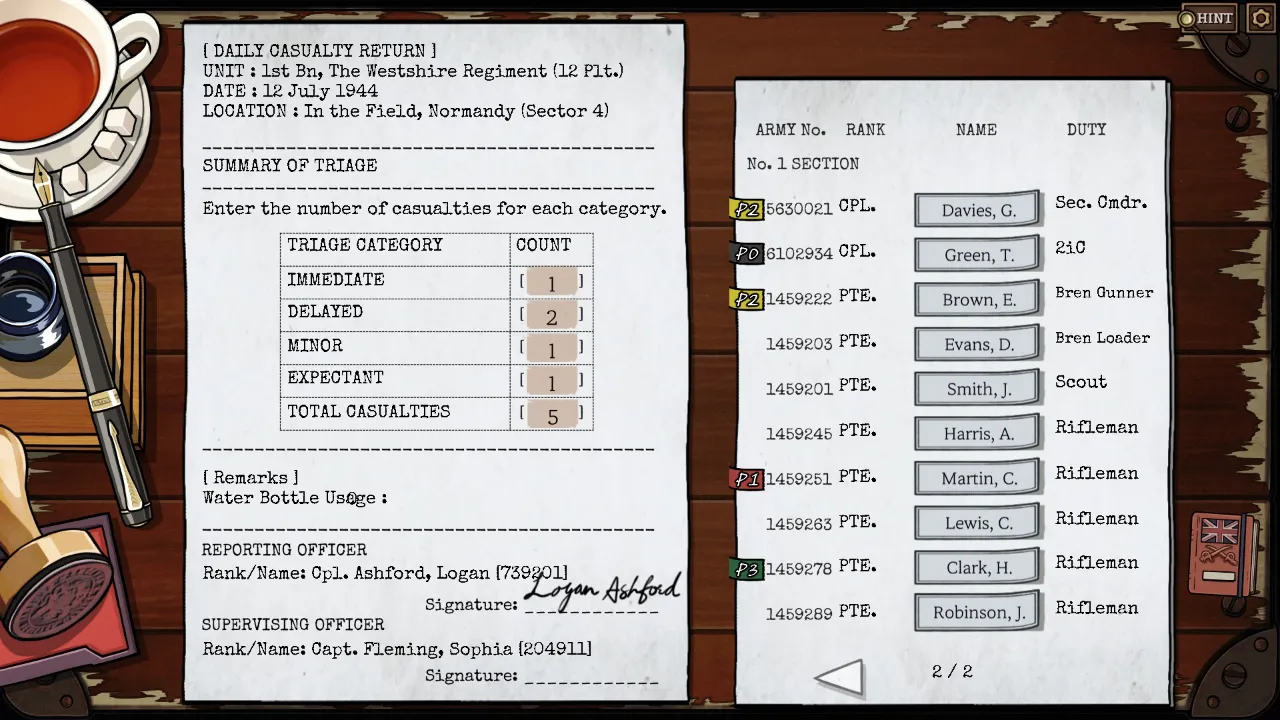
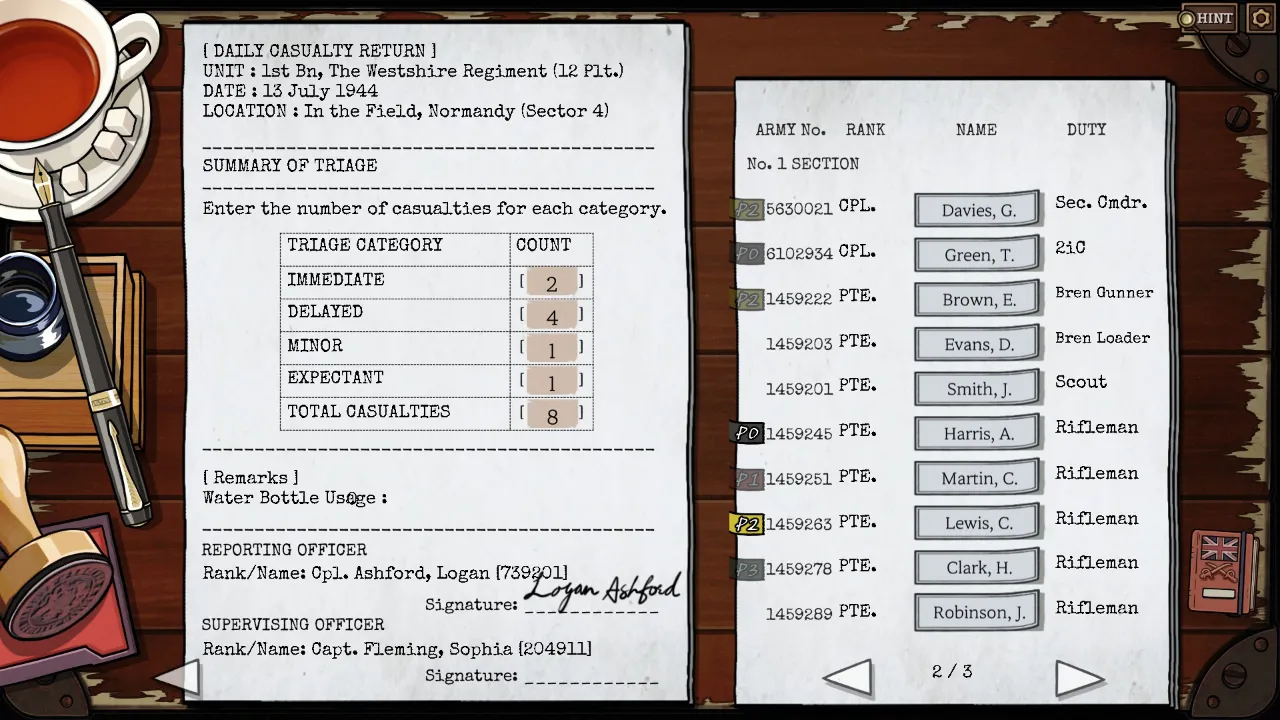
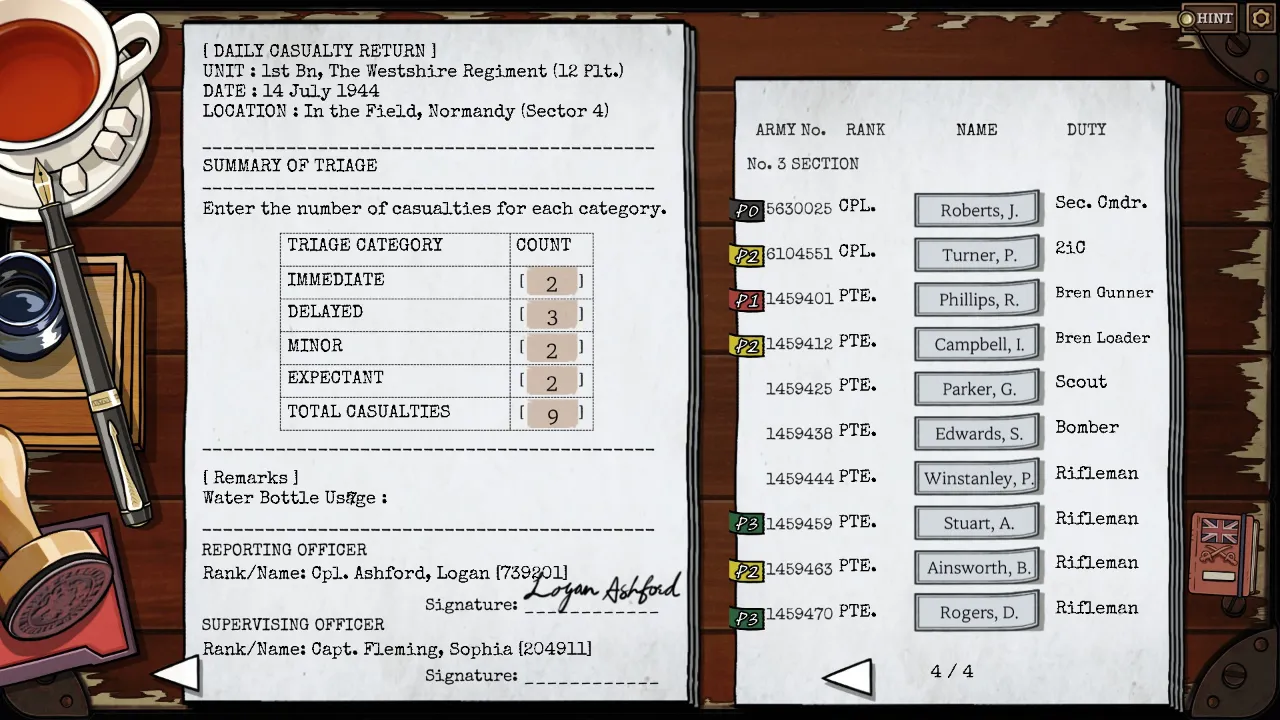
Casualty Form
- After all 5 patients, you’ll need to fill out a casualty form. Note how many of each tag you got.
- Remember, it should total 5.
Day 2
Patient 1
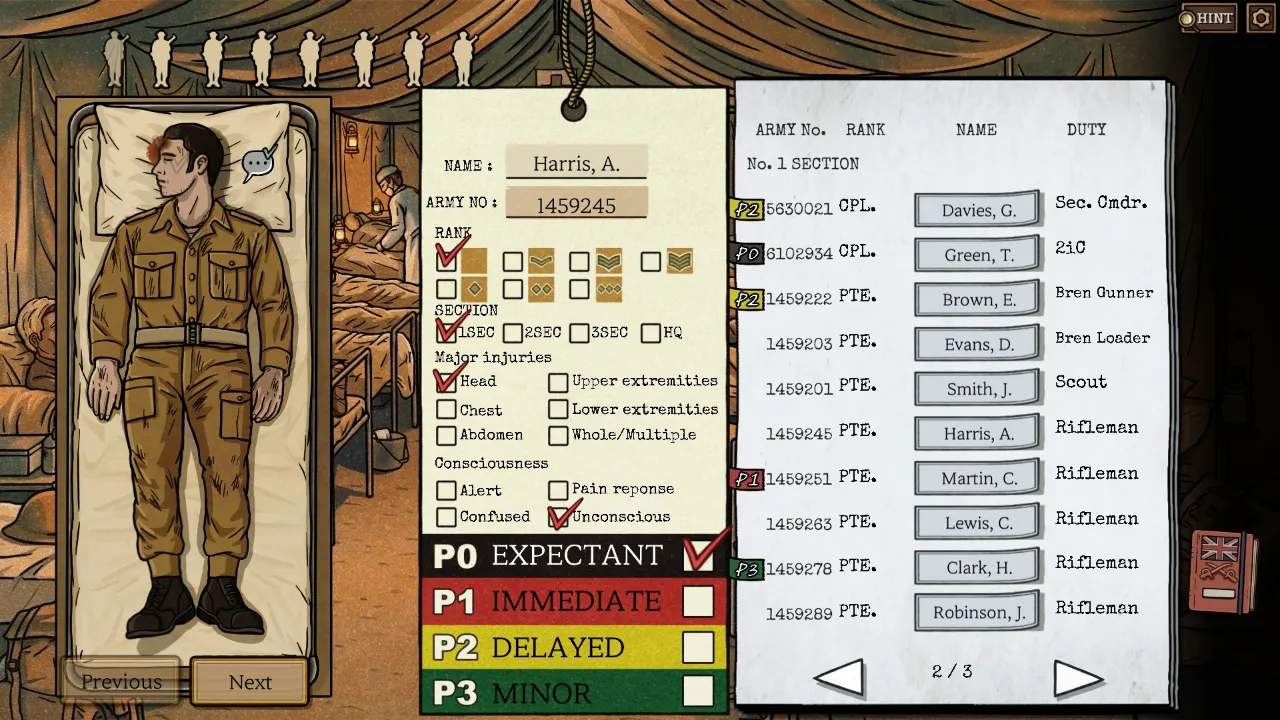
- No pupillary response and they have an inoperable head wound. This one’s easy to identify.
- Pulse doesn’t matter if they can’t be operated on.
Patient 2
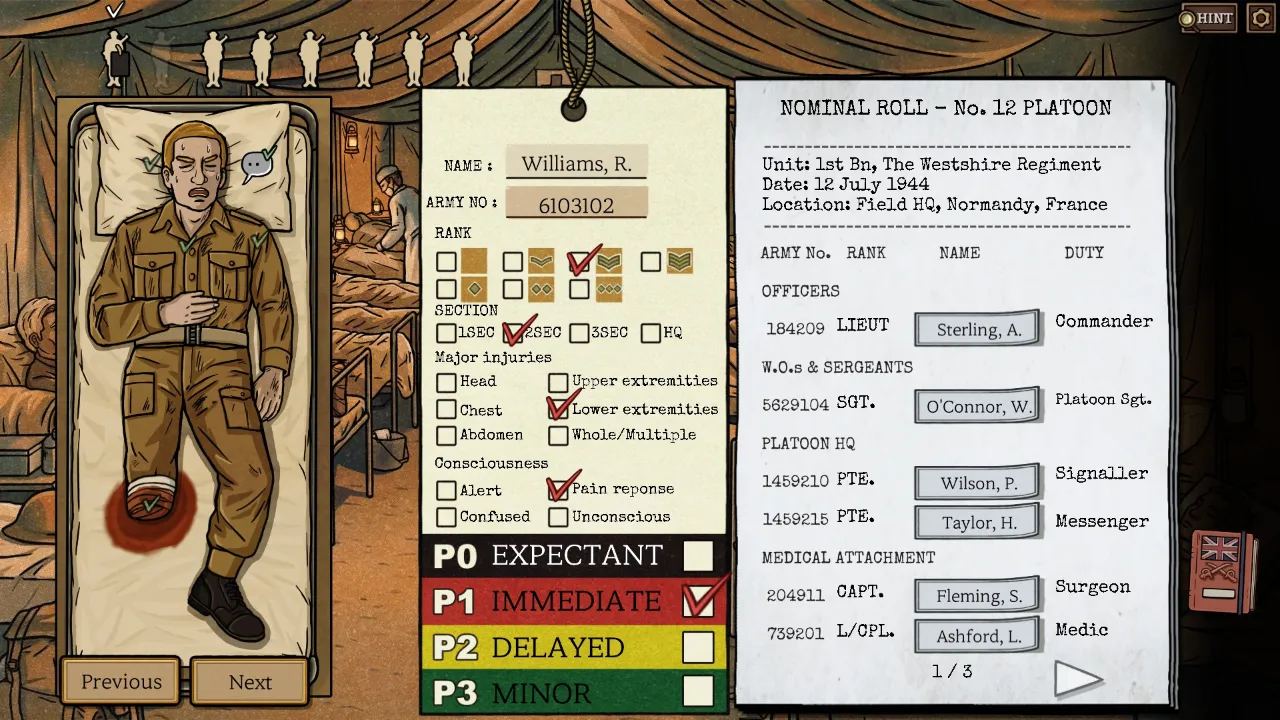
- One of the four No.2 corporals (both No.1 ones were badly wounded yesterday). Is their tag clear enough for you to identify them?
Patient 3
- The ID tag has a 93 in their number, but that doesn’t narrow things down much. You’ll need to use their role as a tiebreaker.
- What were they doing when they broke their ankle?

Patient 4
- The last digit of the ID is 2.
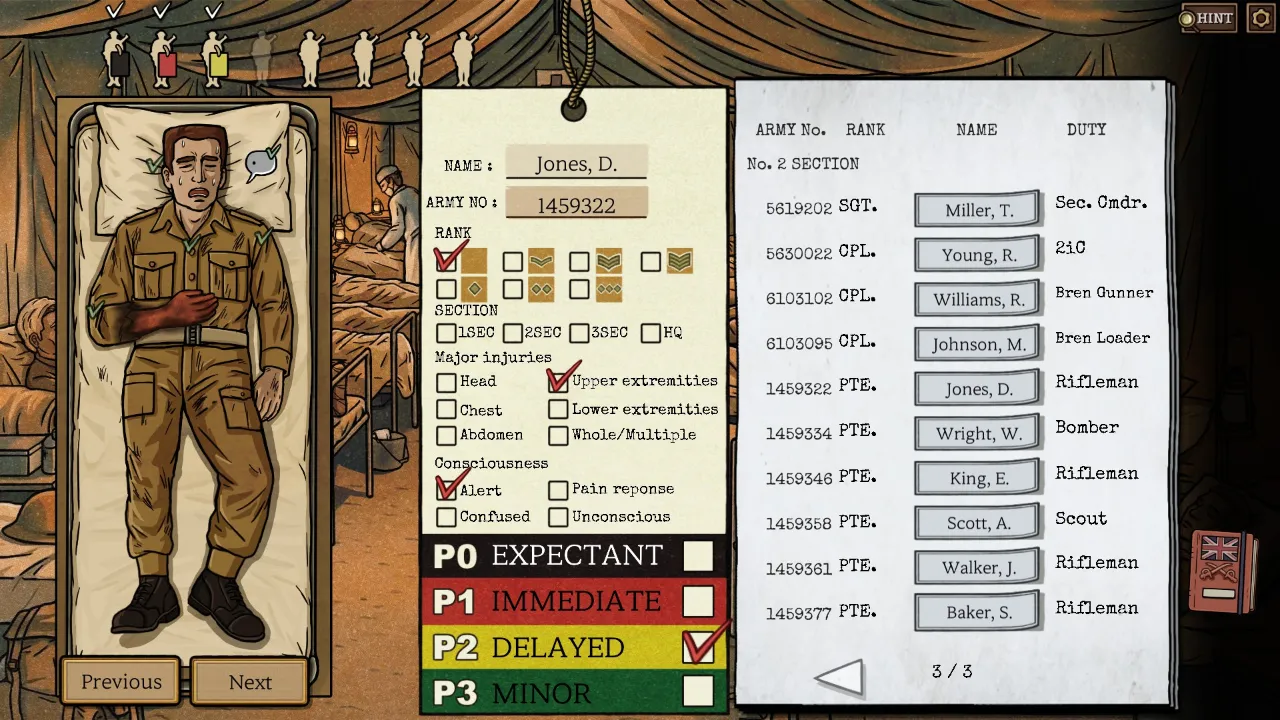
Patient 5
- This one’s a Corporal, and their first initial is M.
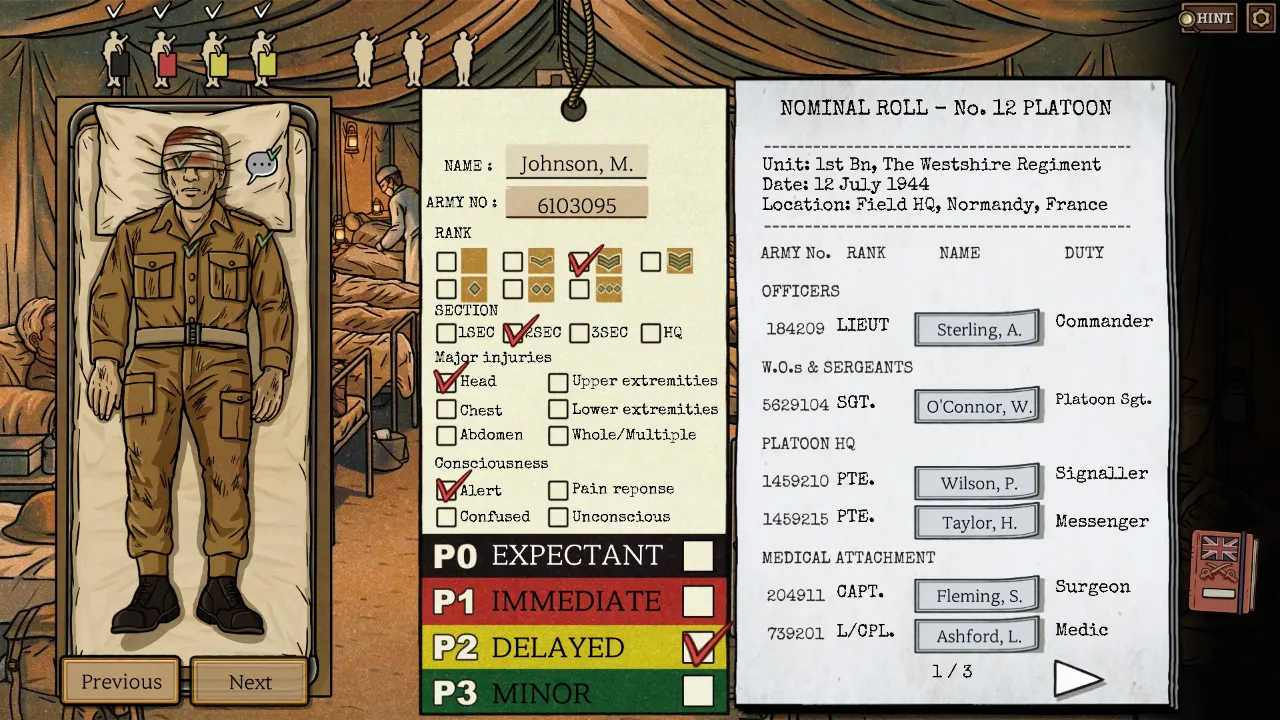
Patient 6
- ID 1459, first initial C.

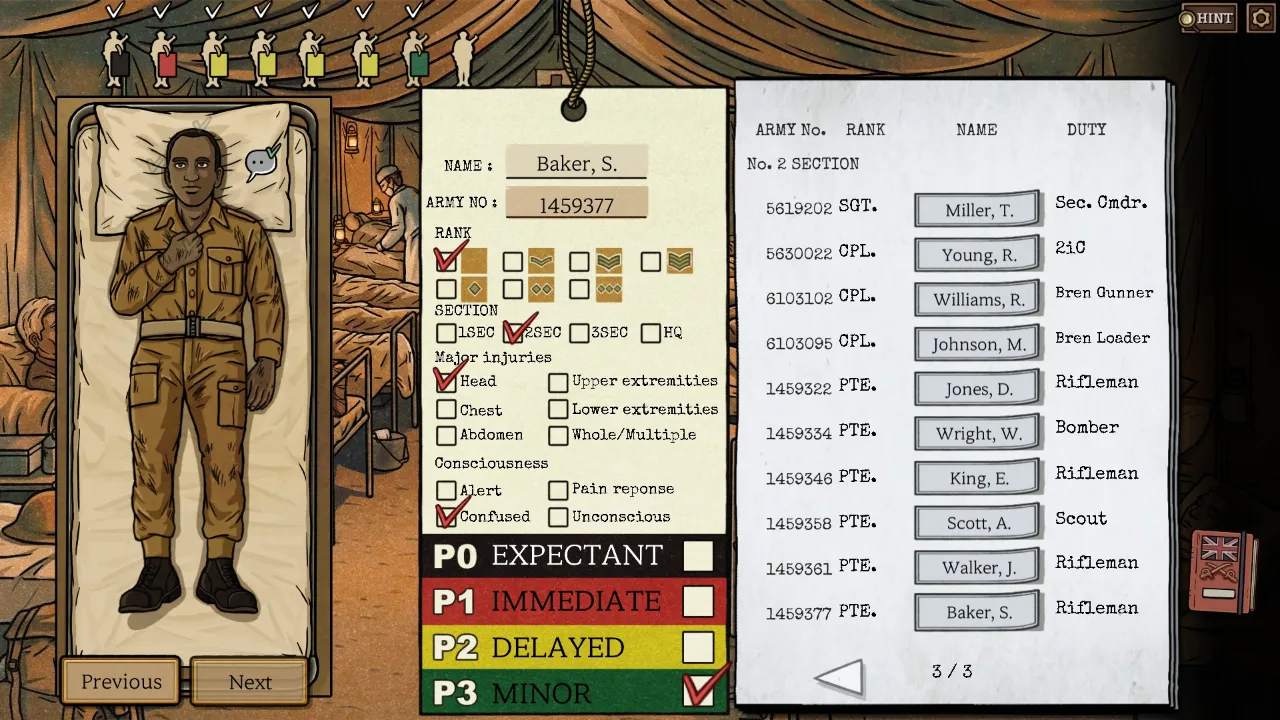
Patient 7
- The only identifying information is their last name.
- This one’s a bit quirky for injury type. Think about what body part would show extreme stress, especially if they’re delirious.
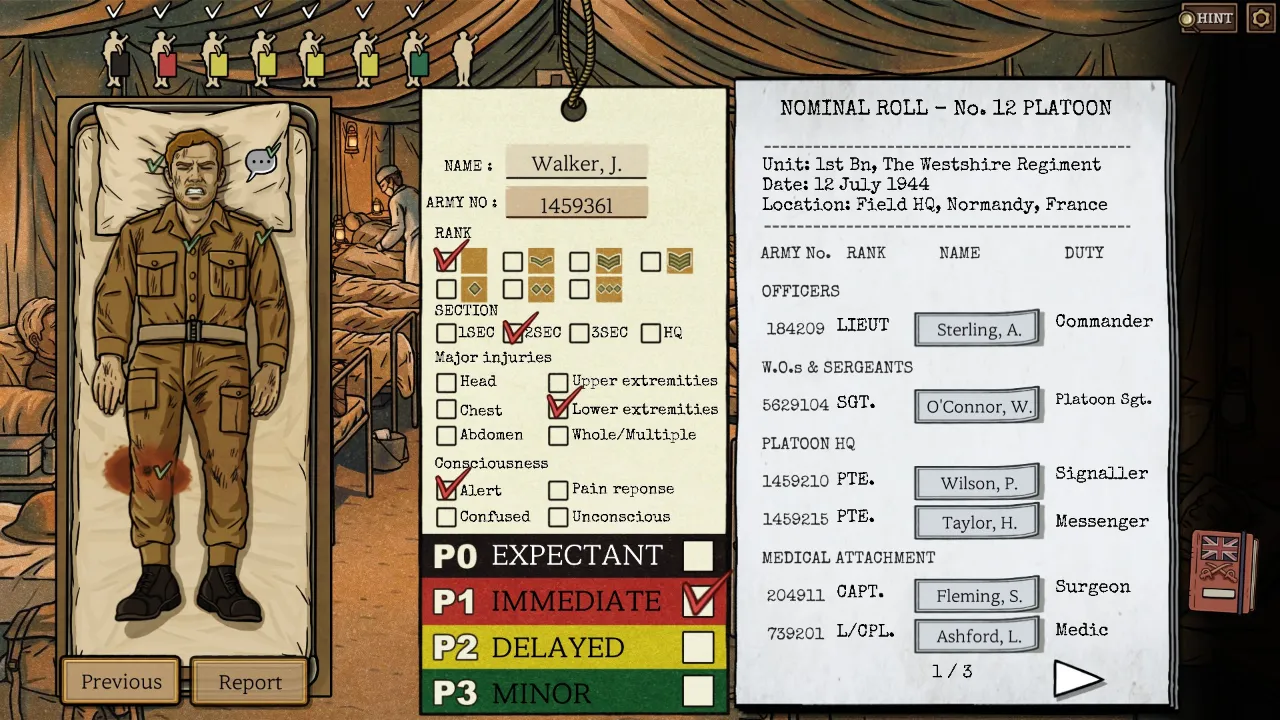
Patient 8
- It’s our old friend again!
Casualty Report 2
- Fill in all tags from today. They must total 8.
- Patients from yesterday will be grayed out.
Episode 3 – the Iron Scalpel [2/2]
Day 3
Patient 1
- Under section commander Roberts.
- Has 45 as later digits of their ID tag.
Patient 2
- Same group as Private Phillips. He’d load up Phillips.

Patient 3
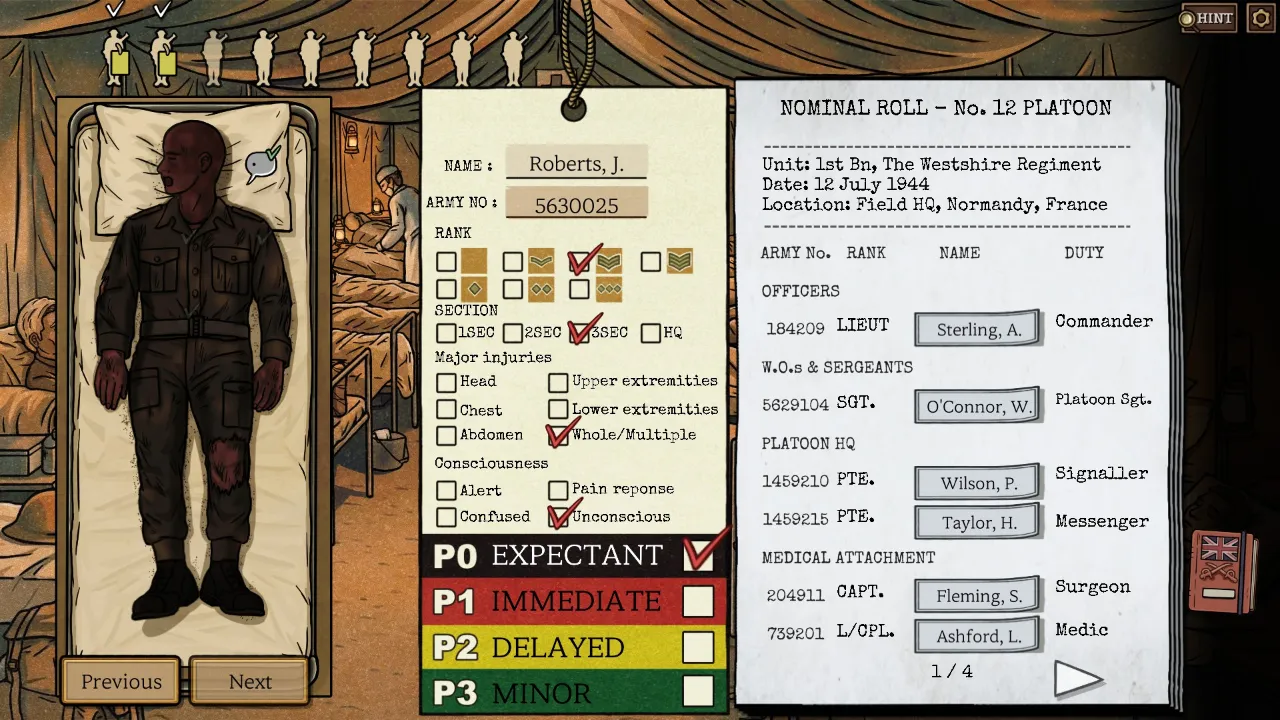
- Unconscious with full body burns
- Has anyone talked about anyone taking burns on their body?
Patient 4
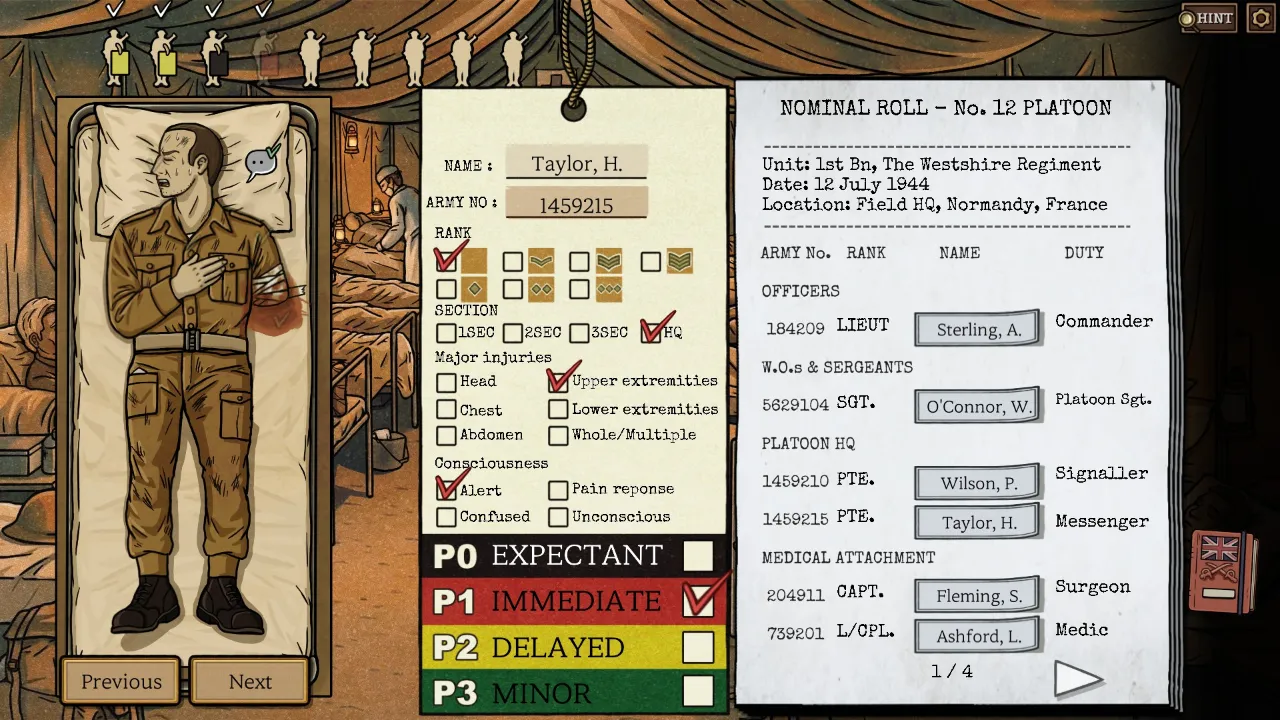
- First initial H
- Not everyone comes from the 1/2/3 No’s. There’s another source for patients
Patient 5
- They have a list of poker scores from No.3 members. Seems like they’ve got a lucky charm…
- … which means they’re on a hot streak
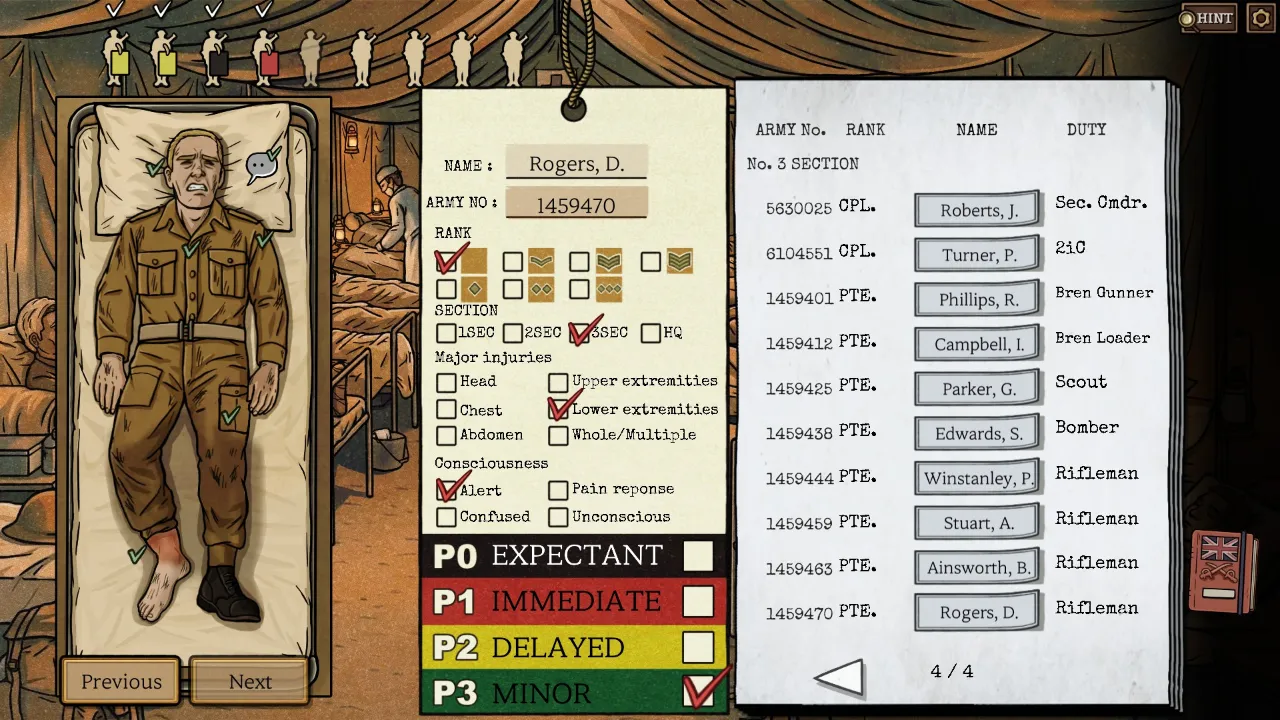
Patient 6
- Under a badly burnt section commander
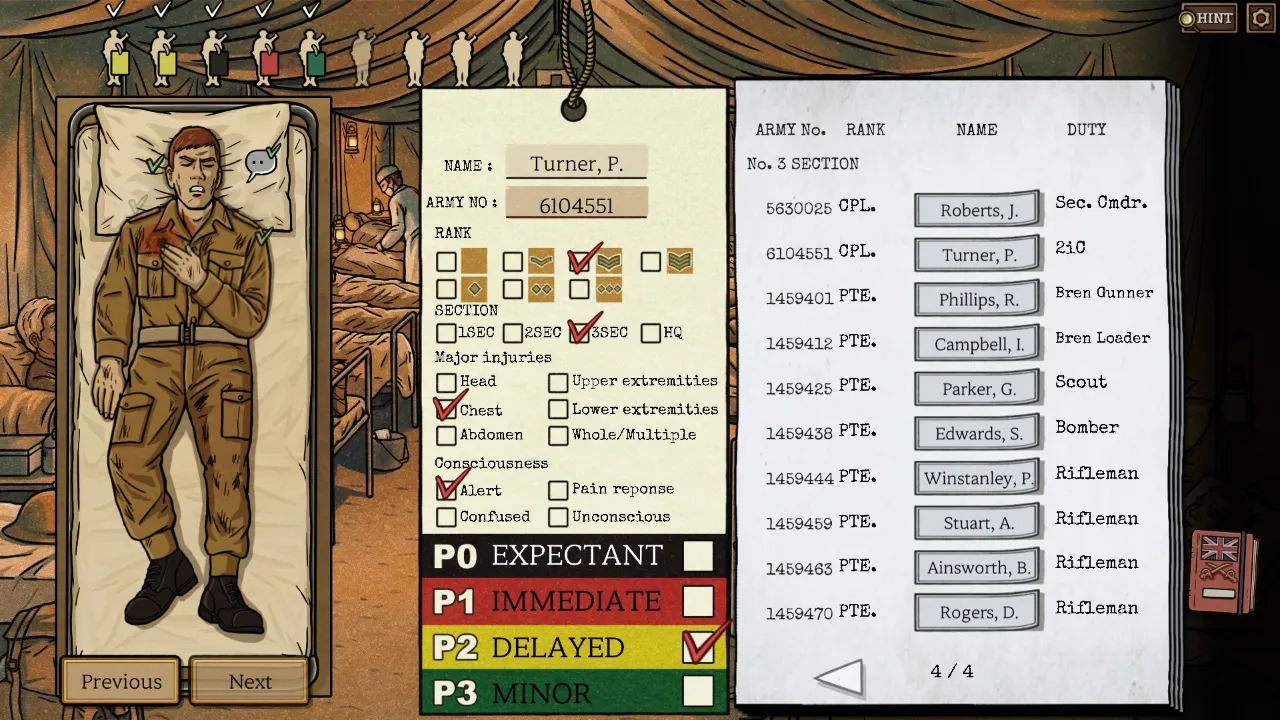
Patient 7
- No matter how much someone threatens us, we stick to the triage rules
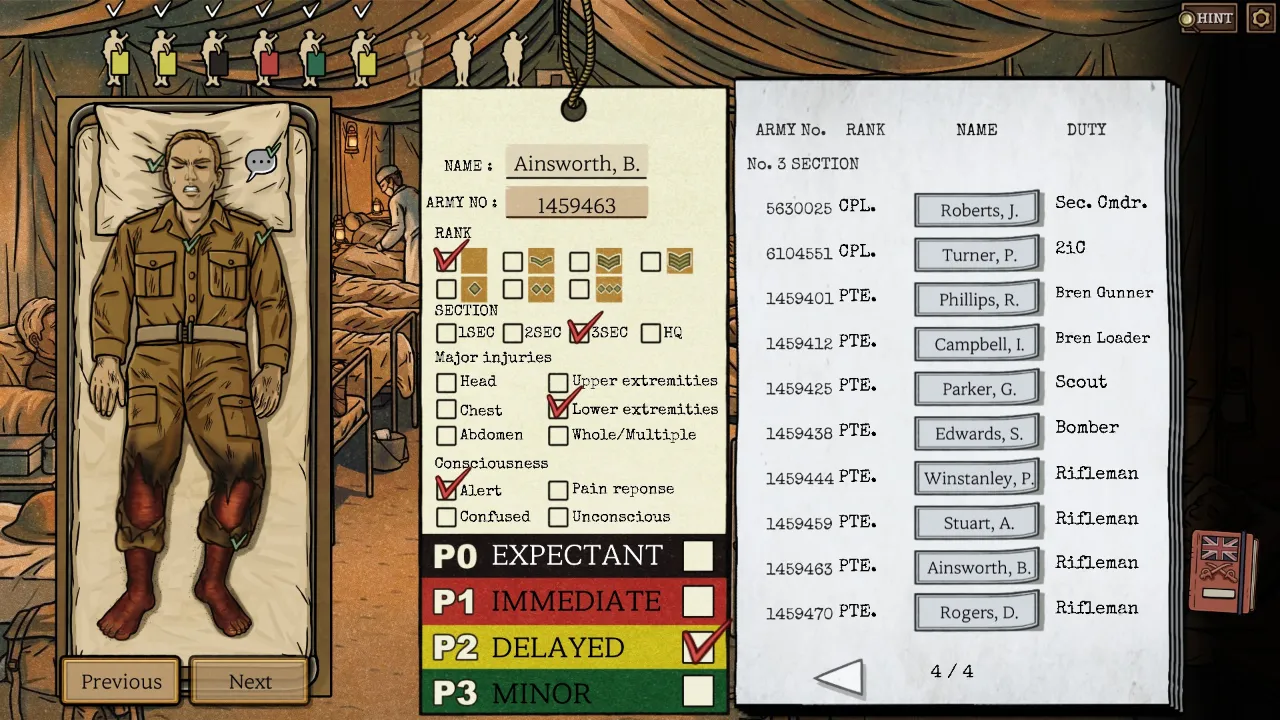
Patient 8
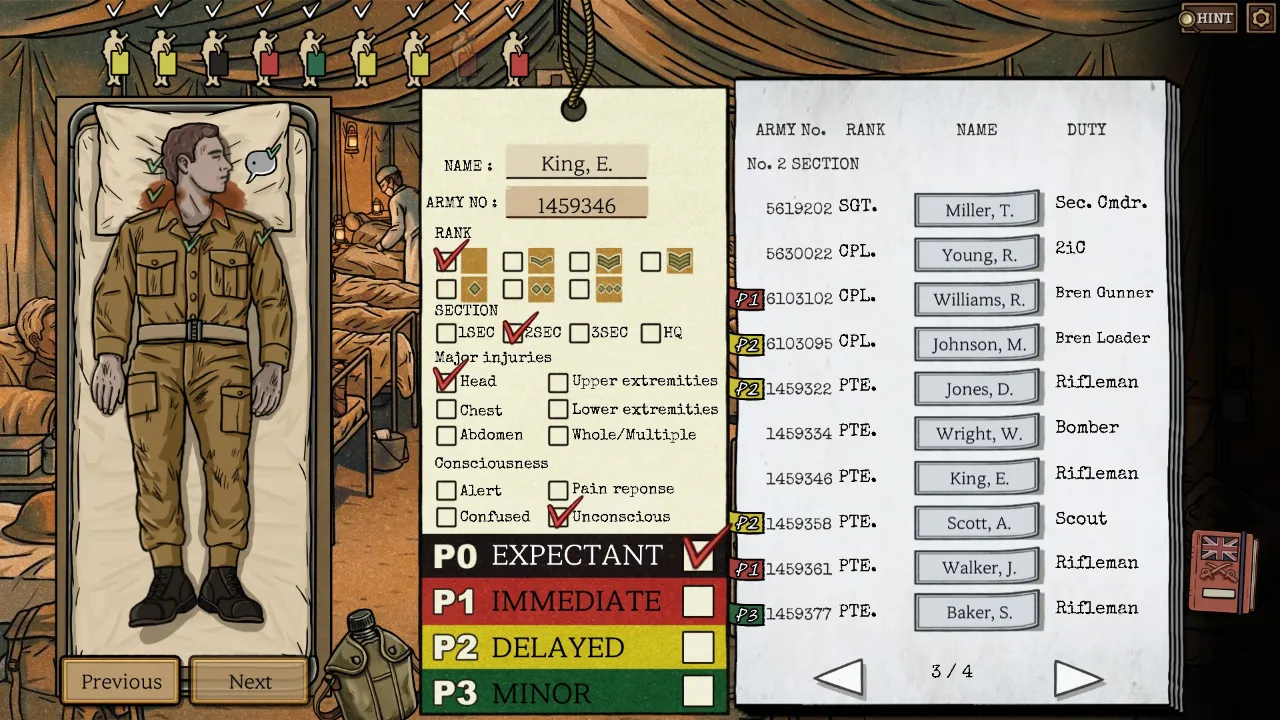
- We’ll treat a neck wound as a head wound
- Last name contains “In”. Process of elimination is key
- It’s either King or Winstanley. What could rule one out?
- The spacing of the “In” makes it look like his name is short. Would Winstanley fit on that tag?
Patient 9
- Got shot through, shivering and soaking wet
- Didn’t one of the other soldiers mention someone taking a bullet and falling into the river?
Casualty Report 3
- Fill in all tags from today. They must total 9
- People from the last two days are gray out
Finally, Sophia asks us to select two patients from the list.
Patient Selections
First, we need to choose a patient who is alive, on PO status, and has healthy skin for grafting.
Answer: Harris (the rest of the PO are dead or fully burned).
Second, we need another set of hands. Sophia suggests the one whose leg she operated on yesterday.
Answer: John Walker, from the leg surgery yesterday.
Episode 4 – a Breathless Death [1/2]
We don’t change scenes point-and-click style; we switch using the button in the lower right.
Words
Scene 1, Bedroom
Notice the old woman’s cyanotic fingertips
- Newspaper: Cigarette Holder, Hot Tea, Teaspoon
- Doctor: Penlight, Pocket Knife
- Nurse
- Dialogue: Hampton
- Inventory: Bandage, Thermometer
- How To Survive 3rd Floor: Violet, Nurse, Margaret, Pembroke, Lavina, Templeton, Elenor, Ainsworth, Artist
- Nursing Notes: Aspirin, Gipson, Morphine, Morris, Green, Tafenol, Jones
- Dog Food Bowl: Chester
- Syringe: Syringe
- Palette Knife: Palette Knife
- Corkscrew: Corkscrew
- Shot Glass: Stirring Rod
- Brandy: Brandy
Scene 2, Hallway
- Lady: Barker
- Fallen Man: Playing Cards, Wilfred, Stanley, Keys
Scene 3, Medical Book
- Hypovolemic, Cardiogenic, Distributive, Obstructive, Asphyxia, Suffocation, Strangulation, Smothering, Choking, Hanging, Ligature, Manual, Anaphylaxis, Epinephrine, Tracheostomy, Thyroid, Cricoid, Tracheal, Cricothyrotomy
Form 1 – Names
- The current nursing notes aren’t signed since the shift was interrupted. How else can we identify the current nurse?
- It can be inferred from context clues, but the briefing mentioned we were here for the death of Elenor Ainsworth. She’s the woman in poor condition.
- All the nurses have pretty distinct handwriting, don’t they?
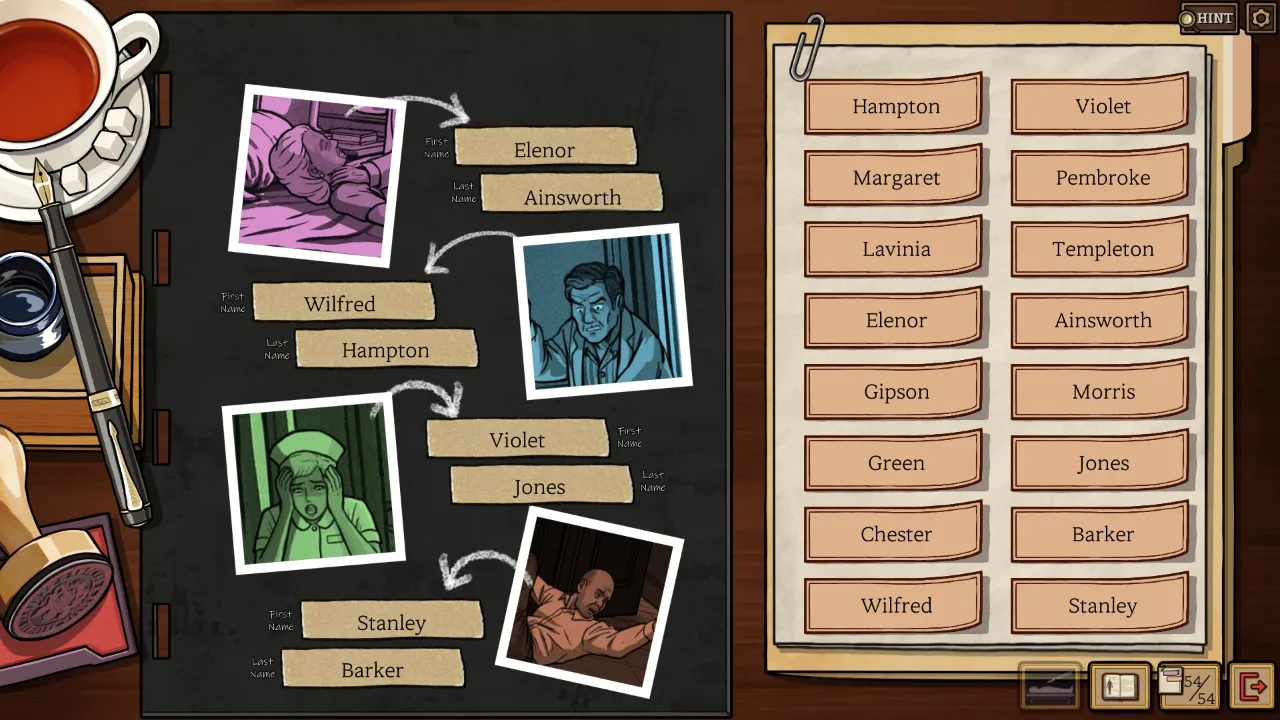
Witness Statements
- Our next forms are the witness statements from the doctor and nurse.
- Remember, the scene shown to us is before the doctor opened her throat, so several actions, like placing the tube-like object, haven’t happened yet.
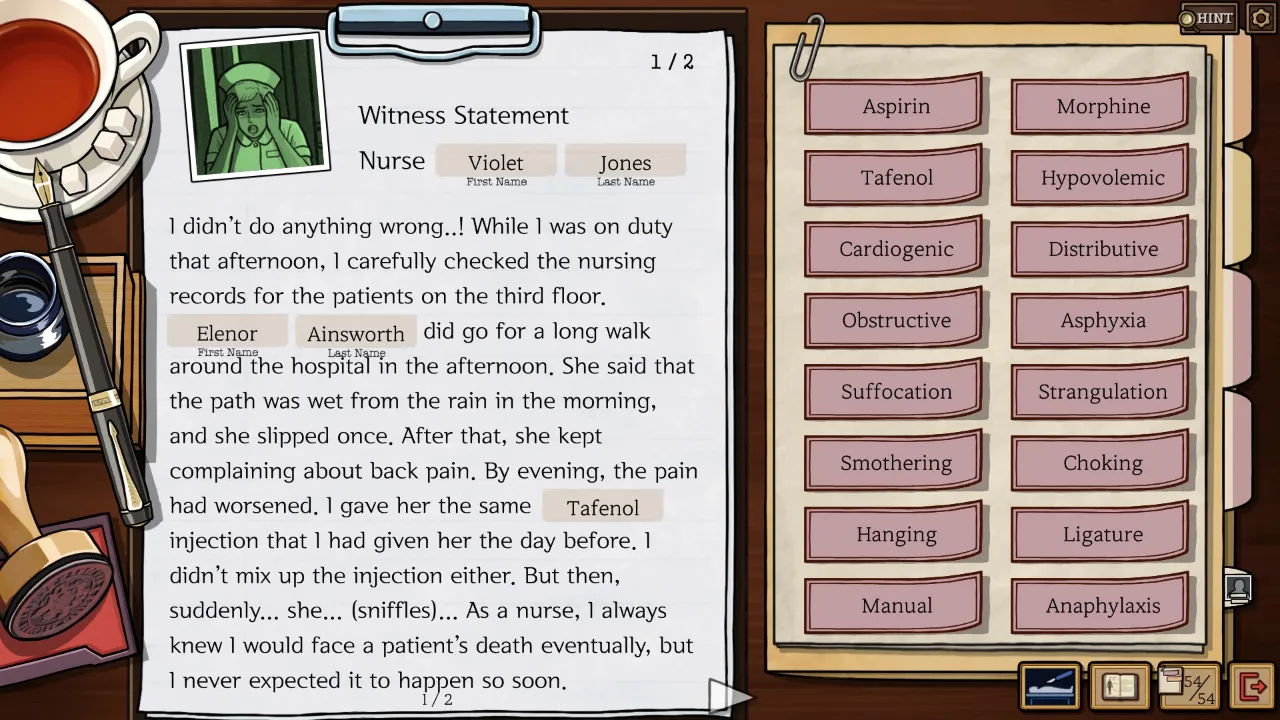
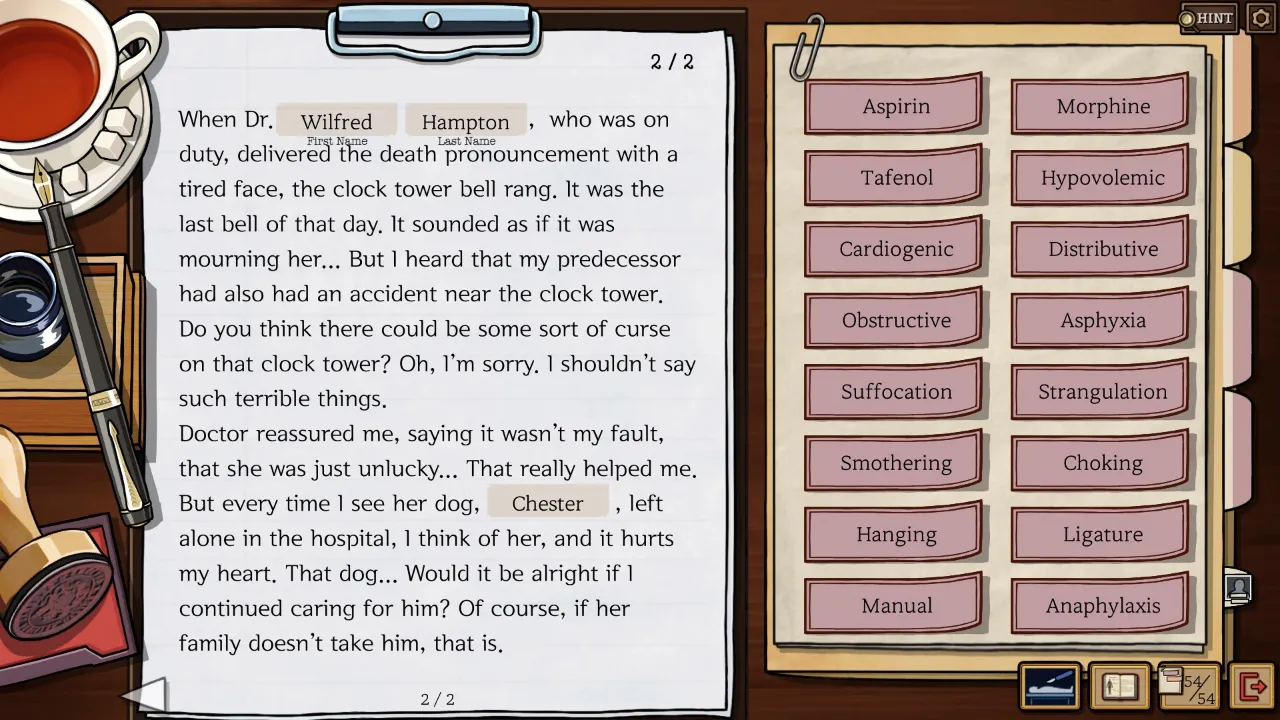
- The nurse’s statement is all about reading comprehension. You know everyone involved by name. The medicine and dog are easily accessible.
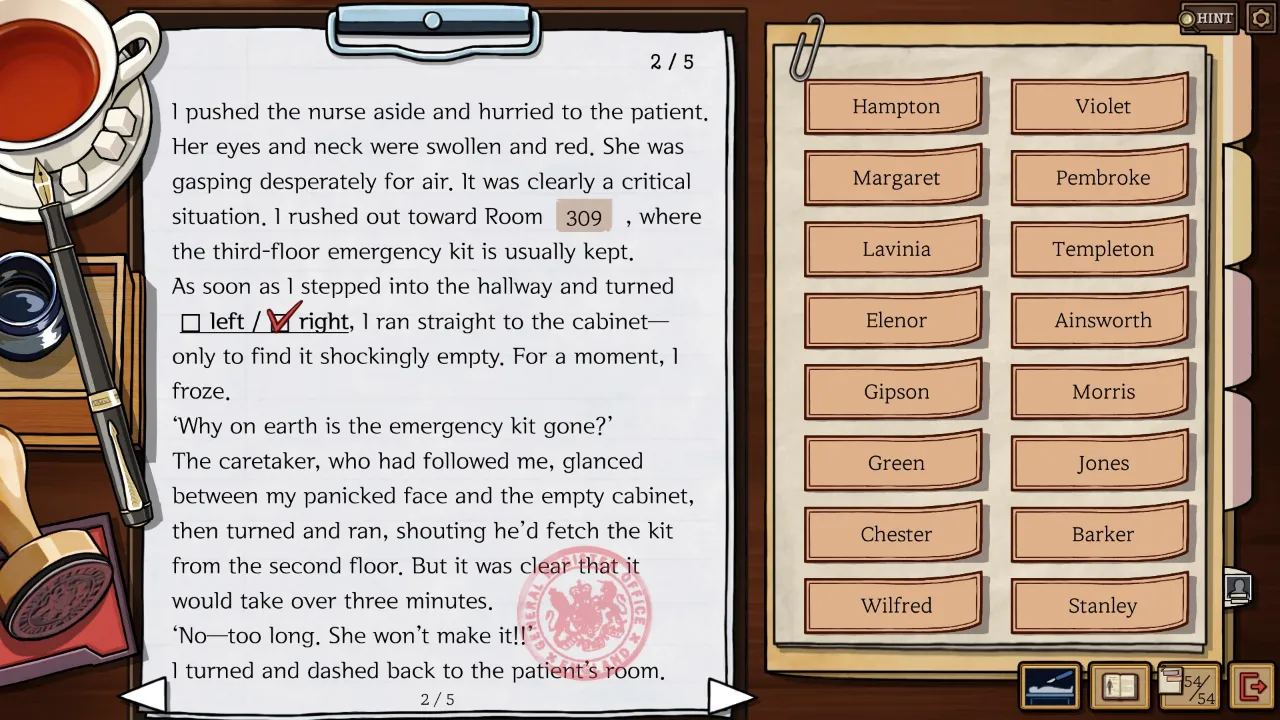
- The doctor has several trickier pieces. The victim’s room number and the overall layout of the floor can be confusing. Do we have a map?
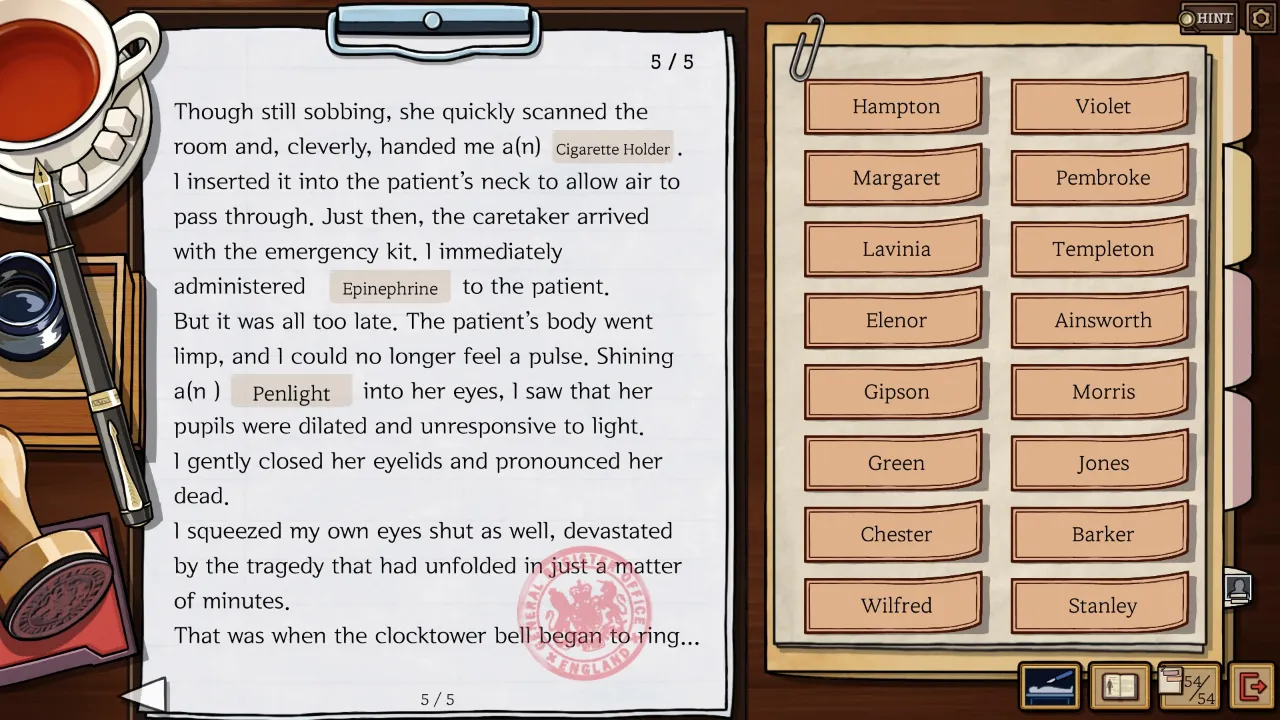
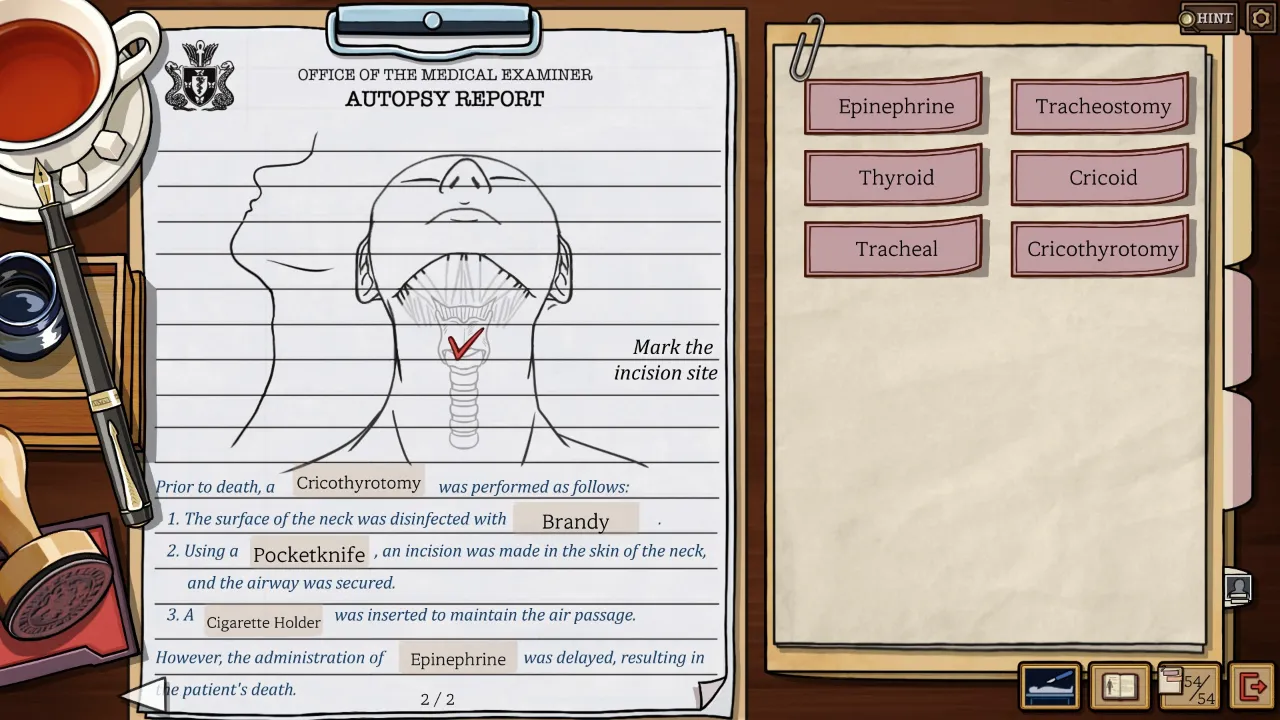
- He explains the medical procedure he performed. Most of it requires the medical book and the pathologist’s findings. Many of them are figuring out what they used as they went along. They used a sharp object from his pocket, something to disinfect, and a tube-like object.
- Disinfectants are typically alcohol-based.
- The tube-like object must be dull or it would cut her. It needs to be long and thin, so it’s not the spoons. What does that leave? Think of something shaped like a pen or pencil.
- The doctor’s statement also mentions going for the first aid kit. It asks what room it’s in, but it means the room it’s outside of. The way he turned to get it is based on where the victim’s room is.
- Let’s focus on the room issue. The map in the hallway shows the location of fire extinguishers, a first aid kit, stairs, restrooms, and room layouts. Each room type has two copies, differentiated by windows, how the door opens, size, and bed position. Only one room matches its layout on the map.
- The map, like in Episode 1, is not oriented the same way as the room. If you turn your head 90 degrees or flip a photo, it’ll line up perfectly.
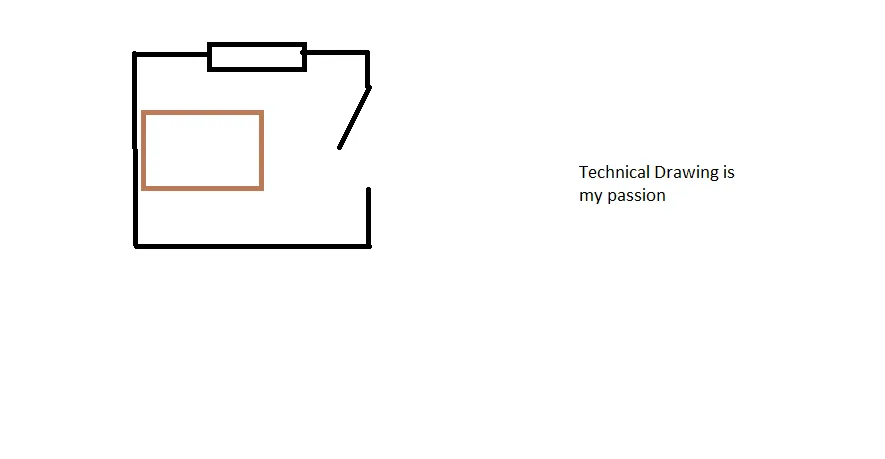
- If you’re having trouble, grab some scratch paper or open MSPaint and sketch the layout of the victim’s room. Don’t focus on the bed: just make sure the door and windows are on the correct walls, and it’ll fall into place.
- The most important detail is how the door opens. The door hinge is on the same side as the window, which narrows it down to just a couple of rooms.
- Honestly, I sketched the victim’s room myself.
Doctor’s Statement


Nurse’s Statement
Episode 4 – a Breathless Death [2/2]
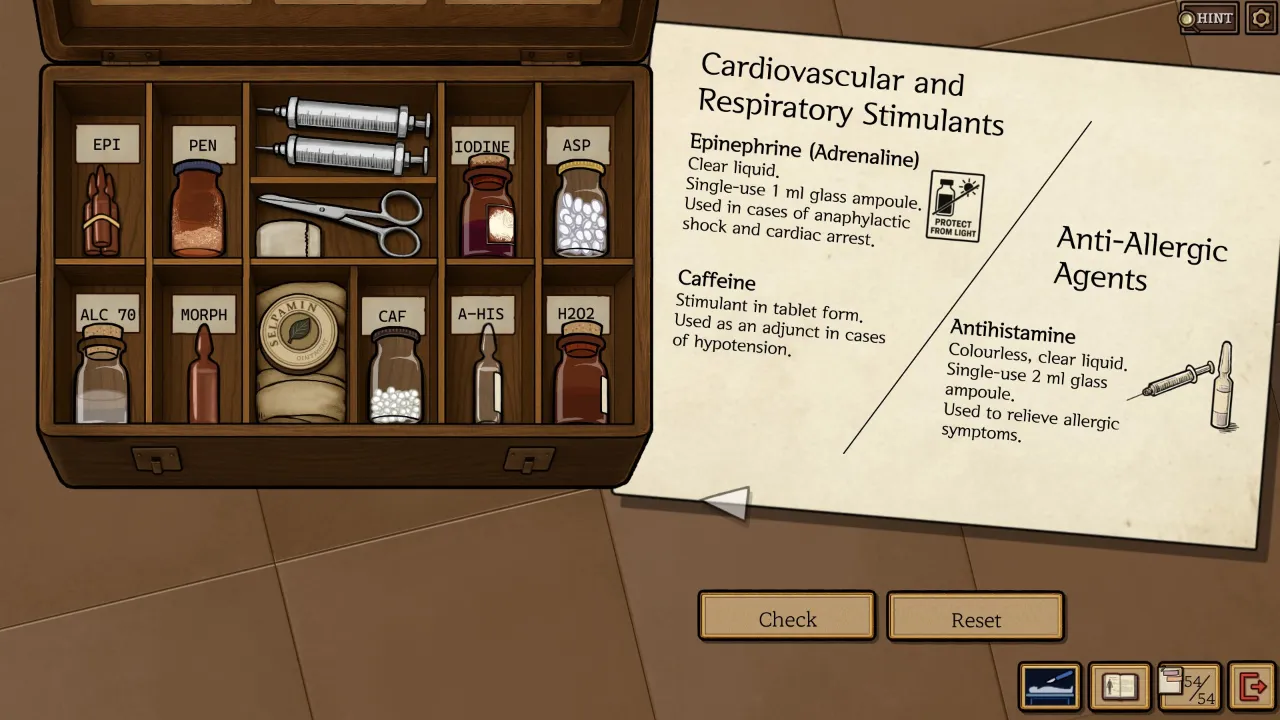
Medicine Sorting Puzzle
- Baker won’t give a statement until we organize the first aid kit. The rules outline their storage.
- Anything photosensitive is stored in a brown bottle.
- All antiseptics are in multiuse bottles.
- Penicillin is the only powder.
- Some ampoules are 1 ml and some are 2 ml. The containers aren’t labeled, so just estimate the size.
- Caffeine and aspirin are both white tablets, but caffeine is 100 mg (according to the newspaper) and aspirin is 300 mg, making aspirin noticeably larger.
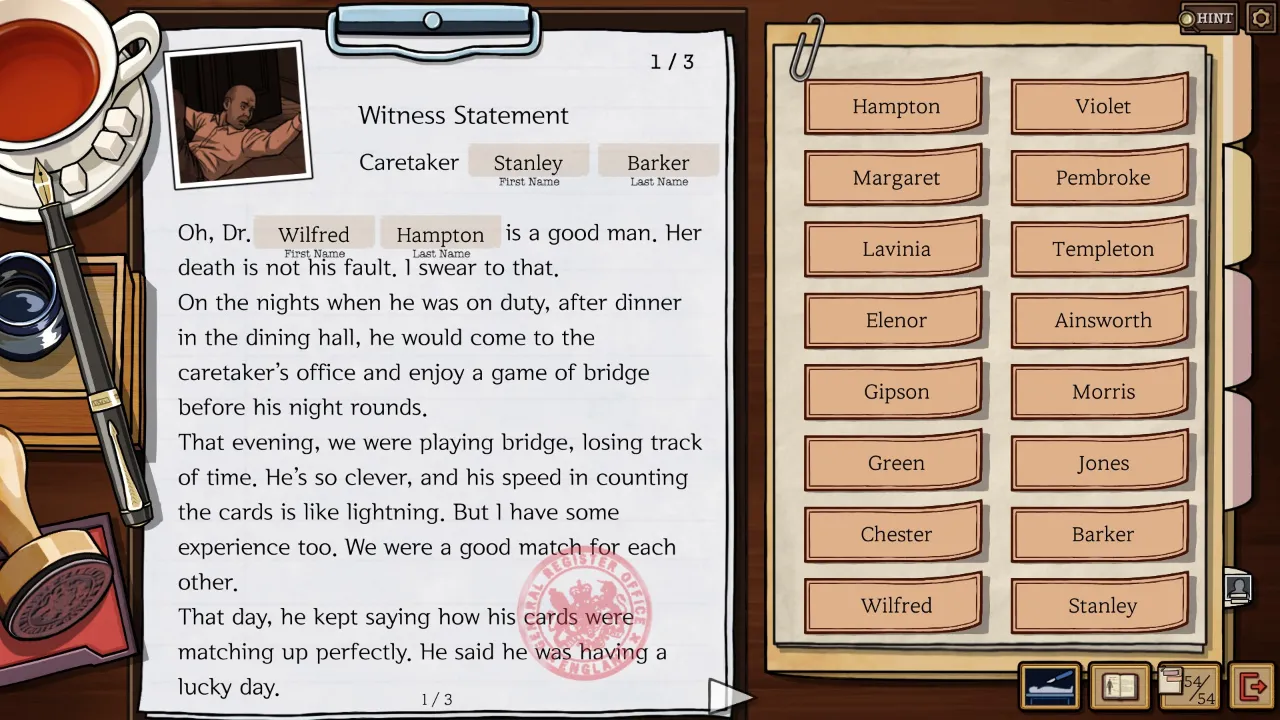
Caretaker’s Statement
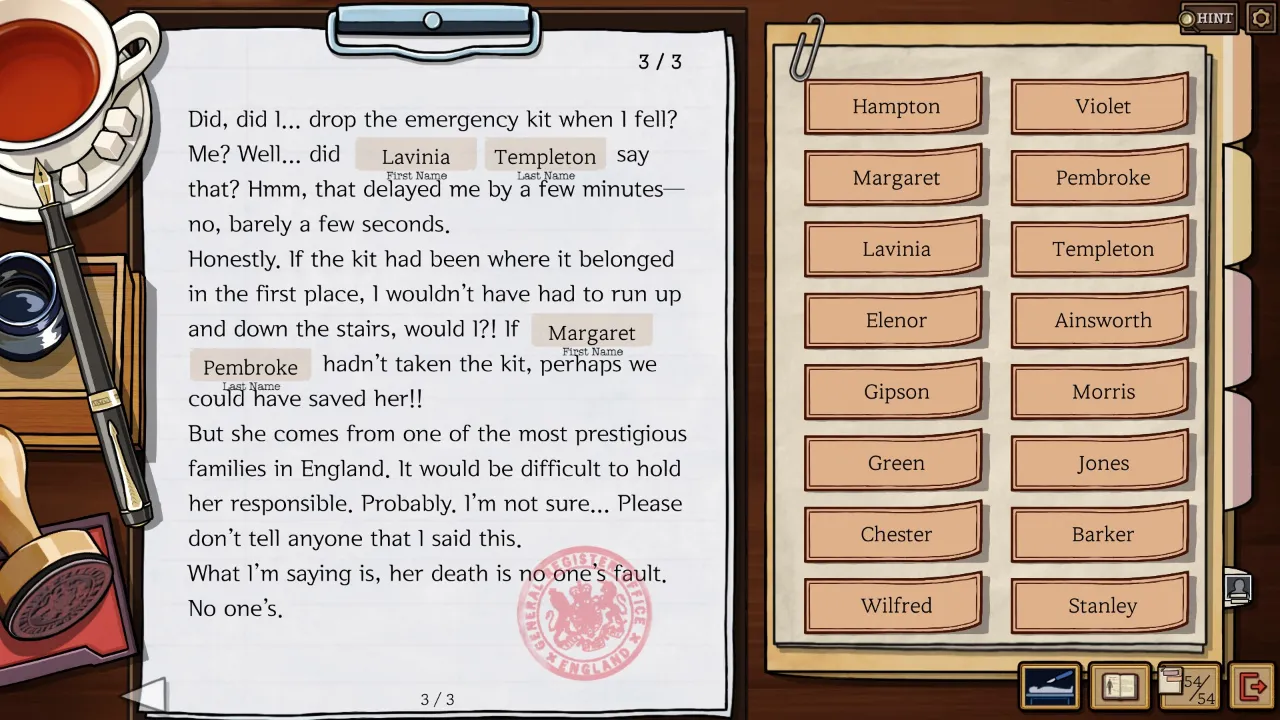
- Now we have context for the second flashback: the patient with the cat saw him drop the kit.
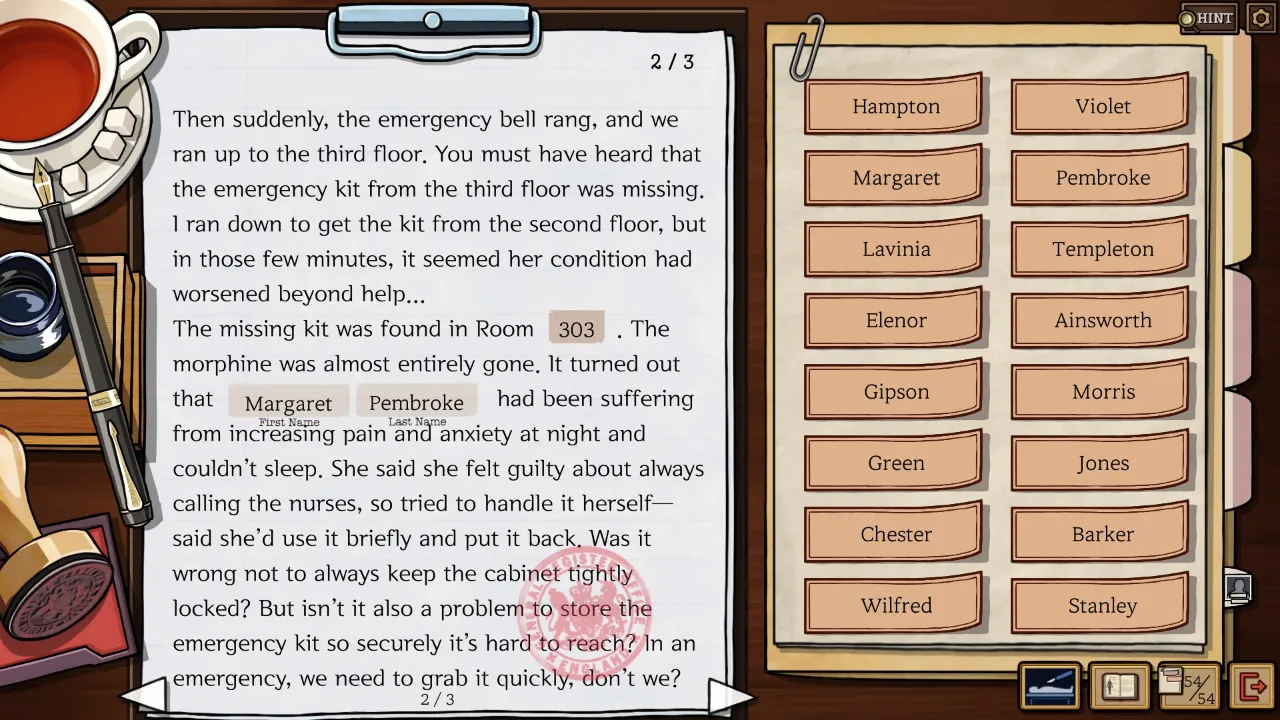
- There are a couple loose ends you might have caught: the other patients mentioned in the survival guide. A lady with a cat watched him fall, and a woman with some sort of anxiety issue that bothered the nurses stole the kit and kept it in her room.
- The neurotic who couldn’t sleep was next to a specific spot, and only one room matches that description.
Death Certificate
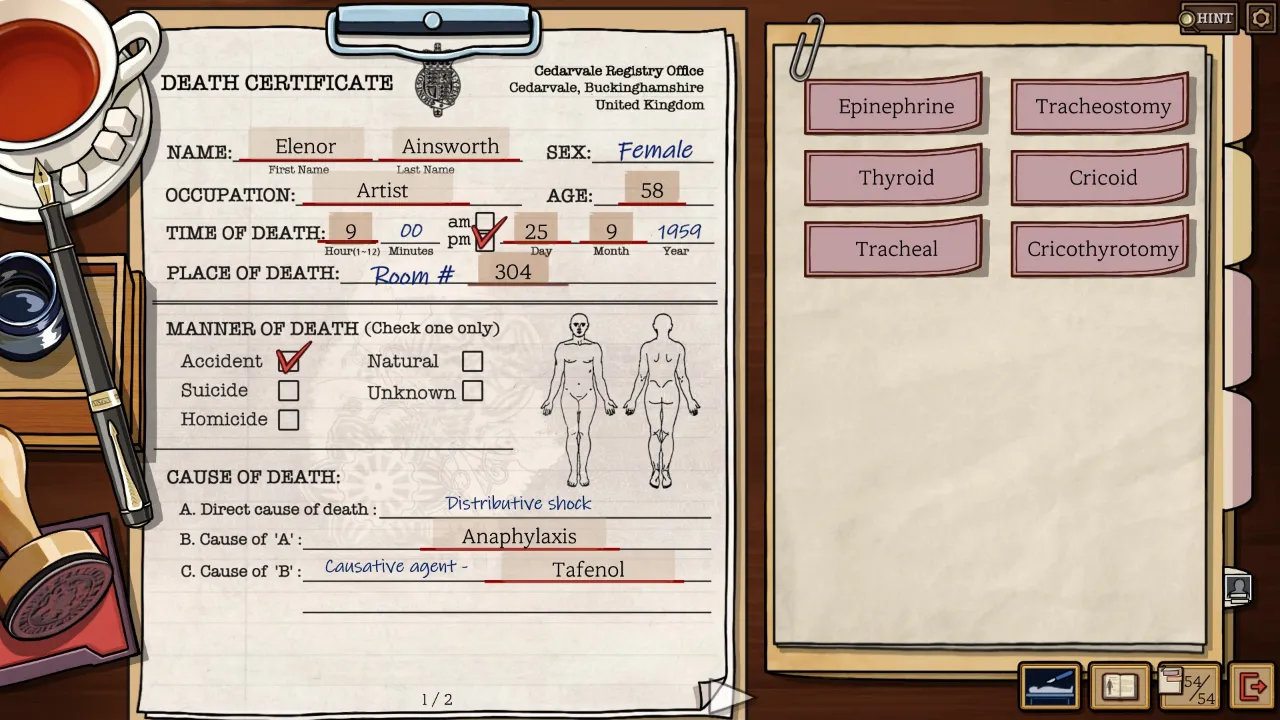
- The first page contains her information and cause of death. The second page is for the emergency procedure. You’ve answered most of that in the doctor’s statement. Just make sure to note the incision location.
- She had an allergic reaction to something. We can rule out pets (she owns a dog and attended a pet event). Food seems unlikely, as a nursing home wouldn’t serve known allergens. Was something new introduced?
- A fatal allergic reaction is more of an accident than a natural cause. Essentially, something unknowingly poisoned her.
- The nursing notes aren’t complete since they were interrupted by the death. Check the nurse’s statement for more context. Other than that, they’re pretty thorough and clearly dated.
- The witnesses claimed the victim passed away at the last chime.
- We don’t have Elenor’s age or birth year… but we do know the year of her first exhibition from the newspaper. What can we combine that with for her age?
- The pathologist states he’s allergic to shrimp. He didn’t react much the first time, but by the second time, it became severe. Did she have a slight reaction to something recently?
- The newspaper notes she had her first exhibition in 1927. Her autobiography states she was 26 at that time. What year did she pass away?
Episode 5 – the Heirs [1/2]
Today’s scenes unfold over three time slots. We have the funeral service, followed by two new segments that have both indoor and outdoor sections.
Words
Scene 1, Funeral Service
- No words
Scene 2, Foyer, Time Slot 2
- The Will: Wexley, Marlowe, Solicitors, Ainsworth
- Funeral Attendees List: Clara, Oswald, George, Reginald, Harry
Scene 3, Garden, Time Slot 2
- No words
Scene 4, Foyer, Time Slot 3
- Goatee Man, Pawn Ticket: Pawnbroker, Pritchard
- Glasses Man: Accountant
- Necklace Woman, Letter: Florence, Beryl, Painted
Scene 5, Garden, Time Slot 3
- Pompadour Boy Drawing: Ernest
- Sad Boy’s Drawing: Thomas
Scene 6, Medical Book
- Condylar, Coronoid, Ramus, Angle, Body, Symphysis, Complete, Incomplete, Simple, Complex, Intrusion, Extrusion, Fracture, Avulsion
Names
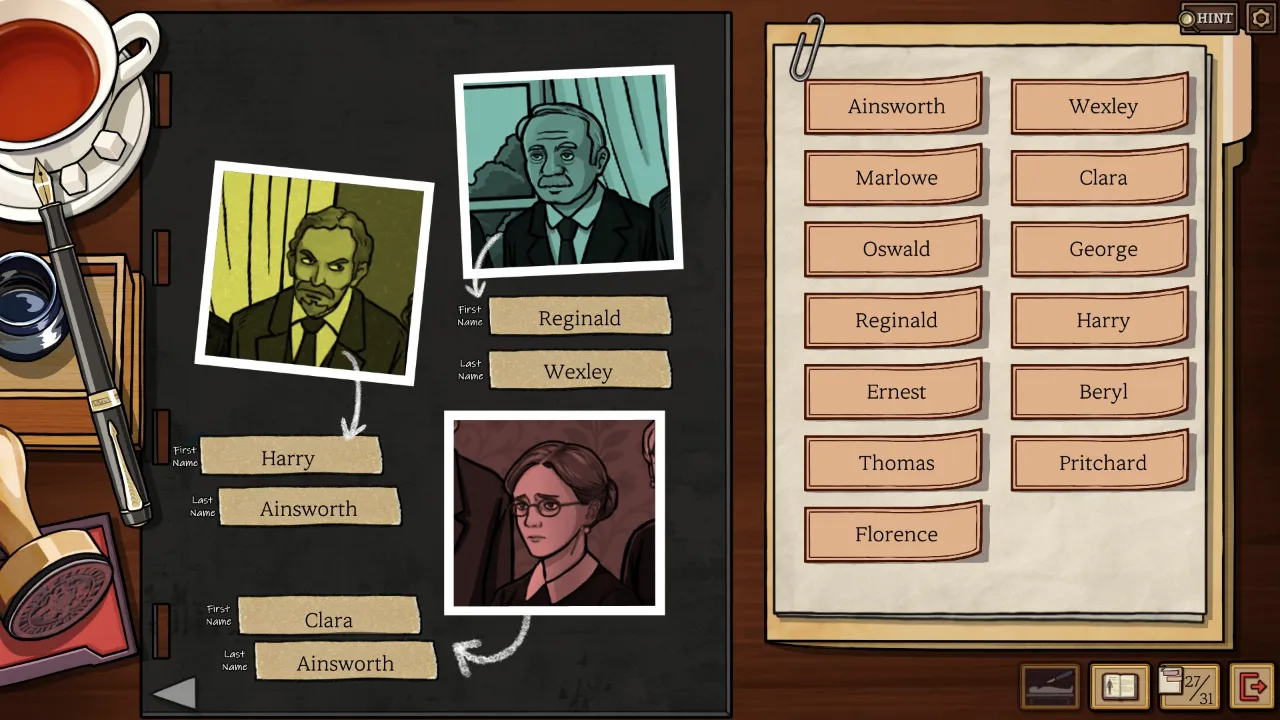
- The funeral attendee list includes four people with an A last name (presumably Ainsworth) and one with a W last name. It mentions Clara brought two children and George came with an adult and a child as guests.
- The next step in the puzzle is making a family tree. Think about it now: who’s married to whom and how many kids do they have?
- The priest, janitor, blonde clerk, nurse, and Sophia Fleming don’t matter—they’re all part of the Fleming staff. But the lawyer appears to be a funeral guest.
- Ignoring the lawyer, all three men are likely Elenor’s biological sons. The trick here is the women: both have children, but only one is in the guest book. The other must have been a plus one.
- There are three kids who signed their drawings, and we know their names. The guest book suggests two are Clara’s and one belongs to George.
- A few guests arrived the night before the funeral and stayed overnight. Does anyone mention that in their dialogue?
- The brunette complains at the funeral that her violent older son takes after his father. It must be tough living with two devils.
- The children’s drawings are key to one part of the case: the guest book says Clara brought two kids. Which two are siblings?
- Florence is clearly identified by the letter on her, so why isn’t she in the attendee book? Who did she come with?

Family Tree
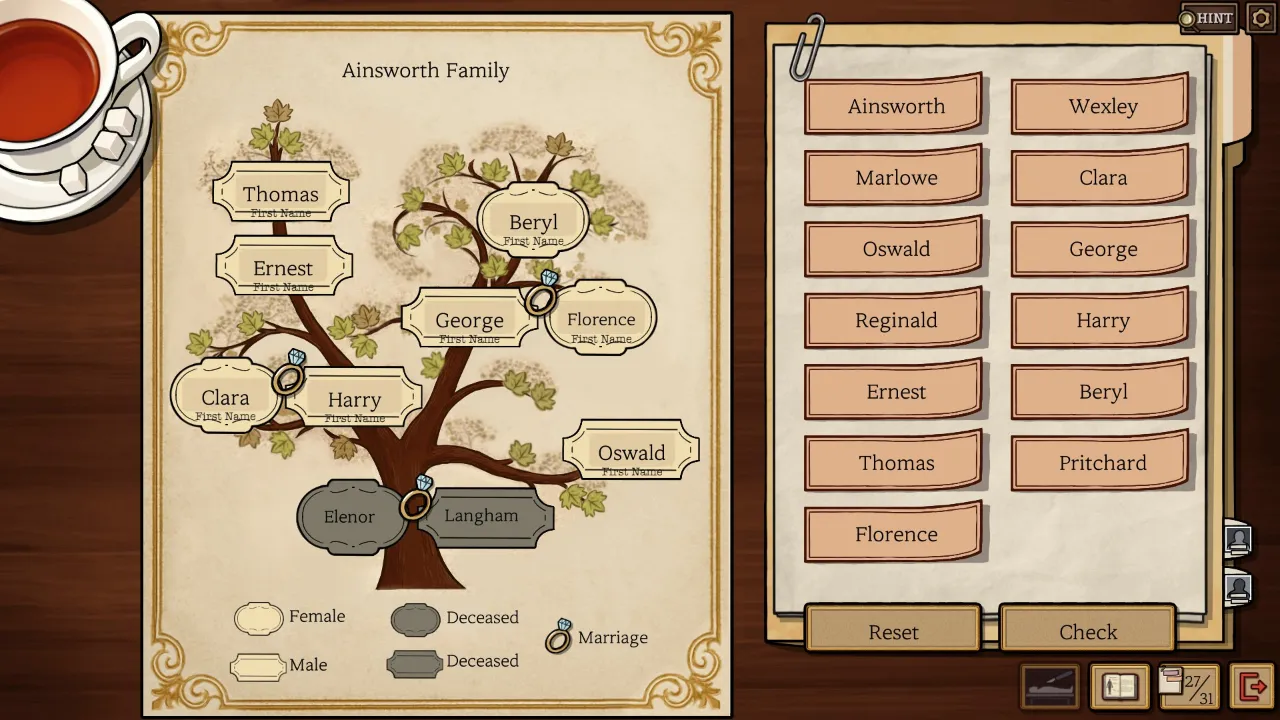
- If you’ve named everyone, you’ve mostly sorted this out.
- Circles represent women, rectangles represent men, and wedding rings indicate marriage.
- The left couple has two kids, the right couple has one, and the right male has no kids.
- The tricky one is figuring out which boy is the older one.
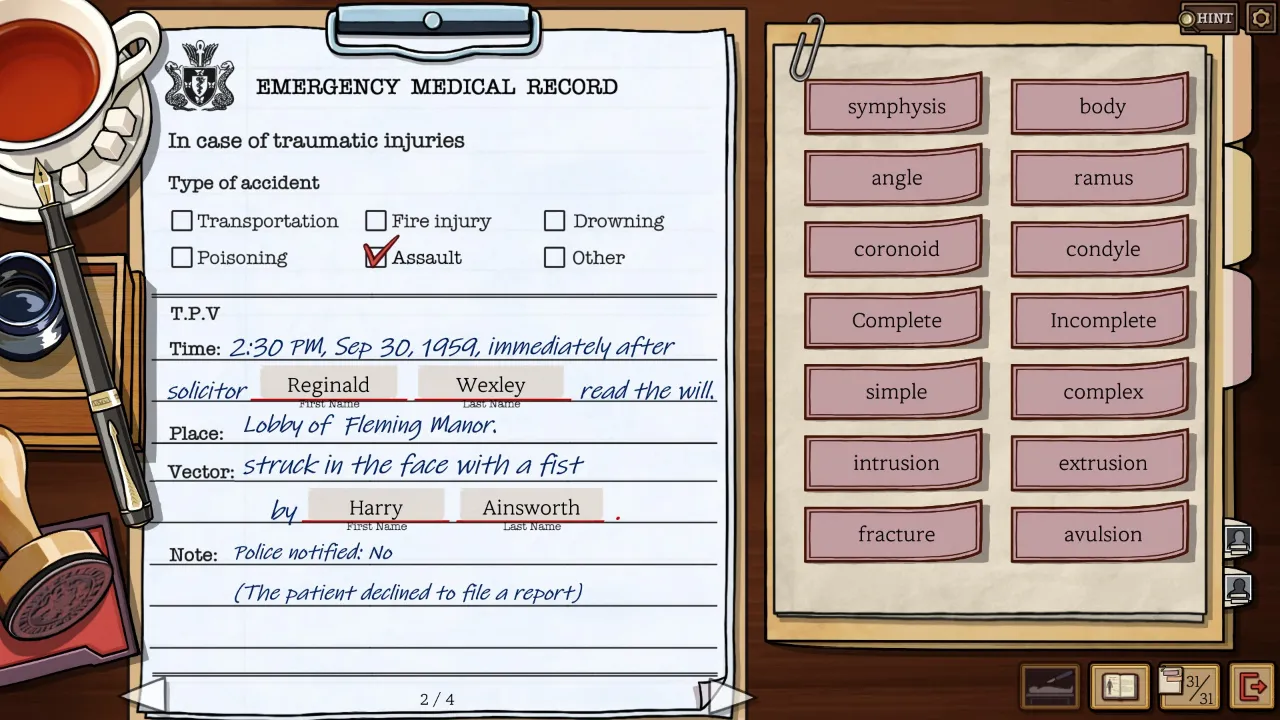
Emergency Medical Record
- Most of this is straightforward, but you’ll need to do some math for age. Is there anything with a year on it?
- The X-rays on pages 3 and 4 need to be interpreted using the medical book.
- Remember: the patient’s left is our right… but the X-ray and FDI numbering system are both based on facing them, so this won’t change our findings… except for the fracture, which is backwards from our perspective (this is why some folks drop out of med school).
- Just eyeballing the X-ray, there are three clear issues: the cracked mandible, missing front tooth, and the front tooth without a crown. The form requires specific medical terms for all three problems.
- There’s also an intrusion that’s not obvious unless you look closely: one tooth has been pushed in deeper than the others.
- The jaw fracture requires medical terminology. A complete fracture goes all the way through the bone, while incomplete is partial. A simple fracture is a single break, and a complex fracture involves multiple breaks. If you broke your arm and it snapped like a twig, that’s a complete, simple fracture of the radius and ulna. If you chipped a piece out of your femur, that’d be incomplete and complex.
- There’s a medical detail not mentioned: the third molar is the wisdom tooth, which is usually removed before adulthood because of the damage they can cause as they move. If you’re wondering why the book example shows 8 per quadrant and the X-ray has 7, that’s why.
- George’s business card shows he’s been practicing since 1948. How old is he?
- Florence’s letter indicates he started his career at 23. Combine this with his business card and the current year, and we get…

Episode 5 – the Heirs [2/2]
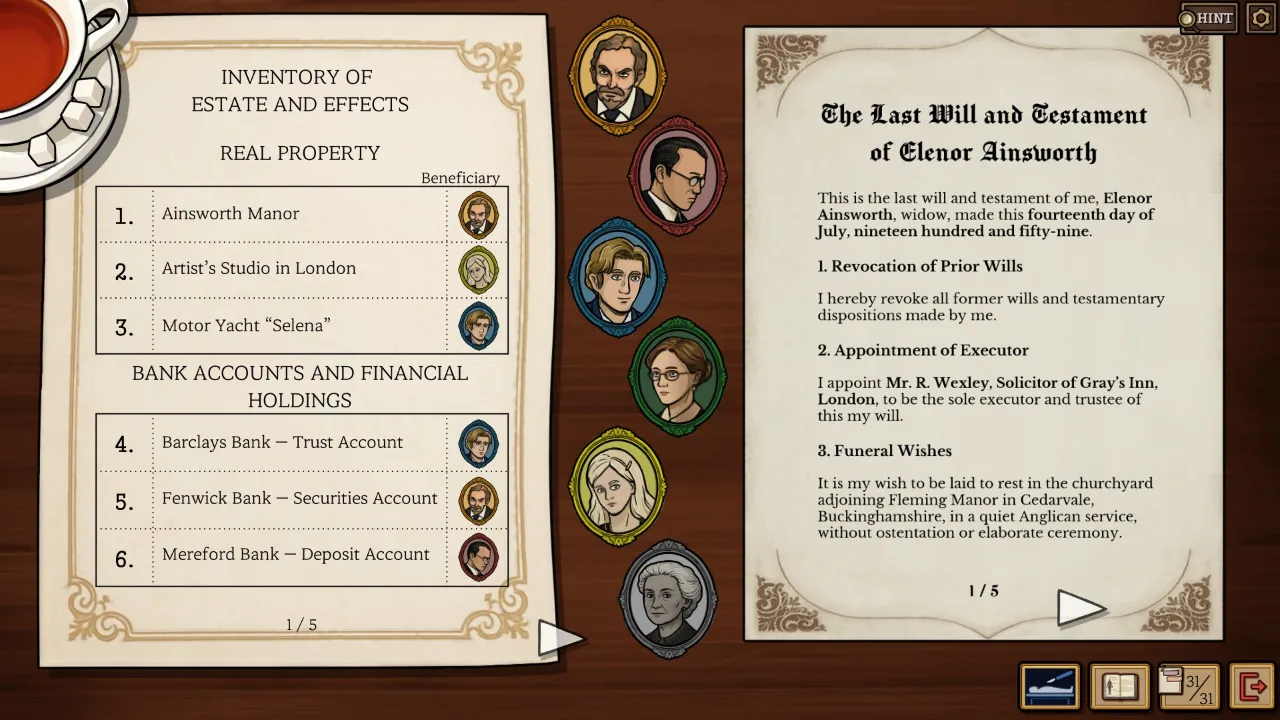
Inventory of Estate and Effect
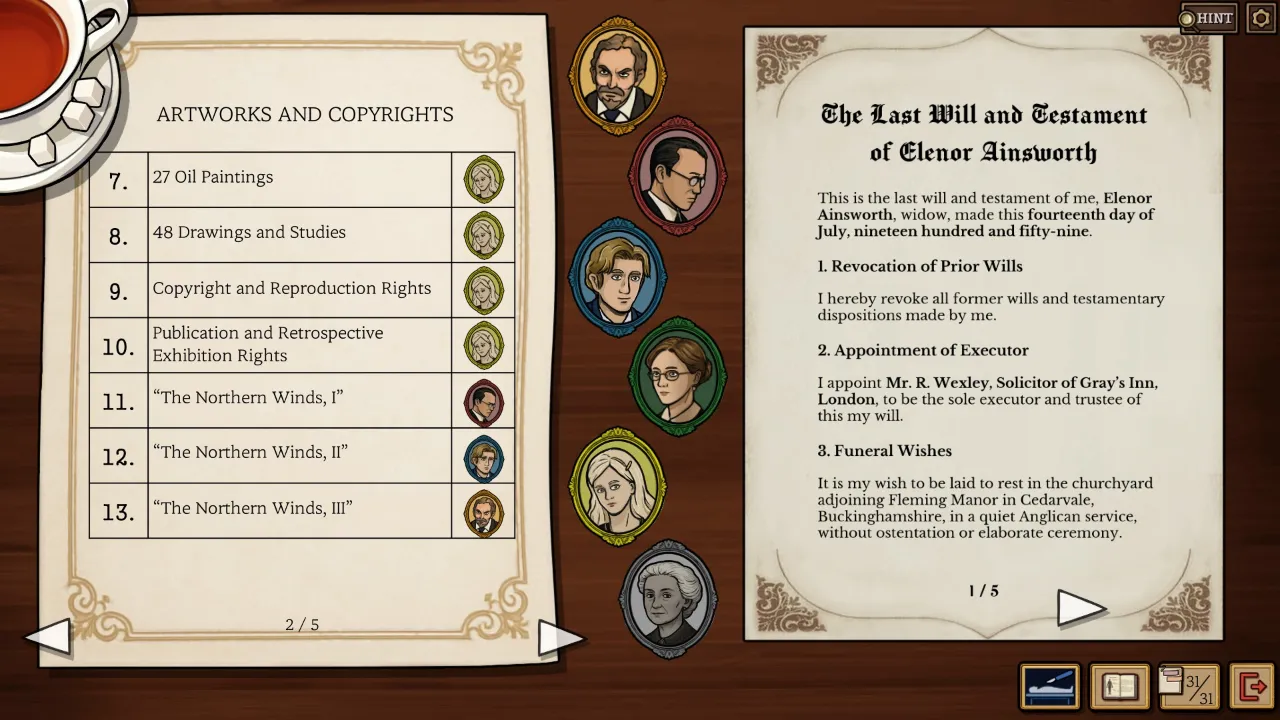
- Our goal is to distribute property to each family member according to the will. Pages 2 through 4 explain how everything is supposed to be divided up.
- On pages 2 and 3, the will is quite specific about who gets what, though the “freedom of the sea” bit is a bit abstract.
- For the married couples, keep an eye on which member gets the property.
- The one that’s a real riddle is the triptych. She describes the paintings as addressing the character flaws of each son, highlighting their dual nature. Think backwards.
- If Elenor is buried with something, it belongs to her.
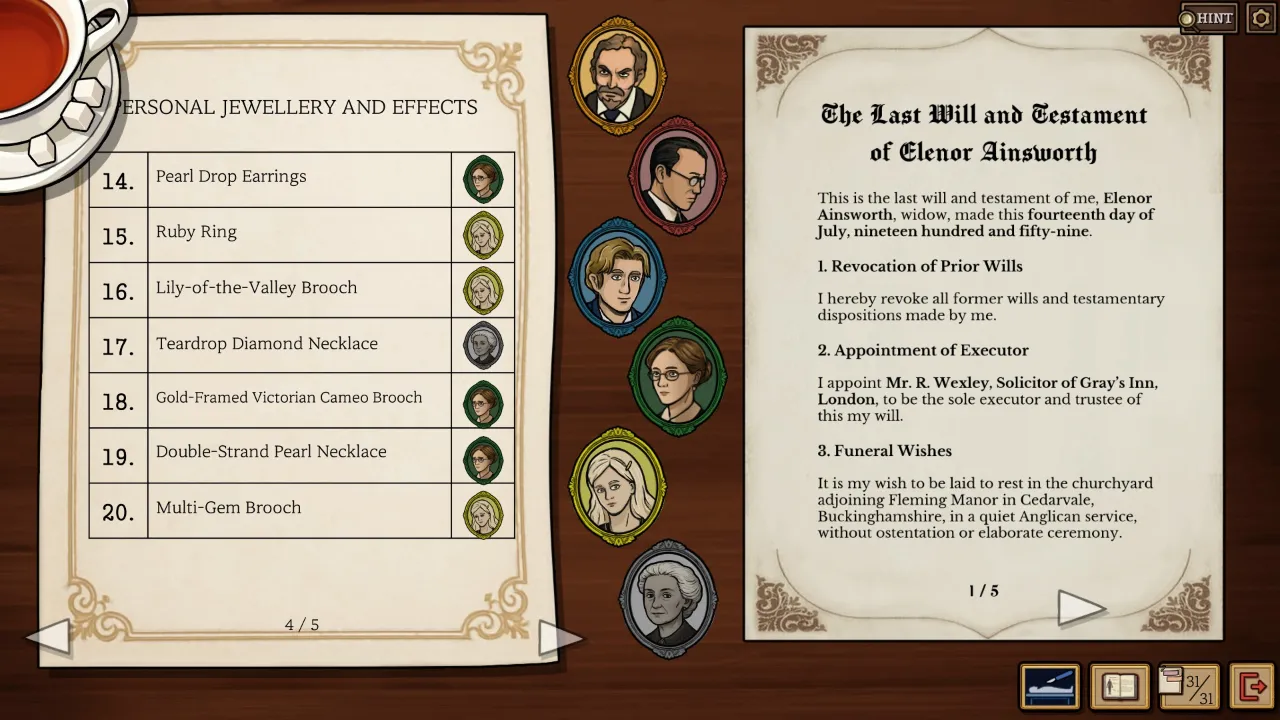
- Pages 4 and 5 of our answer sheet have the same info: descriptions and pictures of the jewels.
- The jewels are to be split among the wives based on their tastes (with one exception). Half of them are bright and colorful, while the others are more modest.
- Florence loves jewelry, but Clara doesn’t…
- …until you consider Harry’s pawn shop receipt—he’s been pawning their jewelry. Check the descriptions for what Clara likes.
- In Elenor’s view, Harry needs to control his temper (quick to anger), George should be more adventurous (sometimes hesitant), and Oswald needs to get married (as he has a wandering heart). What painting contrasts with these traits?
- You don’t need an art degree to interpret the triptych’s symbols. The hiker symbolizes exploration and taking chances, the house represents settling down, and the lake stands for calmness.
Children’s Drawings Analysis
- Let’s craft some psychological profiles of the kids so we know what to look for:
- Ernest is cruel, unempathetic, and follows in his violent father’s footsteps.
- Thomas appears to side with his abused (check the bruises on her arm) mother; he seems sad and withdrawn.
- Beryl appears the most well-adjusted, although that letter suggests Florence might be twisting the narrative of her natural talent. Her color choices are quite odd, though.
- We don’t know the kids’ ages, but George and Florence have been married for 11 years, so the kids are likely around that age. Keep that in mind for signs of maturity.
- If you’re colorblind, this case can be confusing. In Episode 2, the bricks and door of Fleming Manor are a deep red. The landscaping pots are orange. Beryl drawing them in a color similar to the green of the bushes is pretty strange for someone with typical color perception.

If you decide to reveal the findings, you know exactly what question George’s going to ask first. That letter from Florence makes it pretty clear she’s been involved with someone for a while.
Question: What is the chance for our daughter to have a color vision deficiency?
Answer: 0% (this question assumes George is Beryl’s father, which is impossible according to the medical book and Punnett square).
Episode 6 – the Unidentified [1/2]
This case kicks off with one body and a few words, then expands massively in scope as the first forms get filled out.
Words
Scene 1, Shed
Take note of the hair on the window ledge and the blood on the dagger.
- Corpse Leg, Tourniquet: Linen Strip
- Dagger: Dagger
Scene 2, Medical Book
- Hypovolemic, Cardiogenic, Distributive, Obstructive, Elapid, Viperid, Colubrid, Non-Venomous, Algor Mortis, Rigor Mortis, Entomology, Amputation, Avulsion, Stab, Penetrating, Abrasion, Laceration
Form 1 – Blood Test
There are two blood samples: the bloody dagger and the pathologist taking a sample from the chest.
It’s the same chart as Episode 1.
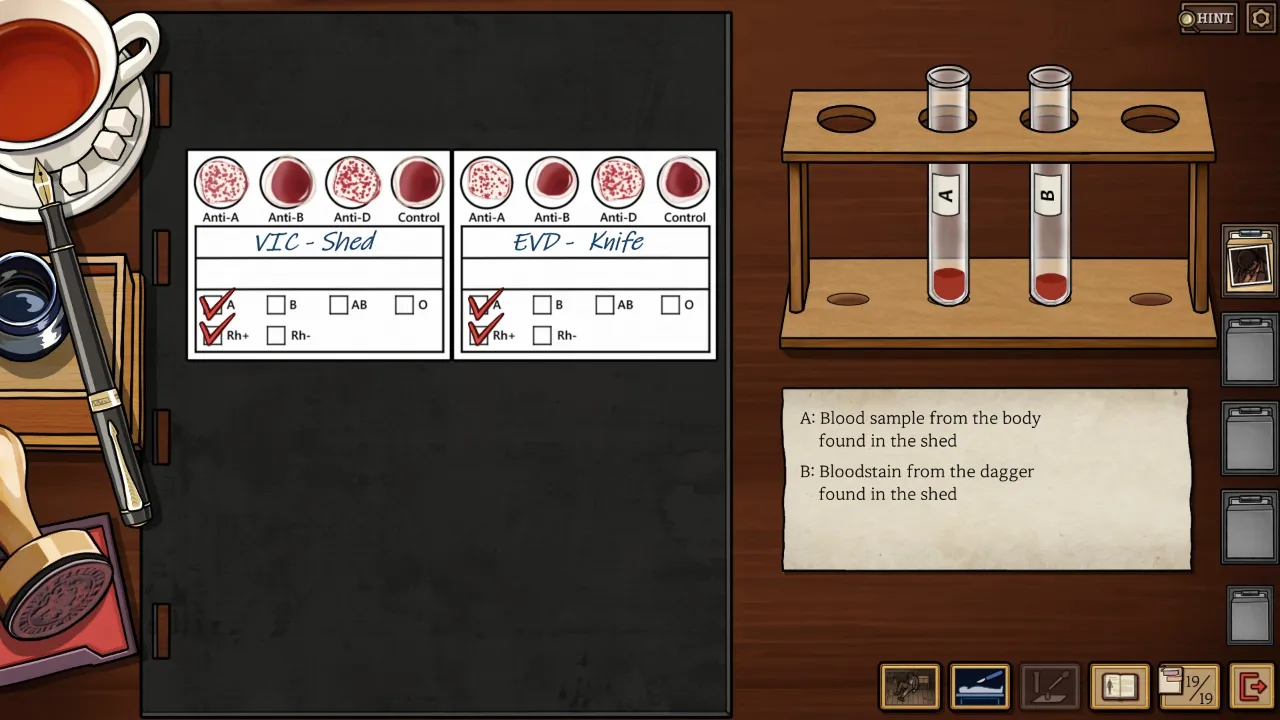
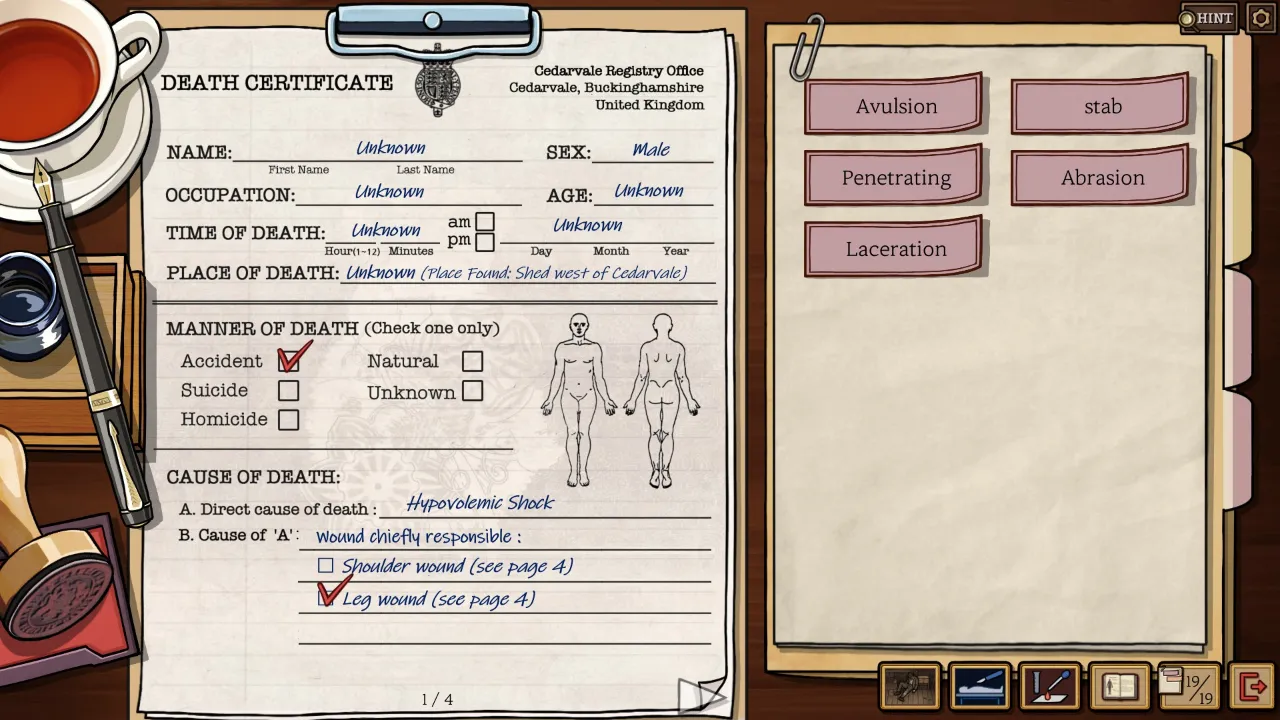
Form 2 – Death Certificate
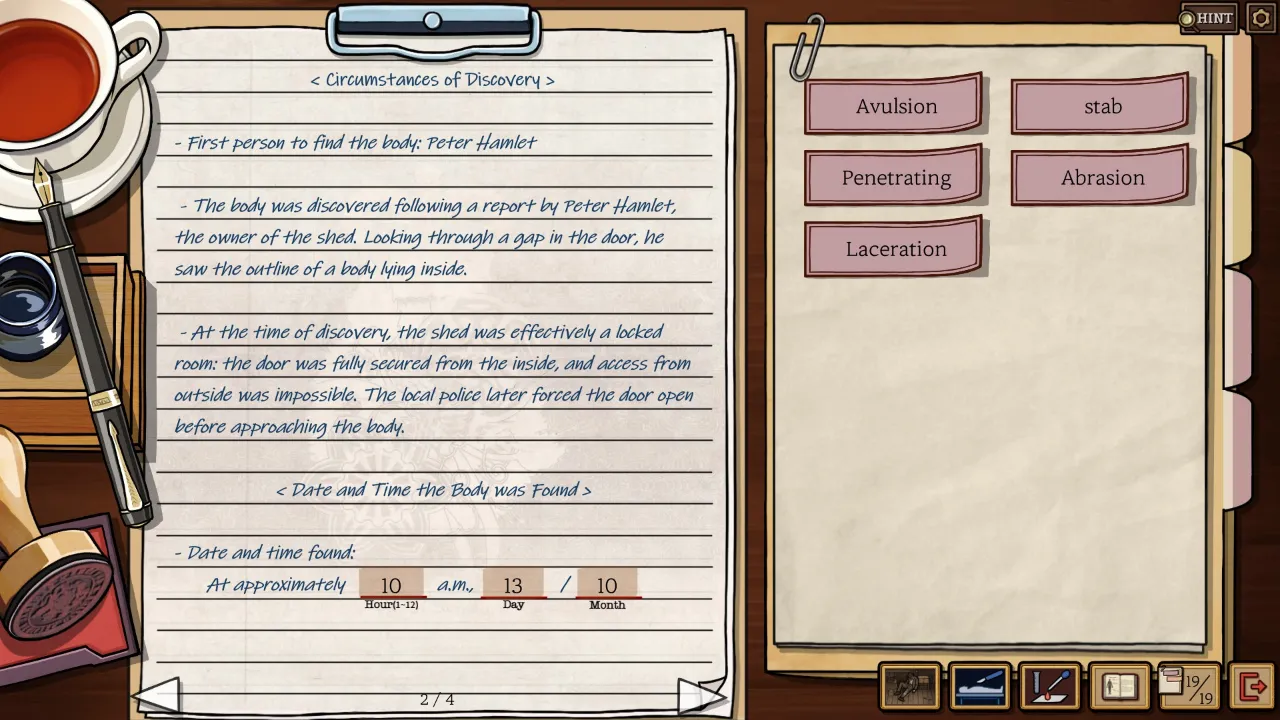
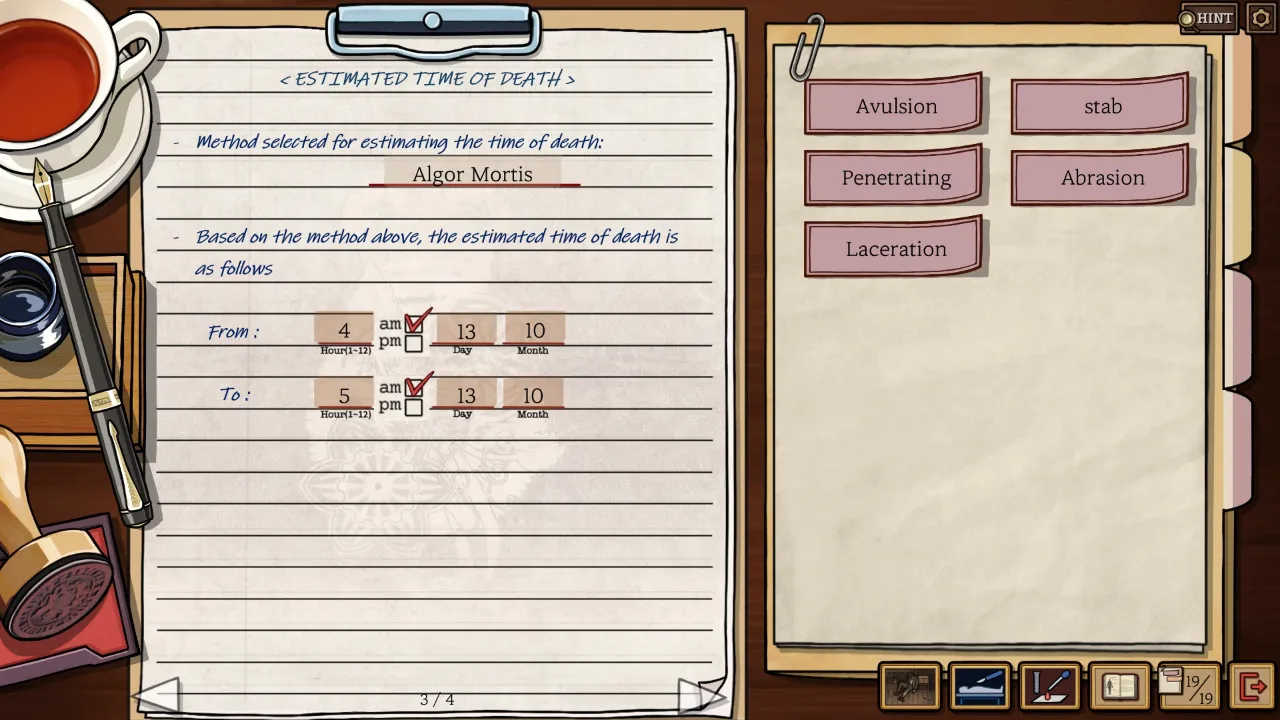
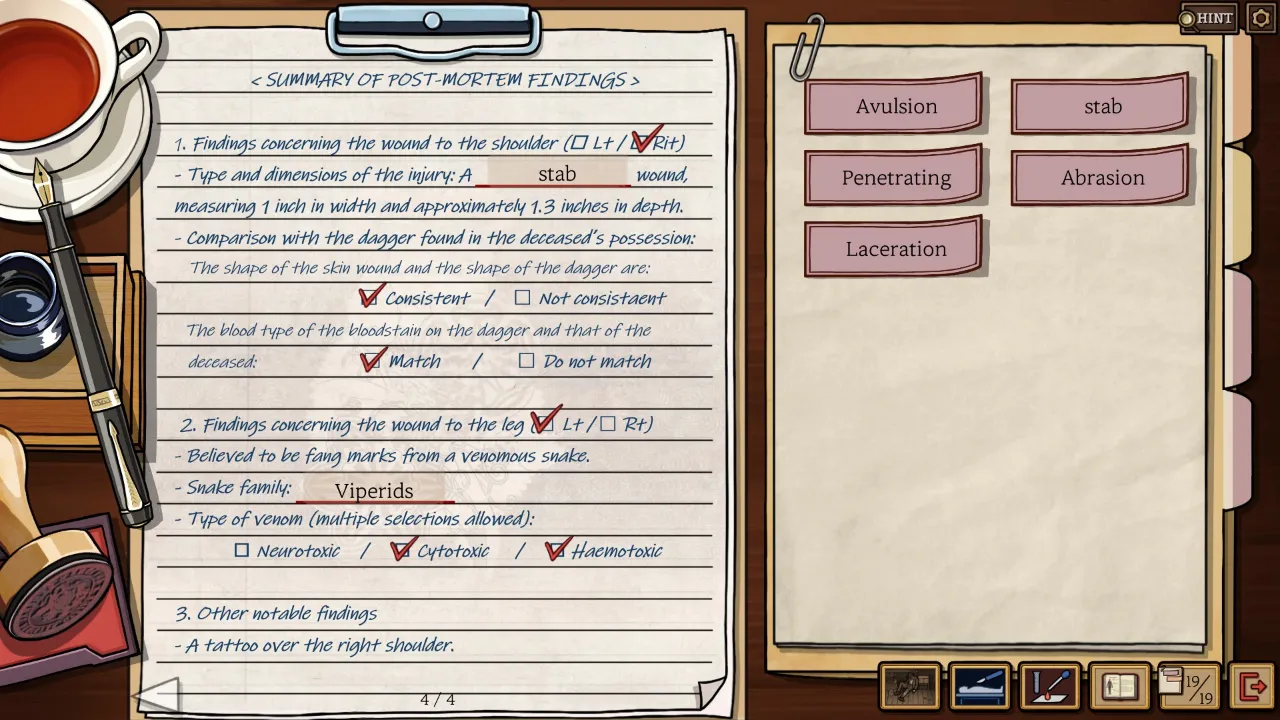
- For now, ignore identifying the victim. Focus on what killed them, when they were found, and our best guess for time of death.
- Today, most of the necessary info is with the pathologist. If you’re stuck, start there.
- The victim was found in a locked shed (the police had to break it down). The killer must have either found a way out or the victim died there alone.
- Hypovolemic shock typically happens when blood leaves the body (like in Episode 2’s blood fountain), but it’s possible to bleed out while all of your blood is still in your body. If someone’s cause of death is internal bleeding, that’s a type of hypovolemic shock.
- Keep in mind: anatomical reporting is their left and right, not ours.
- Manner of death is a bit quirky. From what we know, the victim was bitten by the snake and tried to tourniquet the bite (using cut-up linen). Somehow, they were stabbed without losing much blood. We have unanswered questions, but what does the evidence suggest so far?
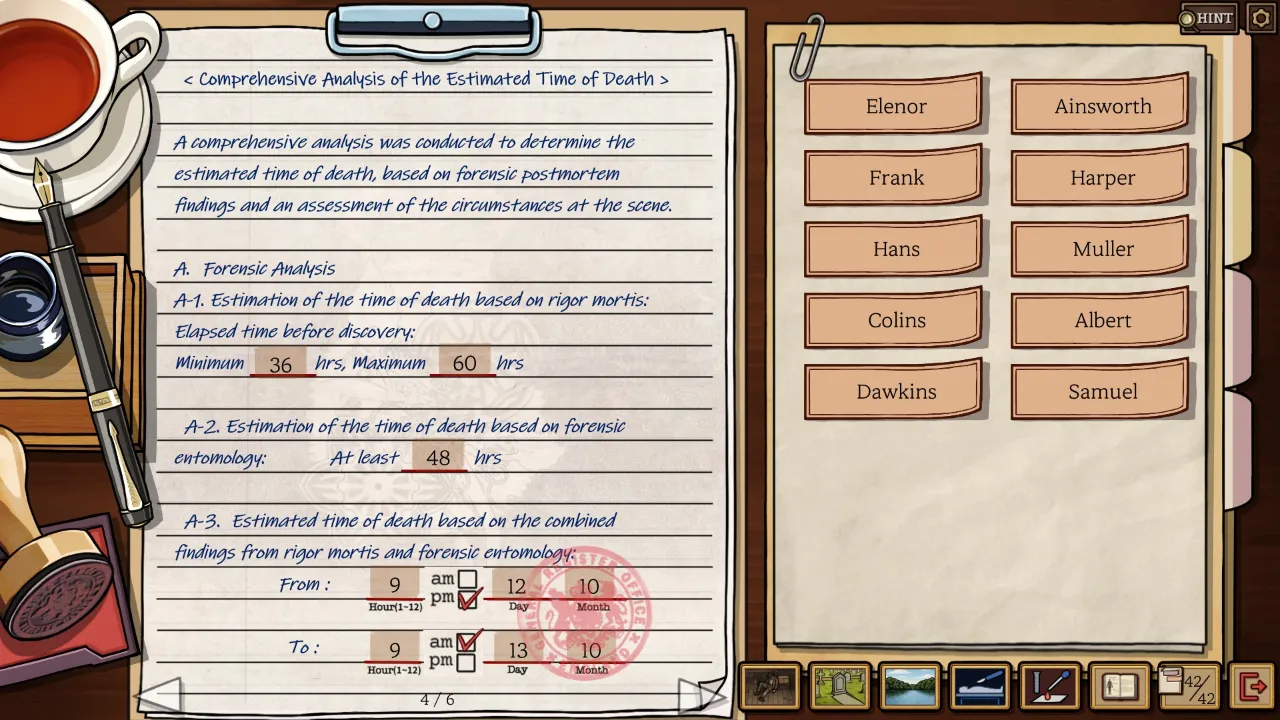
- The best estimate for time of death is the narrowest window. For example, learning that he died in the last 24 hours isn’t very helpful. Listen to what the pathologist says: sometimes he talks about hours ago (from that minute) and how many hours before the discovery.
- Snake bite toxins can affect in multiple ways, and we select all that apply. It’s tough to gauge neurotoxin, but the other two would have visible signs.
- There’s one document with a time and date: the bag of hair at the pathologist’s. The hair was collected when we arrived, and the inspector was there within an hour after the report.
After the initial death certificate is submitted, two more bodies are discovered, adding new scenes and words.
Words Redux
Scene 3, Cemetery
Pay attention to the footprints.
- Footprints on Left: Footprints
- Tombstone: Elenor, Ainsworth
- Right Worker, Work Schedule: Frank, Harper, Hans, Muller, Albert, Colins, Samuel, Dawkins
Scene 4, Lake
Notice blood on the sack and the bloodstain on the oar.
- Sack Pulled Out of Lake: Shovel, Hammer, Nails, Rake, Crowbar, Pliers
- Sandbag: Sandbag
- Boat: Oar, Rope
Scene 5, Medical Book Redux
- A few more words have been added in new pages: Drowning, TBI, SCI
Form 3, Blood Testing Redux
We got a blood sample from each new victim at the pathologist and one more from the oar and sack.
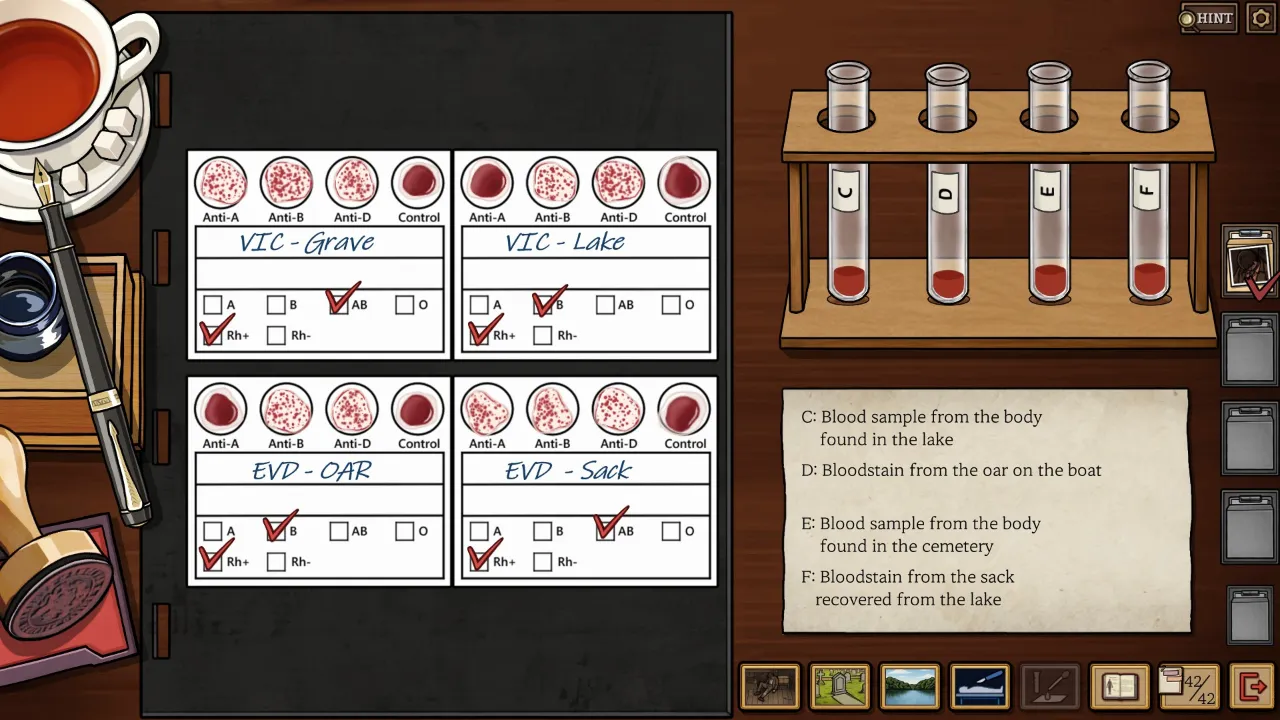
Afterwards, take a fingerprint from all three victims. With the tattoos, fingerprints, and blood types noted, the Inspector will ask what records we need. There’s an achievement for picking all five wrong answers before you find the right one.
Inspector Question: What records are useful?
Correct Answer: Criminal Organization (they all have the same tattoo, and the note in the grave suggests it’s a robbery gone wrong).
Contrarian Answer: What’s not useful is Missing People (too vague), Naval Records (they aren’t sailors), Forensic Entomology, Blood Type (again, too broad), and International Fugitive Fingerprints (they aren’t international fugitives).
Form 4 – Victim Identification
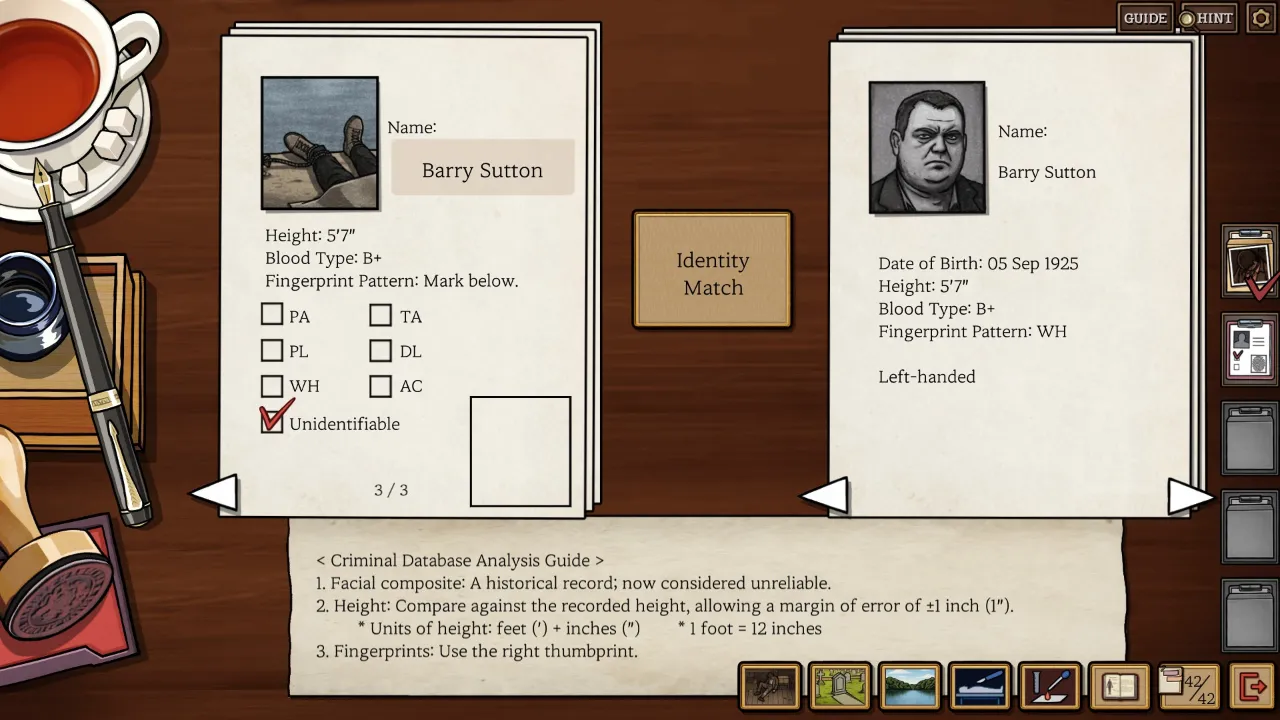
- We have the following details: height (with a margin of an inch either way), blood type, fingerprint pattern, and a rough face sketch. Each identification has additional data, like a criminal record or other identifiable marks.
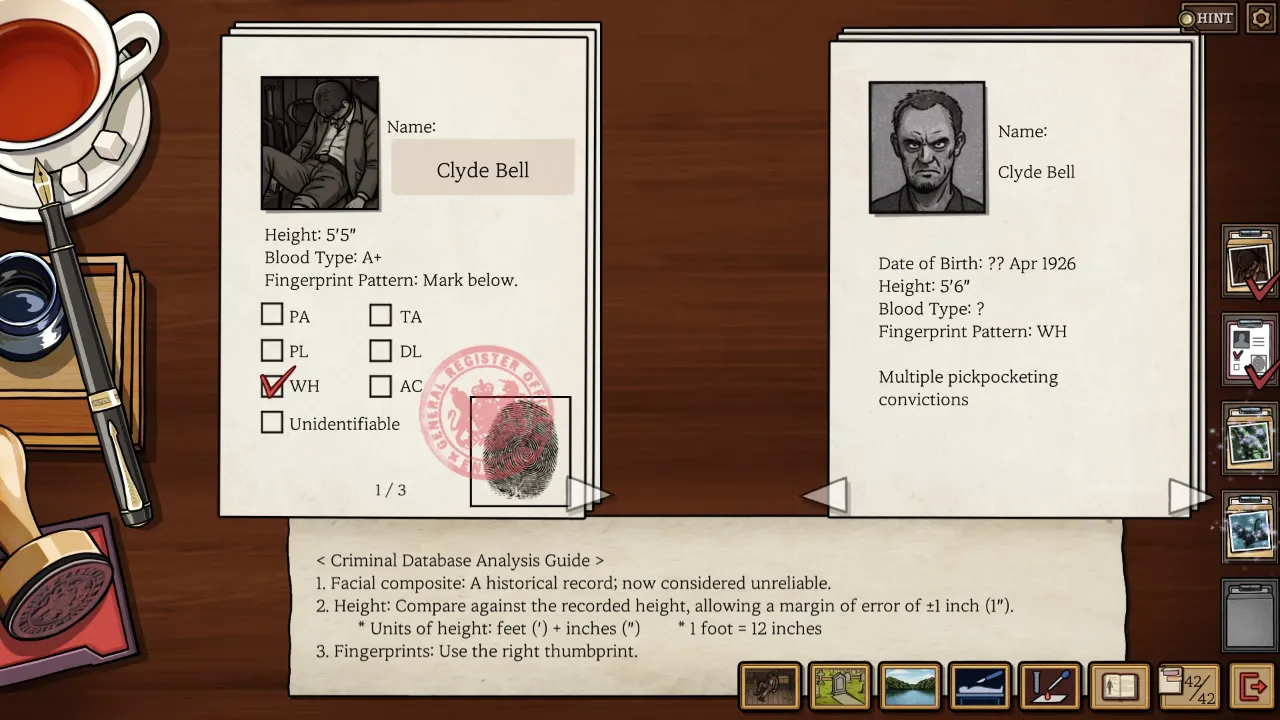
- We need to use all the information to get anywhere. For instance, the shed victim is 5’5″. Five possible identities fall within an inch of that.
- The first and third bodies will tie on categories alone. You’ll need to use extra information to rule people out.
- If you read the Cemetery body note, you might spot a Colin in the profiles… but he’s the wrong height for all three victims, so ignore him.
- The real challenge lies with the lake body, as we couldn’t get a clean print. His identifying traits are limited to…
- …that he wears his watch on his right wrist and is notably heavyset. Other than that, there are no distinct marks.
For each body, I’ll provide a quick explanation in the spoiler zone because this is a subtle puzzle.
Shed Body Answer: Clyde Bell (height, blood type, and fingerprint match. It’s a tie with Marek on those, so we need to rely on the sketch).
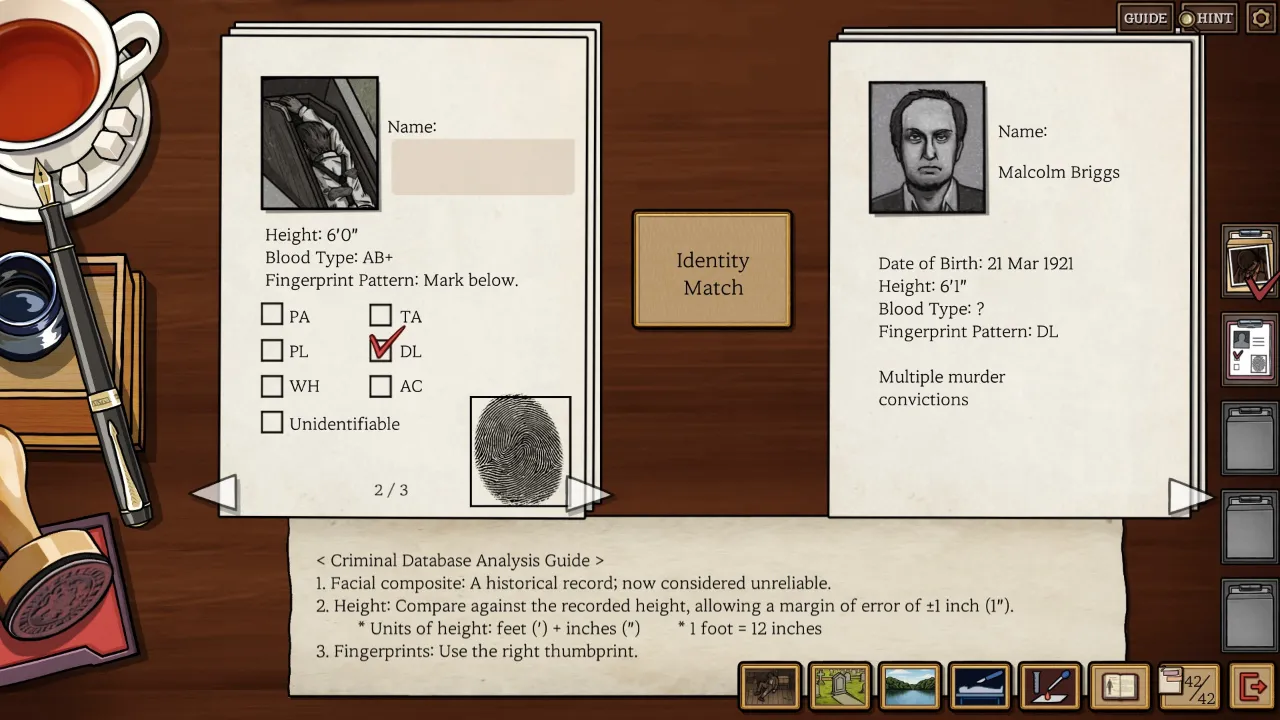
Cemetery Body Answer: Malcolm Briggs (Can be identified on height alone, as he’s the only one within an inch of 6’0″, but the fingerprint seals it. Also, the note on his body refers to him as Mal).
Lake Body Answer: Barry Sutton (Blood type and height make him either Thomas or Barry. The pathologist didn’t see any notable marks… which rules out Thomas, as he has an anchor tattoo. Plus, the broken watch on the right wrist suggests the victim is left-handed like Barry).
E
Forms 5 and 6 – General
- The reports summarize the state of the bodies, how they were found, and an approximate time of death. We’re not investigating the killer yet.
- Most needed info is clearly stated by Avery in his notes.
- Military time is very useful for calculating times.
- The victims’ birth years are in their criminal profiles.
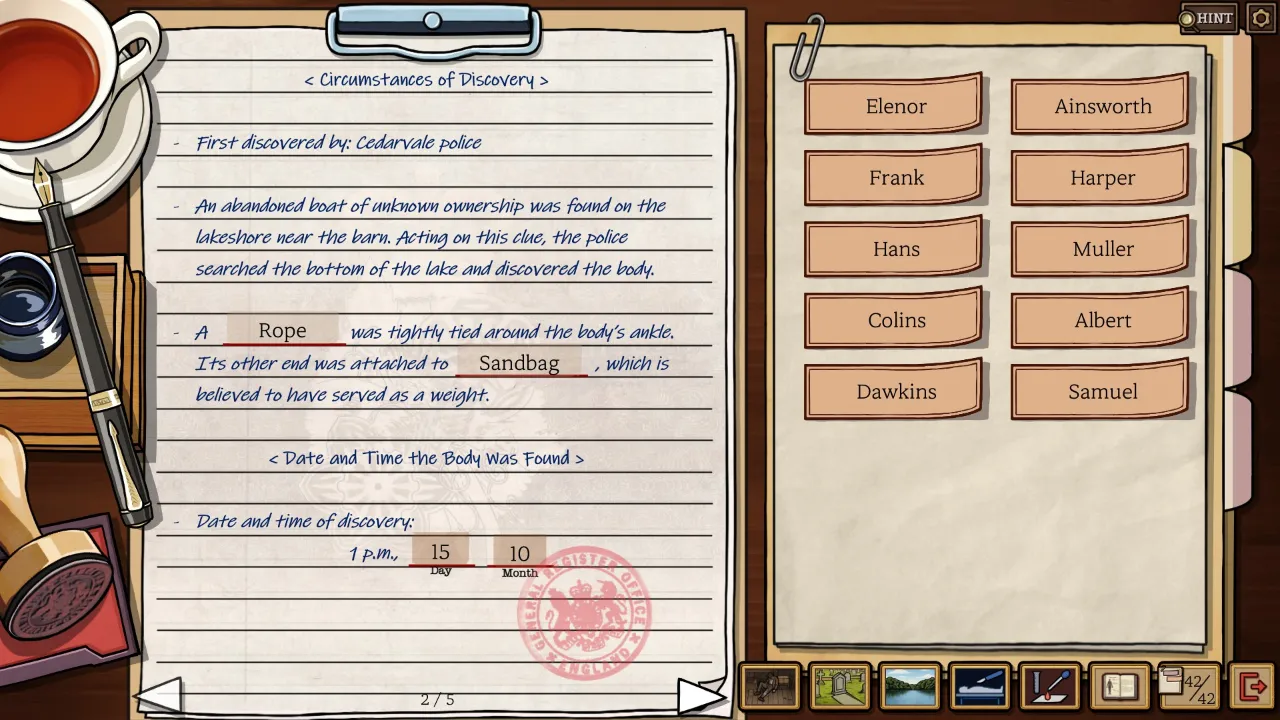
- Both bodies were found on the same day, as the inspector and officer approached us at the same time.
- Before going anywhere, we should solidify the connection between these three victims and their ties. This will matter more later, but for now, getting a feel for what the victims did or were involved in is useful.
- The moment you spot a body in Elenor Ainsworth’s grave, you know what happened. Her will specified she was to be buried with a valuable necklace.
- The cemetery victim’s plan and map are quite clear: dig up the necklace, cross the lake in a boat, go past the barn, and leave at the train station. The bodies line up along this path.
- The cemetery victim has two witnesses who found him, so there’s more info there.
- Part of the challenge is estimating the time of death. This is partly achieved through various pathology tests, but remember we estimated the time of death for the shed victim and these two seem to have died before that.
- We have footprints for all but the cemetery victim.
Form 5 – Cemetery Victim
- Born in 1921.
- Note that the time of discovery is on page 2. You’ll need to deduce the date.
- One question concerns which cemetery map square he was found in. It might help to sketch it out yourself, as we did in Episode 4, but this is easier. There are more landmarks and a more predictable pattern.
- The left worker found the body, and the right one reported it.
- His blood is on the sack. This doesn’t significantly narrow down the weapon choices, as the sack stores four separate weapons.
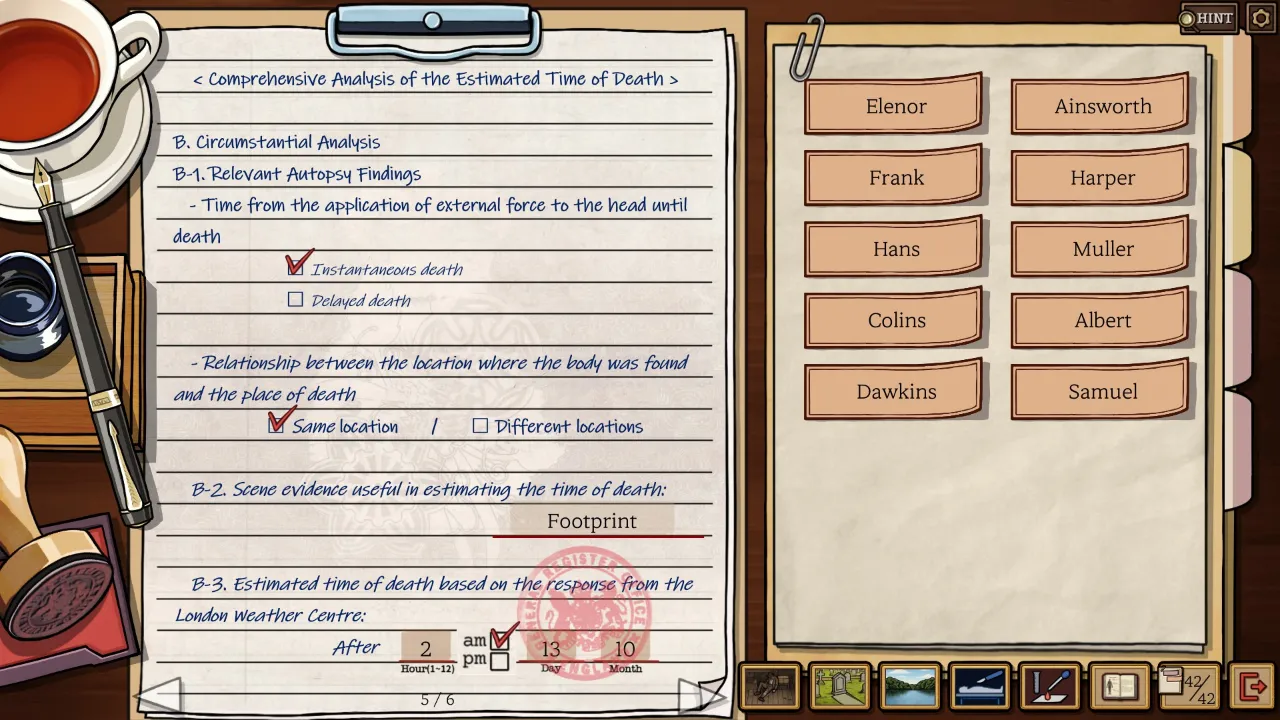
- Just before we identified the bodies, we received the meteorology report. Avery noted that the weather had to be quite specific for the footprints at the cemetery to be as solid as they are.
- The pathologist describes the wound as narrow and deep. The laceration measures four inches long. We actually get a decent view of it from the crime scene.
- Count the graves. How many graves is Elenor’s from the west path and the north path?
- The murder weapon has a long, thin flat edge and is something the killer could have had on hand while digging up the grave.
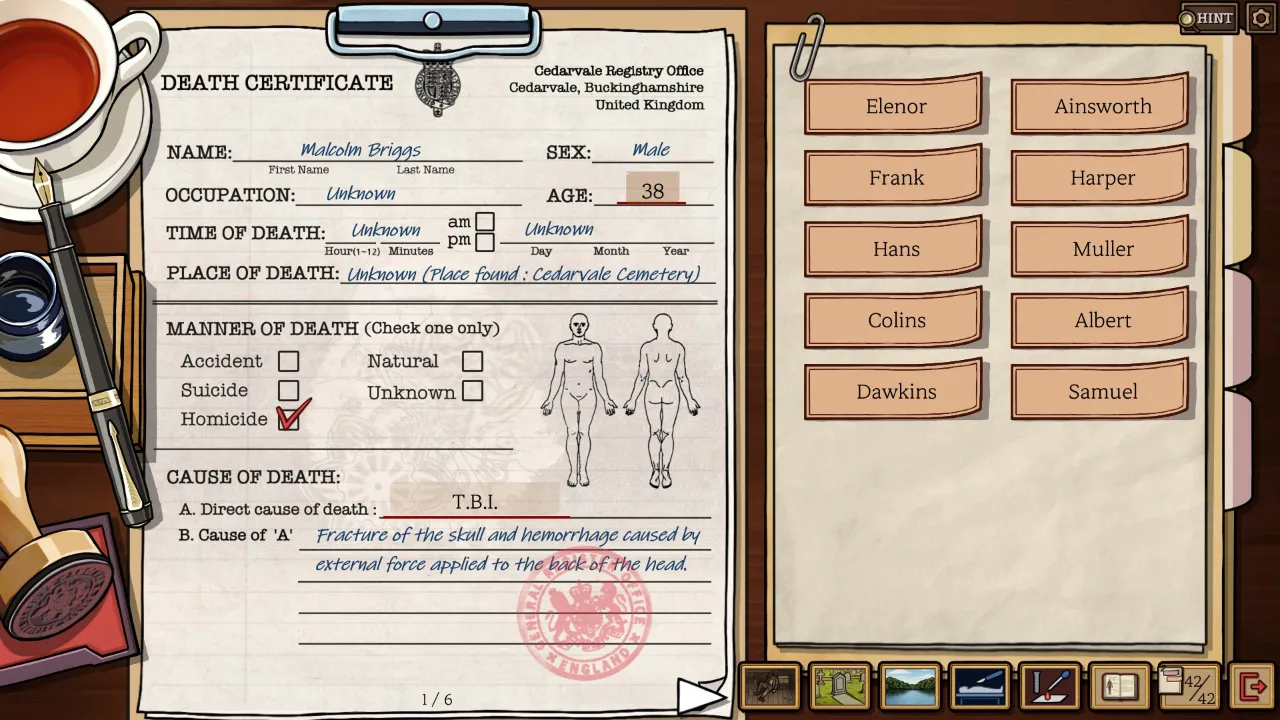
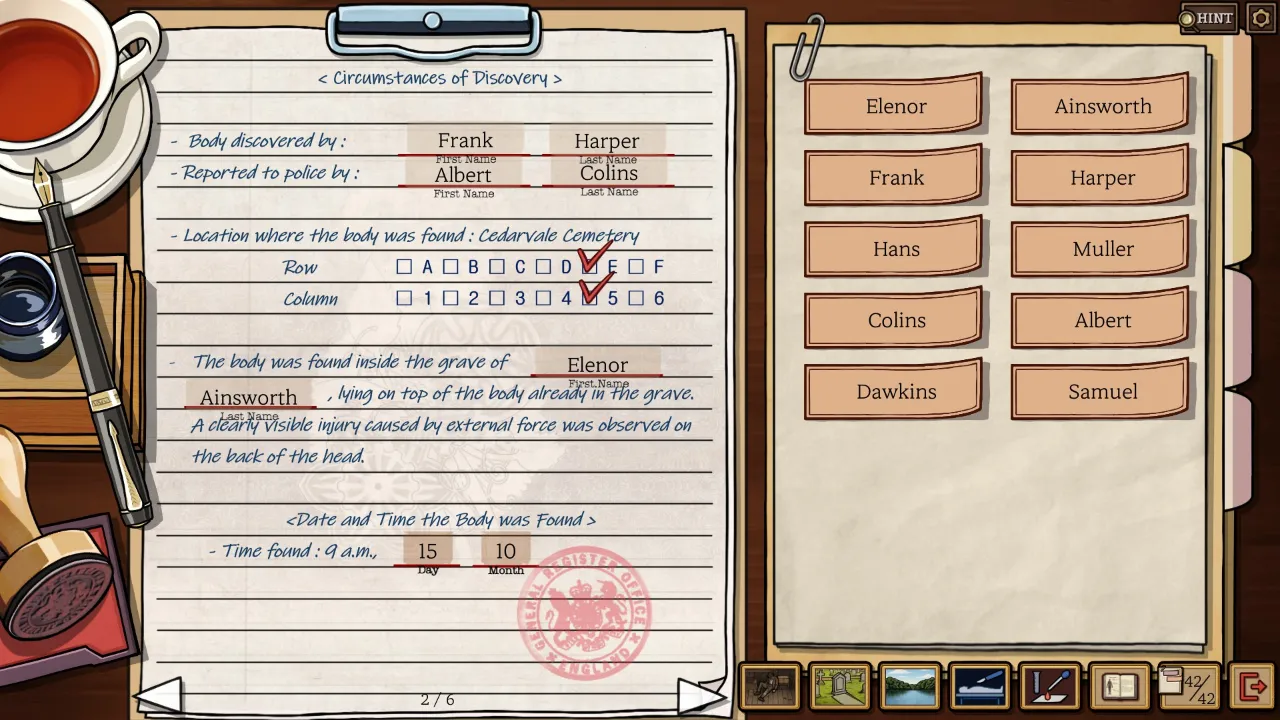
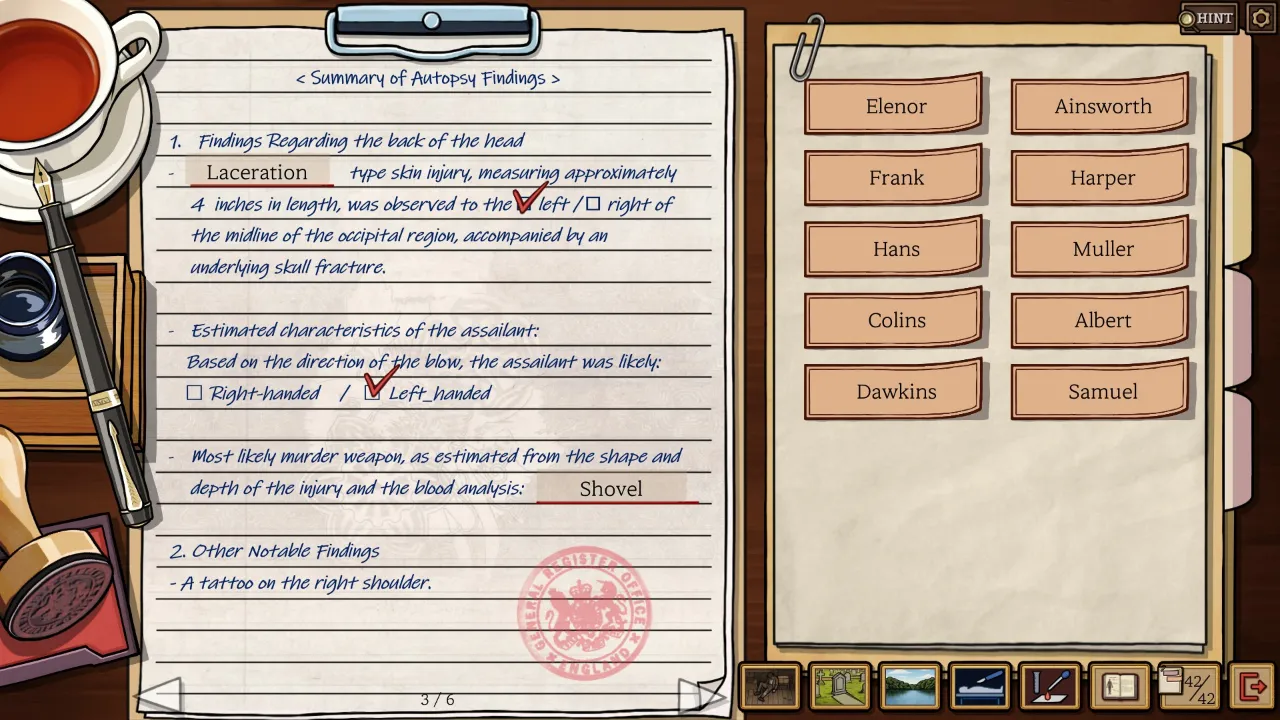
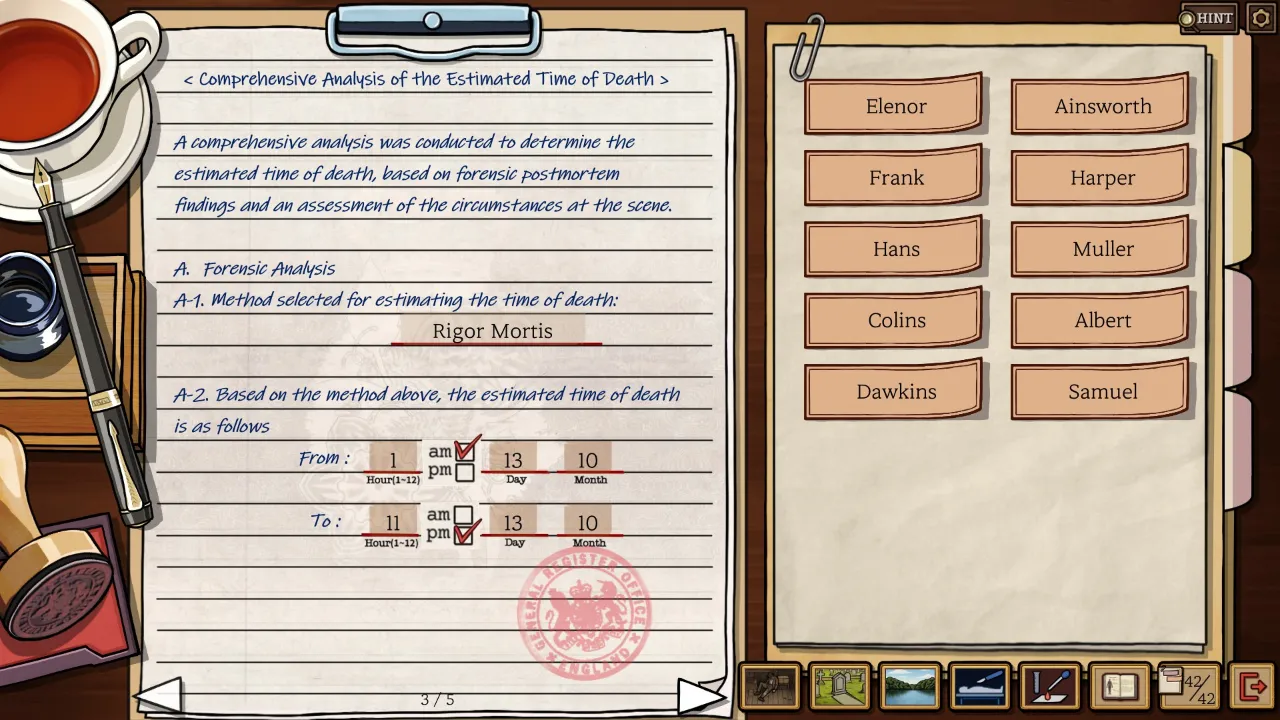
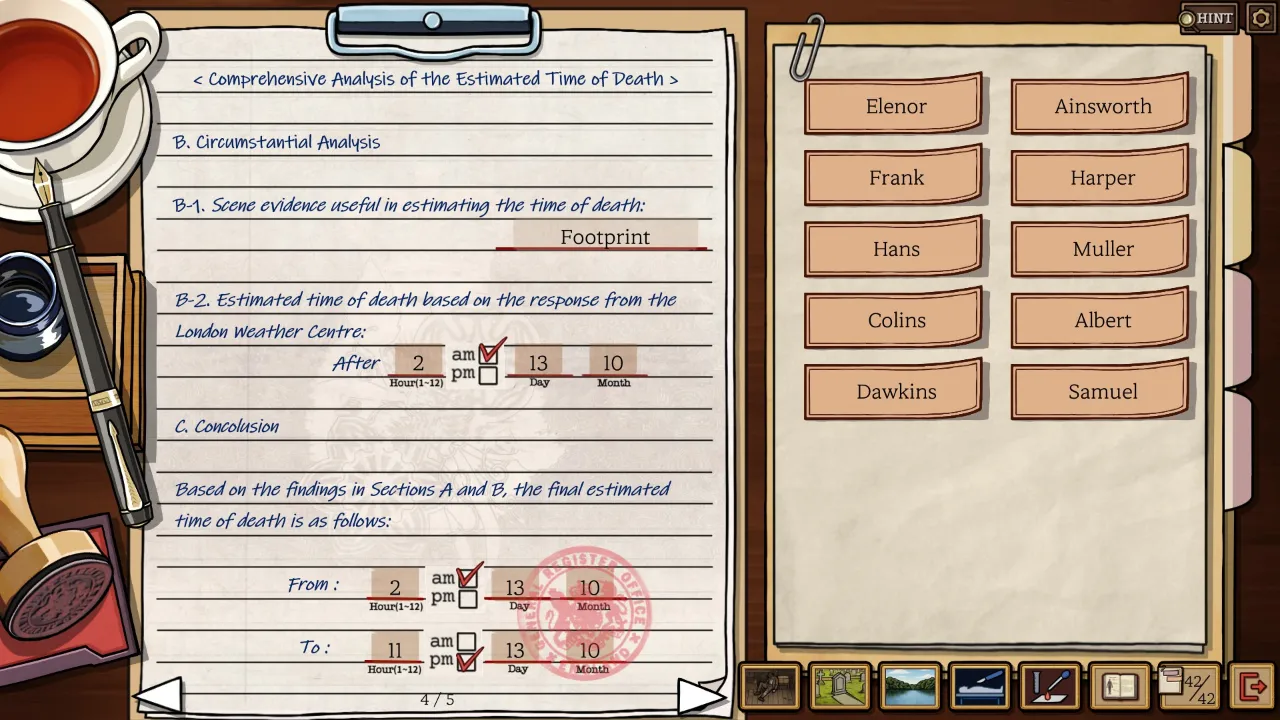
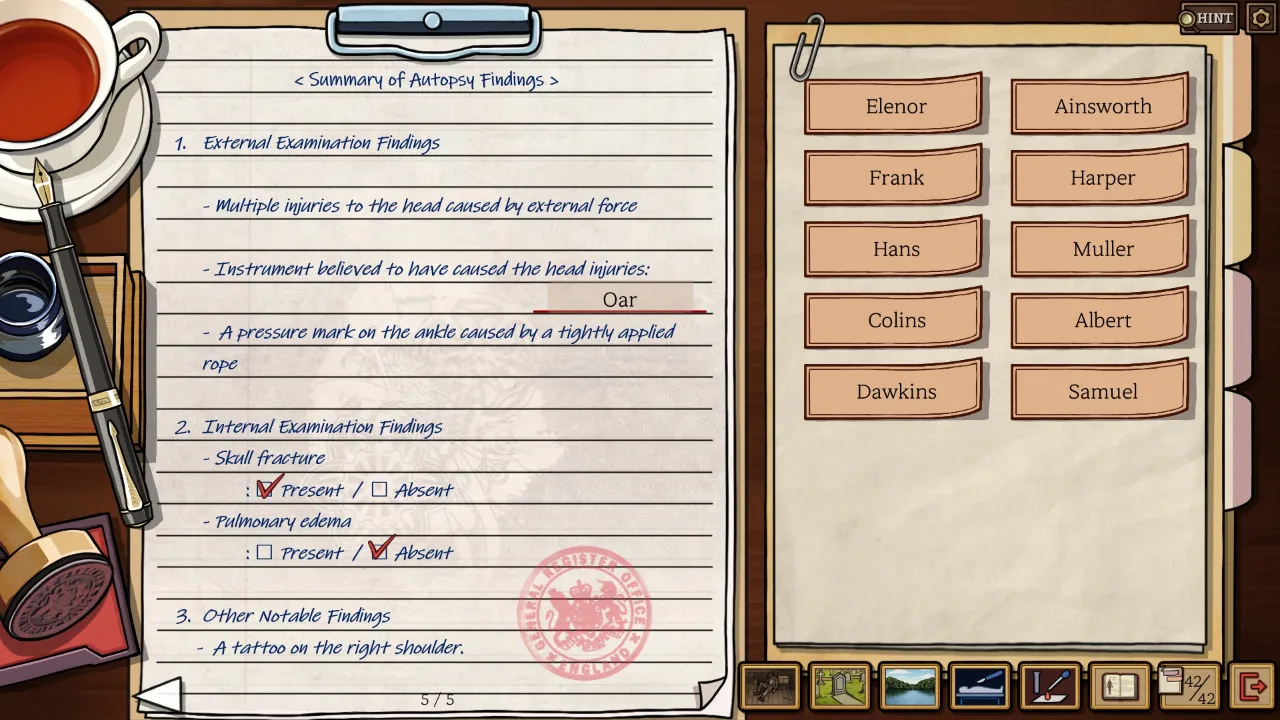
Form 6 – Lake Victim
Born in 1925
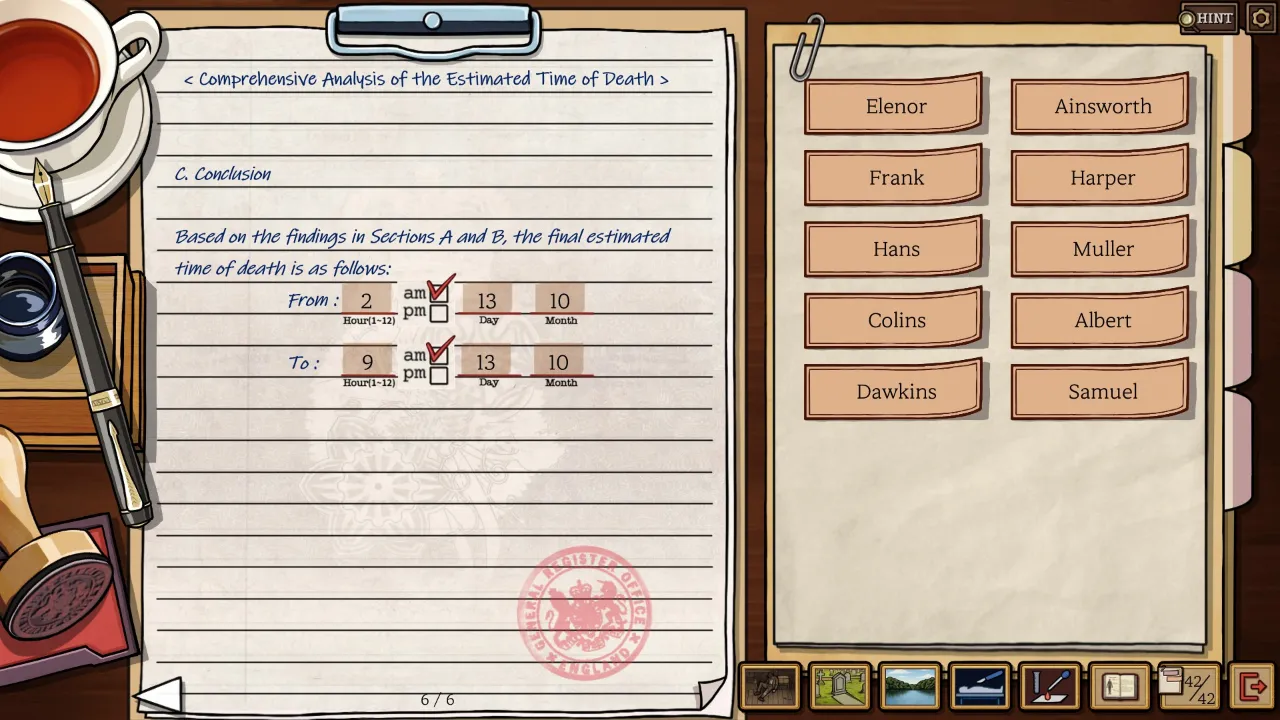
The big question here is whether the victim was knocked out and drowned in the lake, or if they were killed and then placed in the lake. The medical book lays out the characteristics of each possibility.
The report is looking for something related to the weather that helps date the scene. We’ve got a blood type match with the oar.
The best way to estimate the time of death, considering the body’s condition, is to establish an upper and lower limit. The visible sign of pulmonary edema isn’t just the size or shape of the lungs; it’s a cloudiness that suggests fluid.
The victim’s boots are pretty dirty for someone who was underwater. When did they step into that clay-like soil?

Form 7 – Order of Events
You’ve got a good handle on the sequence of events since we needed to sort it out to understand the deaths.
Dig up the necklace, cross the lake by boat, go past the barn, leave from the train station, and then fence it in another city. The bodies all fall along this route.
There’s no honor among thieves. The note about the cemetery victim mentions that he gets half after Colin backed out, leaving the other two to split the remaining half. Each time someone backs out of the plan (or becomes unavailable to cash out), it just means more money for the ones left standing.
If only one person knew the fence, the others would have to keep him alive to see any profit.
Achievements [WIP]
If you miss an achievement because of certain choices in a case, don’t worry— you can reset at any time from the episode select.
Good First Impression: In Episode 2, after submitting Forms 3 and 4, the inspector will throw three yes or no questions your way. Get them all right (Yes, Yes, No). The fourth question doesn’t matter for this achievement.
Contrarian: After finishing the second blood test in Episode 6, the Inspector will provide six databases to check out, five of which are useless. You need to choose all five incorrect options (Missing People, Naval, Blood Type, Entomology, and Fugitive Fingerprints) BEFORE picking the right one (Criminal Organizations).
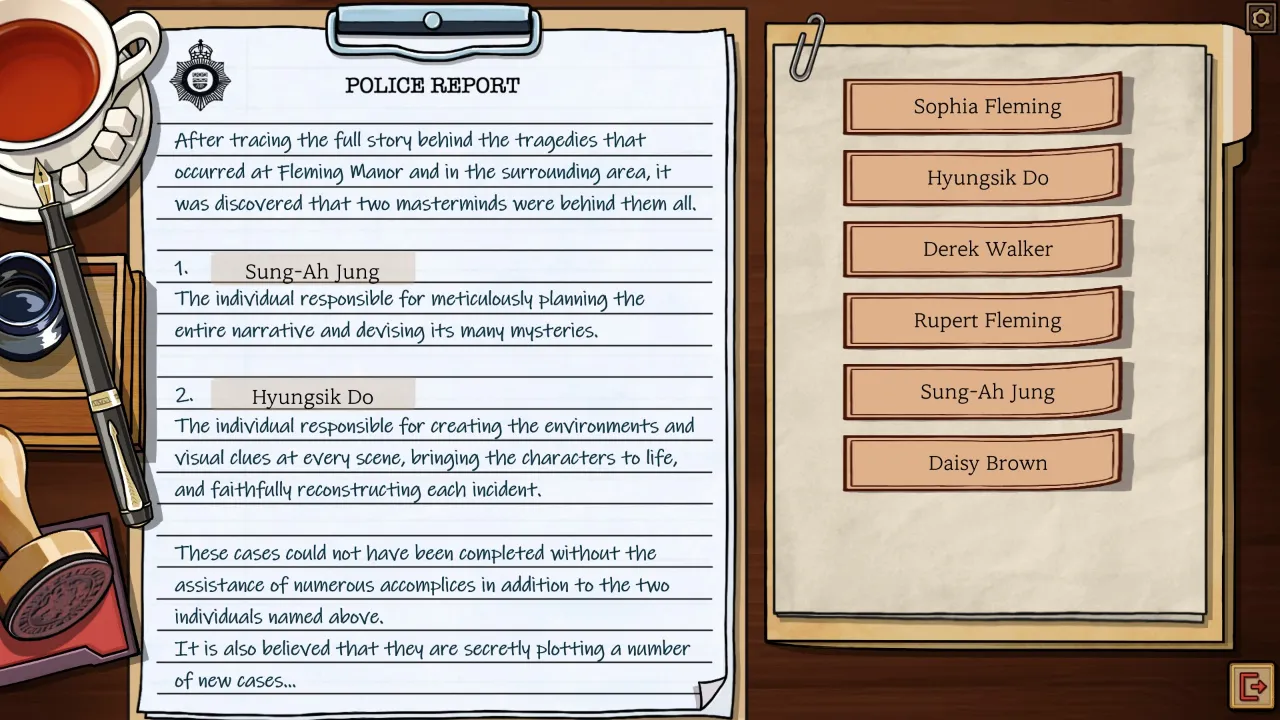
Credit Where Credit’s Due: At the end of the credits, which you’ll find in the lower left of the main menu, there’s a secret quiz. It asks who the mastermind behind the cases was and who was responsible for the visuals, using a word bank of six names. The joke is that they’re actually looking for the developers’ names: director Sung-Ah Jung and art director Hyungsik Do.
Final Answer:
Happy sleuthing! Remember to communicate effectively with the pathologist for clues that can steer you in the right direction.
Based on the original Steam guide by bearsbearsbears
