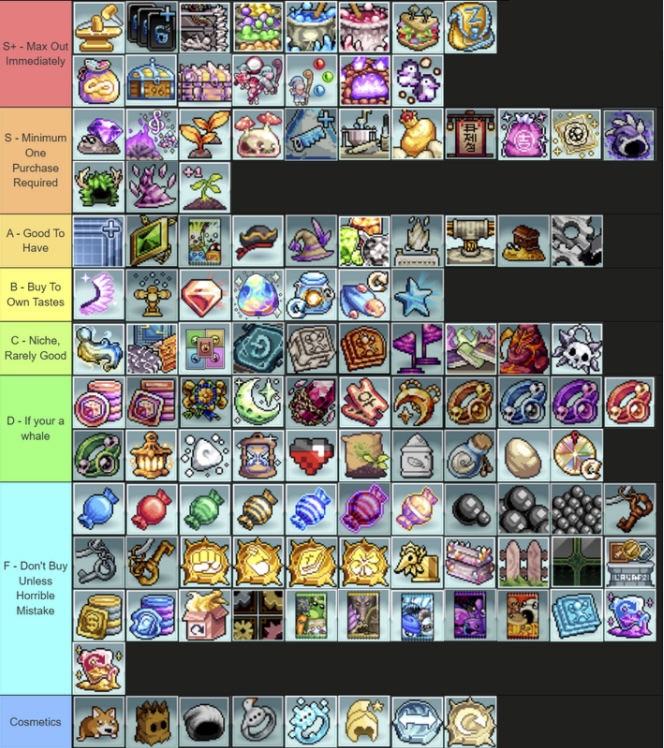
If you’ve ever opened Idleon’s gem shop and wondered where to spend your hard-earned premium currency, this Idleon Gem Shop Tier List breaks down the smartest long-term purchases. Instead of wasting gems on flashy but useless trinkets, this list focuses on what genuinely pushes your account forward — from early-game upgrades to late-world progression tools.

S+ Tier – Max These Out Immediately
These are the most game-changing upgrades you can buy. They provide permanent account-wide bonuses or major quality-of-life improvements that you’ll benefit from every single play session.
Top Priorities:
Infinity Hammer (W1–W2) – Unlocks bonus anvil production speed and crafting versatility early on.
Extra Card Slots – Card power skyrockets once you unlock more slots; essential for every build.
Crystal 3D Printer (W3) – Core to progression, especially for mid-to-late game material farming.
Brimstone Forge Slot – Allows more smelting automation and material efficiency.
More Food Slots – Keeps your buffs active without constant micromanagement.
Tower Building Slots (W3) – Needed for boosting World 3 tower efficiency.
Ritchelin Kitchen (W4) – Expands cooking potential; scales with kitchen count.
Royal Egg Club (W4) – Critical for pet progression and egg incubation boosts.
Souped-Up Tube (W4) – A huge quality-of-life boost for alchemy.
Chest Sluggo (W5) – Automatically loots chests; an incredible time saver.
Divinity Sparkie (W5) – Massive help in pushing Divinity progression.
More Sample Space (W3) – Helps manage samples and boosts overall gains.
Daily Teleport – Optional, but early on it can drastically speed up farming and traveling.
Note: Storage and carry upgrades are worth buying whenever you feel cramped. Whether it’s chest space, inventory capacity, or backpack size — these always pay off long-term.
S Tier – Buy at Least One Copy
These items are powerful upgrades that improve efficiency but don’t always need to be maxed.
Spirit Tree Expansions, Growth Boosters, and Mushrooms Upgrades – Each gives measurable power but scales better once you reach later worlds.
Miscellaneous Utility Items (like crafting expansions and lab unlocks) – Pick them up as your account grows.
A Tier
Not essential, but very useful additions that make gameplay smoother or fill in progression gaps.
- Extra Stamp Pages and Shopping Cart Expansion – Handy once you start juggling multiple currencies.
- Pet and Breeding Perks – A strong bonus for casual or AFK players.
- Automation and Production Buffs – Not mandatory, but they make your life easier once you can afford them.
B Tier
These are luxury or preference-based buys. Their usefulness depends on how you play or which worlds you focus on.
- Dungeon and Party Boosters – Fun for active dungeon runners, but unnecessary for casual play.
- Gems-to-Materials or Resource Exchange – Can help fill temporary gaps, but inefficient long term.
C Tier
These items have specific use cases or are only worthwhile for completionists.
- Special Obols and Gear Cosmetics – Small bonuses or fun items that don’t change much.
- Extra Alchemy Bottles and Cauldrons – You can safely skip until much later.
D Tier
Useful only if you’re willing to spend a lot of gems or real money.
- Candy Packs, Luck Tokens, and Hourglass Boosts – Temporary boosts that don’t justify their cost.
- Gacha-based Upgrades – Skip unless you’re flush with currency.
F Tier
A hard pass unless you like wasting gems.
- Obol Space, Pet Storage, Arcade Balls – Minimal gain for high cost.
- Card Packs (except World 7) – Only buy discounted or limited versions.
- Reset Tokens (Talent/Star) – Usually redundant thanks to in-game reset mechanics.
- Cosmetics & Decorative Items – Purely visual; avoid unless you love collecting.
Limited Specials – Rotation-Only Gems
Certain high-value upgrades appear periodically in the Limited Specials tab. These are worth saving for if you’re planning long-term investments.
Recommended Limited Items:
- Balling Name Tag – Minor but helpful bonuses for World 7.
- Mega Feather Name Tag – Same as above, best for W7 bonuses.
- Golden Watch (Freebie) – Grab immediately when available.
- Stamina Battery (Freebie) – Always a great pick.
Other Rotational Highlights:
- Exalted Stamps (Base 535, Total 3745) – Expensive but excellent in the long run.
- Elite Class Swap (900) – Grab when you need a class reset.
- 5-Star Cardifier (485) – Great for unlocking tough boss cards.
- Emerald Bling Pendant (1150) – Boosts coin farming efficiency.
- Dragonic Liquid Cauldron (969) – A solid late-game investment.
World-by-World Gem Priorities
World 1–2:
Focus on Infinity Hammer, Forge Slot, and basic inventory/storage upgrades.
World 3:
Crystal Printer, Tower Slots, and Sample Space take priority.
World 4:
Souped-Up Tube, Kitchen Upgrades, and Egg Club are must-haves.
World 5:
Grab Chest Sluggo, Divinity Sparkie, and Lava Sprouts early.
World 6:
Buy Pristine Charms daily, plus King of All Winners and Novelty Jade Coins.
World 7:
Invest in Gallery Showcase, Coral Upgrades, and Bling Blang for faster amber gain.
Low-Value Purchases & Traps
Avoid anything labeled as “temporary” or “limited use” unless it’s free. This includes time-based boosts, random loot boxes, and most candies. Even though some look tempting, they rarely provide enough return to justify the gem cost.
The best gem purchases are the ones that permanently boost your account — extra production slots, storage space, and automation features. Prioritize upgrades that apply to all characters rather than single-use boosts. Save your gems for Limited Specials if you’re in late-game worlds, and remember: quality-of-life upgrades almost always outvalue temporary bonuses.