Hi guys, Today we will give you the Blue Lock PWC Beginner Guide and Equipment Tips and Tricks on how to reroll and acquire Equipment in the game.
Equipment is a new feature added to Blue Lock PWC to help players get higher scores in training. This Comprehensive Guide will give you a rundown of the mechanics while also providing a review and some guidance for individual usage.
This Blue Lock PWC Equipment Guide will include general ratings for both veteran and new players. There can be variables like money spent on the account and luck from the game itself.
So come and take a look at this Blue Lock PWC Beginner Guide – Equipements Tips.
Blue Lock PWC Beginner Guide – Equipements Tips
What’s an Equipment and How it Works?
The Equipment feature is unlocked after obtaining Team Rank S+. Currently, Equipment is only obtainable via Banners or specific events (only happened once as of writing this guide.)
After obtaining Gear, you can view it under section “007” with the Barou on the button image.

Blue Lock PWC Equipment

There are three different rarities of Gear *(R, SR, and SSR)*.
Currently, we have ten different types of Gear, each tailoring towards different stats (Fully detailed boosts in Part IV)
Functionality
When training a character, after choosing your support characters/cards, you enter a new interface, where you can choose your Equipment.
The amount of Gear you can use depends on the level of the character you are training:
From Level 1 to Level 64* -> 1 Equipment
From Level 65 to Level 99* -> 2 Equipment
Level 100* -> 3 Equipment
Example of a Level 100 Character Training Gear interface
Main and Sub-stats
The “supportive abilities” or skills of equipments are divided into Main (marked blue) and Sub-stats (marked red).
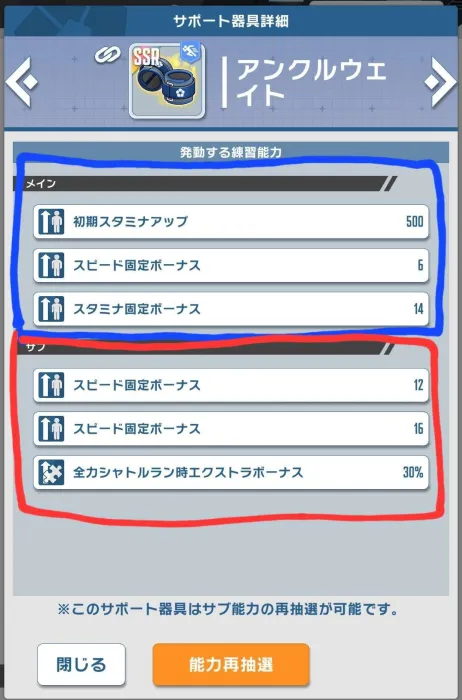
Main Stats
Main Stats are the same between each Equipment type (to see the main stats of each equipment type, check Part IV).
The amount of stats gained depends on the rarity of the Equipment:
SSR
SSR Equipment gives a total of 500 initial stat boost and 20 fixed stats. Fixed stats get added to every practice, regardless of training, and can be increased with a bonus multiplier (100%, 200%, 400%, etc.)
Some Equipment provide 500 initial boost for one attribute, others provide a 350 + 150 initial boost for two attributes.
The 20 fixed stats can also come with either 20 to one attribute or 6 + 14 to two attributes.
It all depends on the Equipment type.
2 – SR
SR Equipment gives a total of 200 (or 140 + 60) inital stat boost and no fixed stats.
3 – R
R Equipment gives a total of 100 (or 70 + 30) iniital stat boost and no fixed stats.
Sub Stats
Sub Stats can be seen below the Main Stats.
Sub Stats vary between each piece you acquire, with different sets of values and skills.
> Unlike with Main Stats, you can reroll these sets values and skills into new ones.
*Please note that, after rerolling, you can’t go back to the old sub stats.
R Equipment have one sub stat.
SR Equipment have two.
SSR Equipment have three
Tips and Tricks on how to reroll and acquire Equipment.
To reroll, you need either a reroll ticket for that specific equipment and rarity or a “ALL” reroll ticket, which can be used to reroll any Equipment.
> To get reroll tickets, you can
– Complete missions and event;
– Trade at the Exchange Shop (3 R for 1 SR and 10 SR for 1 SSR);
– Buy with real world money;
– Sell.
> You can “lock” your favorite Equipment so that you won’t accidentaly reroll or sell them.
When to reroll
SSR Reroll tickets are very rare and quite expensive to get, so it is recommended to first get some SR Equipment with good sub-stats for **each** training type. This will allow you to train optimally until you can get good SSR Equipment.
After getting SR Equipment with good value, you can start saving your SR Reroll Tickets to trade for SSR tickets.
Summoning Tips
Banners are the most reliable way of getting Equipment.
Standard Banner
This banner has a 3.5% chance of getting an SSR Equipment, and it’s not limited. You **should not spend on this banner unless it’s the only one available.**
Mixed Step-Up
Step-up banners have a 5 Step Summoning mechanic, which each “Step” increasing the chances of higher rarity, with the last “Step” giving a guaranteed max rarity.
Mixed Step-up banners have an extra 12th slot which gives a single Equipment. It’s overall a good banner, and it’s recommended to only summon if you can go all 5 Steps. (12.000 gems
Hattrick Banner
This banner divides itself into 3 parts, being able to give Characters, Supports Cards and Equipment is just one summoning session. **The rates are higher, but it’s not guaranteed to get SR or higher.**
Gear Step-Up
This step-up banner is the best banner if your goal is to only get Equipment. All 11th slots will be just Equipment, so it’s a good chance to get something.
Even better, is the fact that all Equipment will be SR or above.
This step-up also only has 3 Steps, so you’ll only need to spend 9.000 gems to get the guaranteed SSR.
That’s the Blue Lock PWC Beginner Guide. You can check the Blue Lock PWC Tier List for character Ranking.